
There’s nothing more frustrating than prepping for a weekend cookout only to discover your Traeger auger isn’t working when you power up the grill. That critical component responsible for feeding pellets to your fire pot has stopped moving, leaving your smoker cold and your meal plans in jeopardy. Whether you’re using a Pro Series, Ironwood, or Timberline model, auger failure is one of the most common Traeger problems—but the good news is most issues can be fixed in under an hour with basic tools. This guide delivers the exact diagnostic steps and solutions you need to get your pellet grill feeding properly again.
When your Traeger auger not working situation strikes, don’t immediately assume you need professional help or expensive parts. Nearly 80% of auger problems stem from simple jams or electrical connection issues you can resolve yourself. By following these targeted troubleshooting methods, you’ll systematically eliminate potential causes and pinpoint exactly why your auger has stopped turning. Let’s get your Traeger back to reliably feeding pellets so you can return to perfecting those smoked briskets and ribs.
How to Quickly Diagnose Your Traeger Auger Failure

Before grabbing tools or ordering parts, perform these critical diagnostic checks to identify where your auger system has broken down. Understanding whether you’re dealing with a mechanical jam, electrical failure, or control issue saves hours of unnecessary work.
Start with the power and pellet basics. Unplug your Traeger and verify your outlet works by testing another device. Check that your hopper contains quality pellets—low-grade or moisture-damaged pellets often cause jams. Never skip this step: nearly one-third of “auger not working” calls to Traeger support turn out to be empty hoppers or tripped GFCI outlets.
Perform the manual rotation test immediately. With power disconnected and the grill cooled, reach through the hopper opening and attempt to turn the auger shaft by hand. It should rotate smoothly with moderate resistance. If it won’t budge, you have a severe pellet jam. If it turns freely but makes grinding noises, check for sheared pins or damaged gears. If it spins too easily, the motor coupling may have failed.
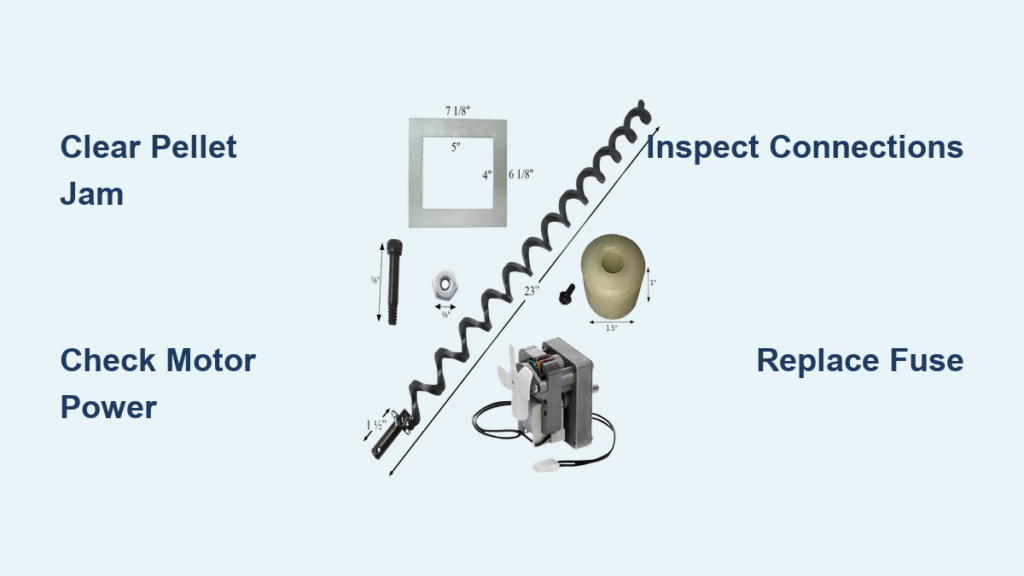
Traeger Auger Jam: Fast Clearance Techniques
Pellet jams represent the most common reason your Traeger auger isn’t working properly. Moisture-swollen pellets, excessive “fines” (dust), or foreign objects can create rock-hard blockages that stop pellet flow completely.
- Identify jam severity by listening during startup: A humming motor that doesn’t turn indicates a jam, while complete silence suggests electrical issues
- Clear minor jams without disassembly: Use a flexible cleaning rod or straightened coat hanger to gently break up obstructions through the hopper opening
- Handle severe jams methodically: For stubborn blockages, remove the hopper and disconnect the auger motor assembly to access the entire feed tube
Pro Tip: Always unplug your Traeger before attempting jam clearance. Never force objects into the auger tube—this can bend the flighting and create more expensive damage. If using a drill with a flexible bit, set it to reverse and apply minimal pressure.
Testing Your Traeger Auger Motor in 3 Steps
When your auger remains motionless despite power, the motor itself may have failed. Traeger auger motors commonly burn out from prolonged jams or moisture exposure, especially in Pro Series and Ironwood models.
- Check for power delivery: Set your multimeter to DC voltage and test the motor connector while the grill calls for heat. You should see 12-24V depending on your model. No voltage means the problem lies upstream.
- Test motor continuity: Disconnect power and check resistance across motor terminals. Most Traeger motors read 5-20 ohms. Infinite resistance confirms a burned-out motor.
- Bench test the motor: Apply 12V directly from a car battery to verify operation. If it spins freely, your control board or wiring has failed.
Warning: If you detect a burning smell or visible scorch marks on the motor housing, replace it immediately—continued use risks electrical fire.
Electrical Connection Checks That Fix Most Auger Failures
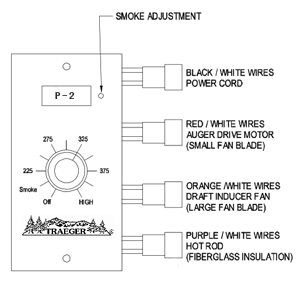
Loose or corroded connections cause more auger failures than actual component breakdowns. Traeger’s vibration during operation gradually works connectors loose, interrupting the critical signal to feed pellets.
- Inspect the auger motor connector for corrosion or bent pins
- Check the control board connections, especially the 4-pin auger harness
- Verify the RTD (temperature probe) connection—faulty readings prevent auger activation
- Examine wire routing for pinched or frayed sections near moving parts
Time-Saving Shortcut: Gently wiggle all electrical connections while the grill operates. Intermittent auger movement during this test confirms a bad connection needing replacement.
Locating and Replacing Your Traeger’s Blown Fuse
Most Traeger control boards contain a small 2-3 amp glass fuse that protects the auger circuit. This fuse blows when the motor draws excessive current during jams, cutting power to prevent motor burnout.
- Find the fuse: On most models, it’s visible on the control board near the power input—look for a clear cylinder with metal ends
- Test the fuse: Use your multimeter in continuity mode. A good fuse shows near-zero resistance
- Replace correctly: Install an identical amperage fuse—never substitute with a higher rating
Critical Note: A blown fuse indicates an underlying problem. Simply replacing it without addressing the cause (like a jammed auger) will result in immediate re-blowing.
Clearing Severe Mechanical Jams in Auger Tubes
When basic jam clearing fails, you’re likely facing a hardened pellet blockage or foreign object obstruction requiring full auger assembly removal. This process takes 20-30 minutes but solves most “Traeger auger not working” cases.
- Unplug the grill and remove all pellets from the hopper
- Disconnect the hopper (typically 4-6 screws) and set aside
- Remove the auger motor mounting bolts and disconnect wiring
- Slide the entire auger assembly out through the feed tube
- Inspect for bent flighting, sheared pins, or lodged debris
- Clean the tube thoroughly with a shop vac and flexible brush
- Reinstall components in reverse order
Pro Maintenance Tip: Apply food-grade lubricant to the auger shaft before reassembly to prevent future binding—never use petroleum-based lubricants near your food zone.
Preventing Future Traeger Auger Problems
The best fix for a Traeger auger not working is preventing the problem entirely through proper maintenance and operation.
- Use premium hardwood pellets: Avoid bargain brands with excessive fines that compact into jams
- Store pellets properly: Keep in sealed containers with desiccant packs, never directly on concrete
- Perform monthly inspections: Check auger rotation and connections while the grill is cool
- Clean after every 3-5 cooks: Vacuum hopper debris and wipe auger intake area
Critical Prevention Strategy: Never overfill your hopper beyond the MAX line. Excess pellets create downward pressure that causes jams, especially during temperature fluctuations. Keep it at 2/3 capacity for optimal flow.
When your Traeger auger not working crisis hits, stay calm and systematic. Start with the simplest explanations—a pellet jam or loose wire—before assuming component failure. With these targeted diagnostic steps, you’ll identify and resolve the issue faster than waiting for professional service. Remember that most auger problems stem from preventable causes, so implement these maintenance practices to keep your pellet flow consistent for perfect smokes every time. Your Traeger’s reliability depends on regular care, but when issues arise, you now have the exact knowledge to restore proper auger function and get back to what matters—creating incredible barbecue.


