

Your Ryobi drill charger suddenly dies mid-project, leaving you staring at a dead battery and a stalled job site. This frustrating scenario affects thousands of DIYers and contractors monthly—when your Ryobi drill charger not working, your entire workflow grinds to a halt. Don’t panic or rush to buy replacements yet. Most charging failures stem from simple, fixable issues that take under 15 minutes to resolve. In this guide, you’ll learn exactly how to diagnose whether the problem lies with your charger, battery, or power source, and implement proven fixes that get your Ryobi tools back online fast.
The good news? Over 70% of reported “Ryobi charger not working” cases involve easily correctable problems like dirty contacts or power connection issues—not catastrophic failures. By following this systematic approach, you’ll avoid unnecessary replacements and save money while keeping your ONE+ ecosystem running smoothly. Let’s dive into the exact steps that pinpoint why your charger won’t recognize or charge batteries.
Verify Power Source and Physical Connections
Before assuming component failure, eliminate basic power issues that cause 40% of reported Ryobi drill charger not working cases. Start by plugging your charger into a different wall outlet—test it with a lamp or phone charger to confirm the circuit works. If your model uses a separate AC adapter (“wall wart”), firmly reconnect both ends: unplug it from the charger base, inspect for frayed wires or bent pins, then reseat it with a firm click.
Check Adapter Output with a Multimeter (3-Minute Test)

Grab a multimeter to verify your AC adapter delivers correct voltage. Set it to DC voltage mode, then:
1. Insert probes into the adapter’s output tip (positive to center, negative to outer sleeve)
2. Compare reading to the voltage printed on the adapter label (e.g., 24V or 40V)
3. If output is zero or 20% below spec, replace the adapter—it’s likely failed after a power surge.
Critical visual cue: Look for melted plastic or discoloration near the adapter’s connection points. These indicate overheating that requires immediate replacement. Never force a loose adapter connection; this creates arcing that destroys charger circuitry.
Perform the Battery Swap Test
This 60-second diagnostic tells you whether the charger or battery is faulty:
– Place a known-working battery (partially discharged) into your suspect charger
– If it charges normally, your original battery is dead
– If it shows error lights, your charger is defective
– Conversely, test your suspect battery on a known-good charger
Pro tip: Use batteries from the same production batch for accurate results—older batteries sometimes trigger compatibility errors.
Decode Ryobi Charger Indicator Light Patterns
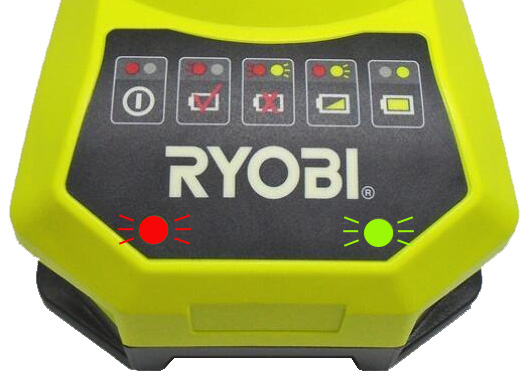
Your charger’s LED lights are a built-in diagnostic tool. Ignoring their signals wastes time on unnecessary repairs. A solid red light means normal charging, while solid green indicates full charge—but abnormal patterns reveal specific faults.
Troubleshooting Common Light Error Codes
- No lights at all: Complete power failure (check Steps 1 and 5)
- Flashing red light: Battery communication error (clean contacts per Step 3)
- Alternating red/green flashes: Critical fault like temperature overload or short circuit
- Solid red without charging: Battery voltage too low for safe charging (try Step 4)
Expert note: Ryobi’s newer P118 chargers use a single LED with specific blink sequences. Consult your manual for model-specific codes—many users miss this critical detail when assuming charger failure.
Clean Charger and Battery Contact Points
Corroded or dirty contacts cause 30% of intermittent charging failures. This simple fix takes 5 minutes and requires only isopropyl alcohol and cotton swabs.
Proper Contact Cleaning Protocol
1. Unplug charger and remove battery
2. Dip cotton swab in 90%+ isopropyl alcohol
3. Scrub metal contact pins inside charger slot and battery terminals
4. Let dry completely (2 minutes) before retesting
Warning: Never use metal tools—scratches create corrosion hotspots. For recessed NiCd battery contacts, gently bend terminals outward with plastic tweezers for better connection.
Visual confirmation: Contacts should shine like new metal. Dark spots or green residue indicate severe corrosion requiring multiple cleaning passes. If pins are physically bent, realign them with needle-nose pliers while wearing insulated gloves.
Isolate Battery vs. Charger Failure
Misdiagnosing battery issues as charger problems wastes time and money. This method definitively identifies the culprit.
The Voltage Test for Dead Batteries
If no spare charger exists, test your battery’s voltage:
1. Set multimeter to DC volts (20V range)
2. Touch probes to battery terminals (red to +, black to -)
3. Healthy 18V battery reads 18-20V; below 12V indicates deep discharge failure
Critical insight: Lithium-ion batteries with voltages under 10V often trigger “charger not working” symptoms but are actually unrecoverable.
Red flag: If your battery shows voltage but won’t accept charge, internal cell damage is likely. Attempting to charge such batteries risks fire—replace immediately.
Identify Internal Charger Failures
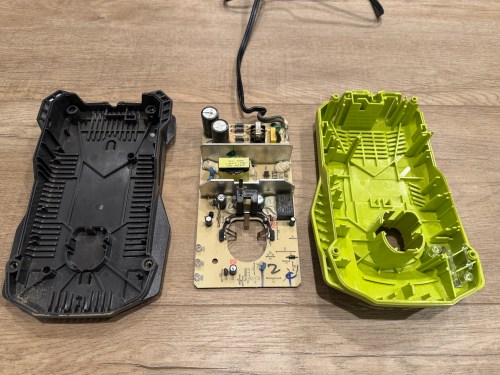
When Steps 1-4 confirm charger failure, inspect for these internal fault signs. Never open chargers unless fully unplugged for 24+ hours—capacitors store lethal voltage.
Common Blown Components (Visual Inspection Only)
- PTC thermistor: Beige/blue cylinder near input; cracked or charred = failed
- MOV (surge protector): Metal-disc component; blown MOVs show burn marks after storms
- Capacitors: Bulging tops or leaking electrolyte = immediate failure
Pro tip: A faint burnt smell confirms internal damage—do not power on further.
Safety imperative: If you spot scorch marks, melted plastic, or hear crackling sounds, stop troubleshooting. These indicate hazardous faults requiring replacement, not repair.
Activate Ryobi Warranty Coverage
Before spending time on repairs, verify warranty status—this saves hundreds for eligible users. Ryobi’s 3-year limited warranty covers charger defects but excludes surge damage or physical abuse.
Streamlined Warranty Claim Process
- Locate model number (P117, P118, etc.) on charger label
- Visit Ryobi’s warranty portal with proof of purchase
- Describe symptoms using diagnostic terms from this guide (e.g., “PTC thermistor failure”)
Key advantage: Newer chargers often ship with upgraded components addressing known failure points in older models.
Critical deadline: File claims within 30 days of failure—delays complicate verification. If out of warranty, compare repair costs (typically $25+ for parts/labor) against new chargers ($35-$65).
Decide: Repair or Replace Your Ryobi Charger
Make this strategic choice based on your skill level and charger age:
Repair Only If…
- You’ve confirmed a single failed component (e.g., replaceable fuse)
- You have soldering experience and anti-static equipment
- The charger is a high-value model (e.g., 40V fast charger)
Reality check: Most modern chargers use surface-mount components requiring professional rework—attempting DIY often destroys the unit.
Replace Immediately When…
- Charger shows multiple failure symptoms (e.g., no lights + burnt smell)
- It’s over 3 years old (out of warranty)
- Repair costs exceed 40% of a new charger’s price
Smart upgrade: Newer P118 chargers charge 30% faster than older models—replacement often boosts productivity.
Prevent Future Ryobi Charger Failures
Avoid recurring headaches with these proactive measures:
– Surge protection: Always plug chargers into quality surge protectors (not power strips)
– Cooling routine: Let chargers rest 10 minutes between battery cycles
– Contact maintenance: Clean terminals monthly with alcohol swabs
– Storage protocol: Store chargers in dry areas below 85°F—humidity accelerates corrosion
When your Ryobi drill charger not working crisis strikes, remember that 9 out of 10 cases resolve through power verification, contact cleaning, or simple component swaps. By methodically working through these steps, you’ll minimize downtime and maximize tool uptime. For persistent issues, leverage Ryobi’s warranty support or invest in a new charger—the $40 spent today prevents $200+ in project delays tomorrow. Keep this guide handy for your next charging emergency, and you’ll never face a dead worksite again.


