
Your Makita drill was your trusty sidekick on the job site, but now the trigger has gone silent. You squeeze it firmly, expecting the familiar whir of the motor, but nothing happens—just frustrating silence. This sudden failure can derail your project, leaving you staring at an expensive paperweight. When your Makita drill trigger not working scenario strikes, it’s more than just an inconvenience; it’s a productivity killer that needs immediate attention.
Fixing a Makita drill trigger that refuses to respond is often simpler than you might think. Most trigger failures stem from common, repairable issues that you can diagnose and fix yourself with basic tools and the right knowledge. This guide will walk you through identifying the exact problem with your Makita trigger switch failure and provide step-by-step solutions to get your drill humming again—saving you the cost of replacement or professional repair.
Why Your Makita Drill Trigger Suddenly Stopped Responding
When your Makita drill trigger not working problem appears, it’s usually signaling a specific failure point in the trigger mechanism. Understanding these failure patterns helps you diagnose the problem efficiently without unnecessary disassembly or part replacement.
Recognizing the Exact Trigger Failure Pattern in Your Makita Drill
Different trigger failure patterns point to specific underlying problems in your Makita drill:
-
Dead Trigger with No Response: When you pull the trigger and absolutely nothing happens—no motor hum, no vibration—this typically indicates a complete break in the electrical circuit. This could be a completely failed trigger switch, a broken wire connection, or in rare cases, a motor issue. The most common culprit is a trigger switch that has developed an open circuit, often from internal contact wear or carbon tracking.
-
Halfway Engagement Followed by Full Speed: This frustrating pattern—where the drill won’t start until you pull the trigger halfway, then immediately jumps to maximum speed—is the hallmark symptom of a worn potentiometer inside the trigger assembly. The carbon track that controls variable speed has developed a “dead zone” at the beginning of its travel. This specific failure makes precision work impossible and frequently causes stripped screw heads, as the drill lacks the low-speed control needed for careful fastening.
-
Intermittent Operation with Trigger Position Sensitivity: If your drill works only when you hold the trigger at a specific angle or with extra pressure, you’re likely dealing with worn contacts inside the trigger switch. Metal particles, dust, or moisture contamination can create inconsistent electrical pathways that only complete the circuit under certain conditions.
-
Sticky or Sticking Trigger: When the trigger feels resistant to pull or doesn’t return smoothly to the “off” position, investigate the mechanical components first. A damaged return spring, physical obstruction from debris, or internal switch mechanism damage could be causing this issue. In severe cases, a trigger that sticks in the “on” position creates a dangerous runaway situation that requires immediate attention.
-
Trigger Works but Only in One Direction: If your drill operates in forward but not reverse (or vice versa), the problem likely lies with the forward/reverse switch mechanism rather than the main trigger switch. This separate component can develop similar contact issues but requires different diagnostic steps.
Step-by-Step Trigger Diagnosis Without Opening Your Drill
Before you grab your screwdrivers, perform these critical checks to avoid unnecessary disassembly:
-
Battery Power Verification: Remove the battery and check for corrosion on both the tool and battery contacts. Clean with isopropyl alcohol if needed. Test the battery in another compatible Makita tool to confirm it’s delivering proper voltage. A weak battery can mimic trigger failure symptoms because it can’t provide enough current to overcome resistance in a partially failed switch.
-
Forward/Reverse Switch Check: Toggle the direction switch multiple times while attempting to activate the trigger. Sometimes this secondary switch develops intermittent connections that prevent power from reaching the motor regardless of trigger position.
-
Listen for Subtle Clues: Pull the trigger slowly while holding the drill close to your ear. A functioning but failing switch might produce a faint “buzz” or “click” as it makes intermittent contact. If you hear absolutely nothing, the failure is likely more severe.
-
Check for Physical Obstructions: Examine the trigger mechanism for visible debris, sawdust buildup, or foreign objects jamming the trigger’s movement. Use compressed air to blow out the trigger area before proceeding to internal diagnostics.
-
Test at Different Angles: Hold the drill in various positions while pulling the trigger. If it works only when tilted a certain way, you likely have a loose internal connection that shifts with gravity—pointing to a wire that’s partially disconnected.
Fixing Your Non-Responsive Makita Drill Trigger
Once you’ve confirmed the trigger itself is at fault, you have two repair paths depending on the severity of the failure. These solutions progress from simplest to most comprehensive, allowing you to stop once the problem is resolved.
Deep Cleaning Your Makita Trigger Switch for Intermittent Failures
For triggers that work sporadically or feel “sticky,” thorough cleaning often provides a complete fix:
-
Prepare Your Workspace: Remove the battery completely and gather your tools: contact cleaner (DeoxIT D5 is ideal), small brush, flashlight, and Phillips screwdriver. Lay out a clean towel to organize small parts.
-
Access the Trigger Mechanism: Remove the housing screws (typically Torx T15 or T20) and carefully separate the two halves of the drill housing. Take photos at each step to ensure proper reassembly.
-
Apply Contact Cleaner Strategically: With the housing open, locate the trigger switch assembly. Spray contact cleaner directly into the switch housing while working the trigger back and forth repeatedly. Focus spray on the area where the trigger plunger enters the switch.
-
Work the Cleaner Through the Mechanism: Continue pressing the trigger 30-50 times to distribute the cleaner through the internal potentiometer. This dislodges conductive dust and debris that cause intermittent connections.
-
Allow Proper Drying Time: Wait at least 15 minutes for the cleaner to evaporate completely before testing. Rushing this step can cause short circuits.
Pro Tip: For stubborn contamination, use a cotton swab lightly dampened with isopropyl alcohol to clean visible contacts. Never use WD-40 or household lubricants—they attract more dust and degrade plastic components.
Replacing Your Makita Drill Trigger Switch Assembly
When cleaning doesn’t restore full function, complete switch replacement is the permanent solution:
-
Identify Your Exact Switch Model: Locate the part number printed on your existing trigger switch (common Makita numbers include D-108, D-187, or D-249). Cross-reference this with your drill model number (found on the nameplate near the battery compartment) to ensure compatibility.
-
Source the Correct Replacement: Order from reputable suppliers like eReplacementParts.com, ToolPartsDirect, or a Makita service center. Verify the switch matches your drill’s voltage (18V, 12V, etc.)—using an incorrect switch can cause immediate failure or safety hazards.
-
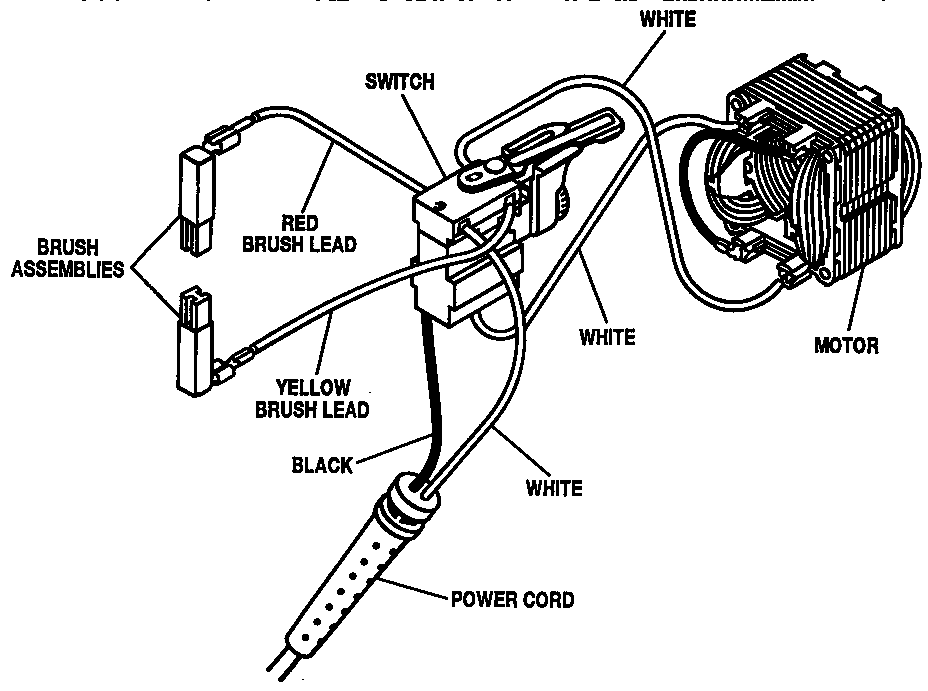
Document Wiring Configuration: Before disconnecting anything, take multiple high-resolution photos of the switch wiring from different angles. Note the color and position of each wire connector. Most Makita triggers use a standard 3-4 wire configuration, but reversing connections can damage the new switch.
-
Transfer Components Carefully: Some trigger assemblies include a small return spring or mechanical linkage that must be transferred to the new switch. Handle these delicate components with tweezers to avoid losing them.
-
Test Before Final Assembly: After installing the new switch but before closing the housing, insert the battery and test the trigger’s full range of motion. Verify smooth speed control from minimum to maximum and check both forward and reverse operation.
Critical Warning: Never skip the test-before-assembly step. If the drill behaves erratically or doesn’t work after installing a new switch, the problem likely lies elsewhere (such as the motor brushes), and you’ll need to investigate further before reassembling.
Preventing Future Makita Trigger Failures

After fixing your Makita drill trigger not working issue, implement these maintenance practices to extend your tool’s lifespan:
Trigger-Specific Maintenance Routine
– After each use, especially in dusty environments, blow compressed air through the trigger mechanism to prevent debris buildup
– Every six months, apply a small amount of dielectric grease to the trigger pivot points (not inside the electrical switch)
– Store your drill with the trigger in the “off” position to maintain spring tension
Usage Habits That Protect Your Trigger
– Avoid “feathering” the trigger at maximum load for extended periods—this creates electrical arcing that degrades contacts
– Let the drill do the work; forcing the bit causes motor stalling that stresses the trigger switch
– Use the correct drill bit for the material to prevent unnecessary strain on the entire system
When to Seek Professional Makita Repair Services
While most trigger issues are DIY-fixable, consult a Makita authorized service center if:
- You’ve replaced the trigger switch twice with the same failure pattern
- There’s visible water damage or corrosion inside the tool
- The motor runs but produces unusual noises or burning smells
- Your drill is still under manufacturer warranty (self-repair may void coverage)
A professional technician has specialized diagnostic equipment to check for less obvious issues like failing motor brushes or circuit board problems that can mimic trigger failure symptoms.
Don’t let a malfunctioning trigger turn your reliable Makita drill into a frustrating obstacle. By following this systematic approach to diagnosing and repairing your Makita drill trigger not working problem, you’ll restore precision control to your tool and extend its service life for years to come. With the right knowledge and a few basic tools, you can tackle this common failure and get back to the job at hand—confident that your drill will respond exactly as you intend, from the gentlest touch to full power.


