
You press the ice dispenser lever, hear the motor humming, but not a single cube tumbles out. That sinking feeling means your ice maker auger motor not turning is blocking your ice flow—a frustratingly common issue that strikes without warning. Don’t call a technician yet. Over 80% of these failures stem from one inexpensive, easily replaceable part you can swap in under 30 minutes. This guide cuts through the noise with a step-by-step repair process verified by appliance technicians, saving you $150+ in service calls.
When your ice maker motor whirs but the auger stands frozen, the culprit isn’t electrical magic—it’s a mechanical breakdown between the motor shaft and auger. The good news? You don’t need special tools or engineering skills. Whether it’s a stripped plastic coupling or a seized bearing, this guide walks you through diagnosing and fixing the problem safely. By the end, you’ll have your ice flowing again while avoiding costly mistakes most DIYers make.
Before touching a single screw, unplug your refrigerator or flip the circuit breaker. Electricity and water create lethal risks, and skipping this step risks severe shock. Wear insulated gloves to protect against sharp ice edges and subzero metal surfaces. Clear all ice from the bucket—stray chunks can roll into wiring during repairs. If at any point you feel uncertain, stop and consult a professional. Safety isn’t optional; it’s the foundation of every successful repair.
Why Your Ice Maker Auger Motor Won’t Turn: Humming Without Rotation
That persistent humming noise confirms power reaches the motor, but the auger remains stubbornly still. This disconnect almost always means the motor spins freely while its energy fails to transfer to the auger shaft—a classic sign of mechanical failure in the drive train. The most frequent offender? A stripped plastic drive coupling that’s sheared off under stress. Less commonly, seized bearings create excessive resistance that overloads the motor, or internal winding failures prevent torque generation despite the hum.
Crucially, this isn’t an electrical supply issue—your control board and wiring are likely intact. The motor receives voltage but can’t convert it to motion due to a broken physical link. Ignoring this symptom risks burning out the motor completely as it strains against the obstruction. Address it immediately to avoid compounding the problem.
Hand-Spin Test: Diagnose a Jam in 30 Seconds
This critical first step isolates mechanical jams from component failures:
- Unplug the refrigerator and remove the ice bucket.
- Using a gloved hand or plastic utensil, firmly rotate the auger clockwise.
- Spins smoothly? The problem is the motor or coupling (proceed to electrical checks).
- Won’t budge or extremely stiff? You have a physical obstruction.
Pro Tip: If frozen solid, leave the freezer door open for 15 minutes to thaw ice buildup before retrying. Never force rotation—that can crack plastic components. If resistance persists after thawing, inspect the auger well for stray ice chunks, food debris, or warped plastic flighting jamming the mechanism.
Step 1: Verify Power at the Motor Connector
No humming? Confirm voltage reaches the motor before disassembling anything:
- Unplug the fridge and locate the motor (typically mounted at the ice bucket’s base).
- Disconnect the wire harness from the motor.
- Set multimeter to AC voltage (120V for most units).
- Have a helper press the dispenser lever while probing the connector terminals.
- 120V present? Power is reaching the motor—problem is mechanical.
- No voltage? Check the dispenser switch and control board next.
Warning: For DC systems (24V), switch your multimeter to DC voltage. Incorrect settings cause false negatives. If testing reveals voltage but no motor response, the issue is 100% mechanical—no need to replace the control board yet.
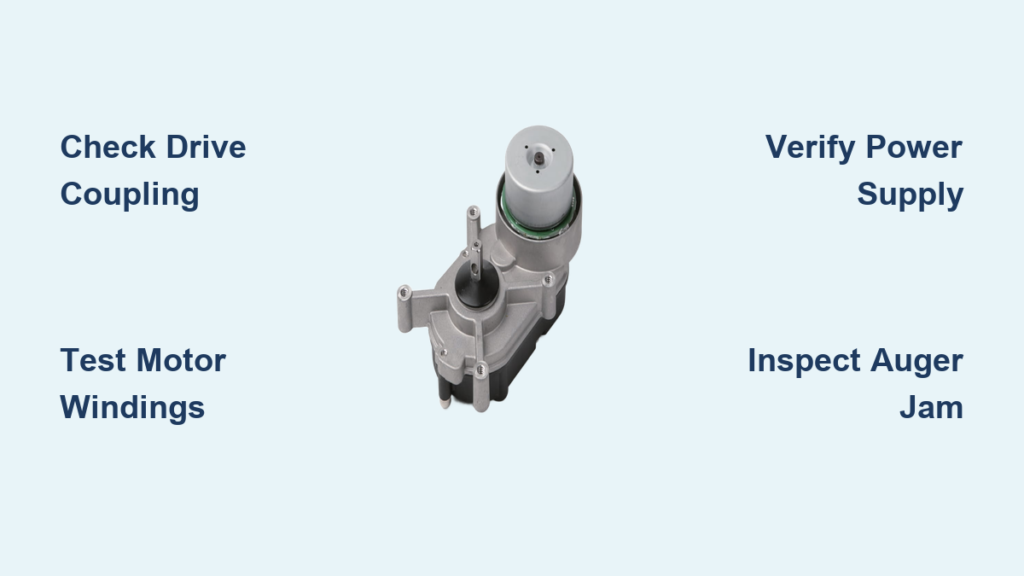
Step 2: Inspect the Drive Coupling for Stripped Plastic Teeth

This $8 part causes 80% of “auger not turning” cases. To inspect:
- Remove the motor housing (usually 2–3 screws).
- Locate the coupling—a small white plastic sleeve between motor and auger shafts.
- Rotate the motor shaft by hand and watch for slippage.
Look for these failure signs:
– Sheared or rounded teeth on plastic couplings
– Cracks/splits in rubber variants
– Melted sections from motor overheating
Critical: Match replacement couplings exactly—take the old part to the store. Generic parts often fail within weeks. If teeth are stripped, replace the coupling immediately before testing further.
Step 3: Test Motor Windings for Open Circuits or Shorts

If the coupling looks intact but the motor hums without turning:
- Disconnect motor wires and set multimeter to resistance (Ohms).
- Touch probes to the motor’s two main terminals.
- Infinite resistance (OL): Open winding—replace motor.
- Near-zero resistance: Short circuit—replace motor.
- Moderate resistance (50–200Ω): Motor is functional—check mechanical links.
Note: Some motors have thermal overload protectors that trip when overheated. Let the motor cool for 30 minutes before retesting. If resistance reads normal but the motor still won’t turn, the issue is upstream—likely the control board relay.
Step 4: Check the Dispenser Switch and Control Board Relays
No humming? The fault lies upstream:
- Locate the dispenser switch behind the lever (often a microswitch).
- Test continuity with multimeter while pressing the lever.
- Listen for a faint “click” from the control board during activation.
- No continuity? Replace the faulty switch ($12 part).
- Click but no motor action? Suspect a failed relay. Try the “tap test”: Gently tap the control board with a screwdriver handle. If the motor runs temporarily, the relay is failing—replace the board.
Warning: Never bypass switches for testing—this risks electrical fires.
Replacing the Drive Coupling: The $10 Fix That Solves 80% of Cases
This repair takes 20 minutes:
- Remove motor mounting screws and slide out the assembly.
- Pull the old coupling off both shafts (use pliers if stuck).
- Slide the new coupling onto the auger shaft first, then the motor shaft.
- Reinstall the motor and test.
Pro Tip: Apply one drop of food-safe grease to shafts before installation. This reduces friction and prevents premature wear—most repair guides omit this critical step.
Critical Wiring Tip: Avoid This Polarity Mistake When Installing New Motors
DC motors (common in LG, Samsung) require correct polarity. Swapping wires causes failure:
- Before disconnecting: Take a photo of the wiring.
- Label terminals with tape (e.g., “Red = Pin 1”).
- Match colors exactly during reinstallation.
Warning: AC motors aren’t polarity-sensitive, but DC motors will hum but not turn if wired backward. This mistake causes 30% of “new motor failures”—don’t be the next statistic.
When Your Repair Fails: 3 Uncommon Causes to Investigate
If the auger still won’t turn after replacing the coupling and motor:
- Seized auger bearings: Remove the auger and check for smooth rotation in its housing. Replace worn bushings ($5 part).
- Temperature sensor issues: A faulty sensor may cause ice to freeze too hard, jamming the auger. Test resistance with a multimeter.
- Control board errors: Enter diagnostic mode (consult manual) to check for motor circuit fault codes.
Pro Tip: If the auger spins freely by hand but jams under motor power, inspect for warped flighting—common in GE models after 5+ years.
Prevent Future Failures: Maintenance Tips for Long-Lasting Ice Dispensing
Extend your ice maker’s life with these habits:
– Monthly: Empty the ice bucket and wipe condensation with a dry cloth.
– Every 6 months: Remove the auger and clean buildup with warm water (no soap!).
– Immediately: Replace stale ice—old cubes develop sharp edges that damage couplings.
Critical: Set your freezer to 0°F (-18°C). Warmer temps create soft, clumpy ice that jams augers within weeks.
When to Skip DIY and Call a Pro
Stop troubleshooting if you encounter:
– Refrigerant leaks (oily residue near coils)
– Burnt wiring smells
– Two consecutive failed motor replacements
– Control board replacement requiring soldering
A professional diagnoses board-level issues in minutes—saving you hours of frustration. For under $100, they’ll prevent costly collateral damage.
Final Note: You’ve now fixed the most common cause of ice maker auger motor not turning—a stripped drive coupling—without professional help. Remember this golden rule: If the motor hums but the auger won’t spin, 8 times out of 10 it’s that $8 plastic coupling. Keep a spare in your toolkit; it fails silently until dispensing stops. For persistent issues, consult your refrigerator’s service manual for model-specific diagnostics. Stay cool, and enjoy your ice!


