
That frustrating moment when your welding arc suddenly veers off course on drill pipe isn’t just bad luck—it’s magnetic interference sabotaging your work. How to weld magnetized drill pipe effectively separates competent welders from those who deliver substandard joints that fail inspection. Magnetized pipe creates unpredictable arc blow that causes poor fusion, excessive spatter, and weld defects that compromise structural integrity. This guide delivers battle-tested methods to either eliminate magnetism or adapt your technique when demagnetization isn’t possible—so you can produce code-compliant welds on even heavily magnetized drill pipe.
Why Magnetized Drill Pipe Causes Arc Blow and Weld Defects
Your welding arc isn’t just wandering randomly—it’s being deflected by invisible magnetic fields surrounding the pipe. When you strike an arc on magnetized steel, the magnetic flux lines interact with the electric current, creating a repulsive force that pushes the arc away from its intended path. This arc blow manifests as an unstable, sputtering arc that makes consistent puddle control impossible and leads directly to incomplete fusion, porosity, and undercut defects that fail NDT inspections.
How to Identify Magnetic Interference in Your Drill Pipe
Watch for these telltale signs before you even strike an arc: a compass needle that spins erratically near the pipe indicates significant magnetization. During welding, listen for that distinctive “underwater” sound as the arc struggles against magnetic forces. Visually, you’ll see excessive spatter patterns that deviate from normal radial distribution and an arc that consistently deflects in one direction regardless of your welding angle. Heavy magnetism will cause the arc to jump completely off the workpiece within seconds of striking.
Common Sources of Magnetization in Oilfield Drill Pipe
Drill pipe becomes magnetized through multiple mechanisms you can’t ignore. Friction-induced magnetism develops during drilling operations as steel components rub together under high pressure. Earth’s magnetic field gradually magnetizes pipe during extended storage, especially when stored in a fixed north-south orientation. Previous magnetic particle inspection leaves residual fields, and even DC welding operations on adjacent sections can magnetize the entire pipe string through electromagnetic induction.
How to Measure Drill Pipe Magnetism Before Welding
Never attempt to weld magnetized pipe without first assessing the severity of the problem. This critical step determines whether you can adapt your technique or must perform full demagnetization. Ignoring this assessment guarantees wasted time and defective welds that require costly rework.
Using a Compass for Quick Magnetism Assessment
Grab a simple magnetic compass and slowly rotate it around the pipe circumference. If the needle deviates more than 15 degrees from magnetic north at any point, you have significant magnetization requiring intervention. For light magnetism (needle deviation under 30 degrees), technique adjustments may suffice. But if the needle spins wildly or locks perpendicular to the pipe, heavy magnetism demands professional demagnetization before welding.
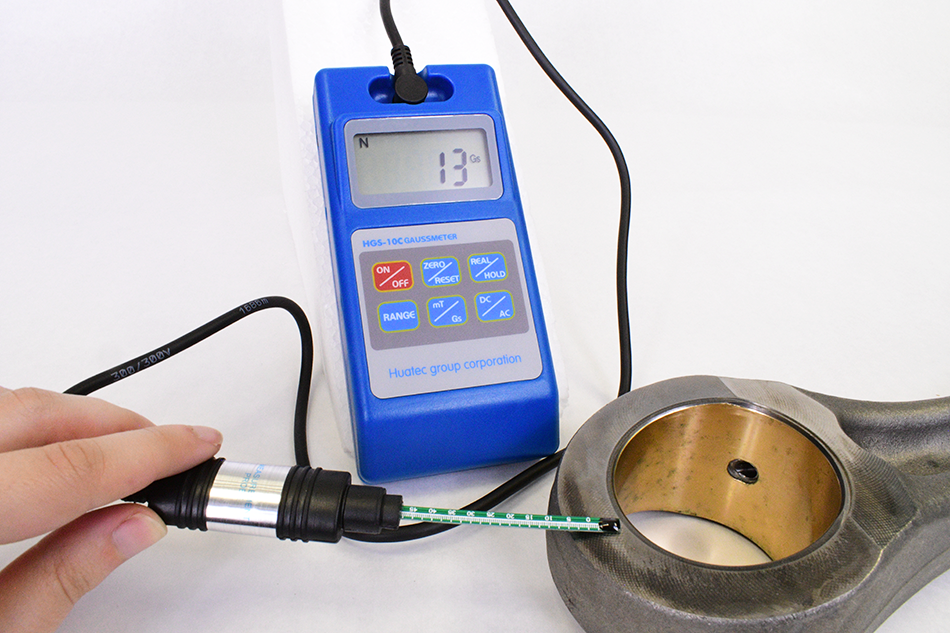
Professional Magnetism Measurement with a Gaussmeter
For critical applications, invest 5 minutes using a gaussmeter—the only reliable way to quantify magnetic fields. Place the probe against the pipe surface and record readings at multiple locations. Light magnetism measures under 20 gauss, moderate falls between 20-50 gauss, while heavy magnetism exceeds 50 gauss and requires demagnetization. Document these readings before and after any demagnetization process—this paper trail proves due diligence if welds later face scrutiny.
Thermal Demagnetization: Heating Drill Pipe to the Curie Point
When magnetic fields exceed 30 gauss, thermal demagnetization becomes your most reliable solution. This method exploits steel’s fundamental property: heating above its Curie point (approximately 770°C) permanently destroys magnetic domains. Unlike temporary fixes, thermal demagnetization delivers complete, lasting results when performed correctly.
Achieving Complete Demagnetization at 700-800°C
Heat the affected pipe section to a visible dull red (600-700°C) using an induction heater or carefully controlled torch. For complete demagnetization, continue heating until the steel reaches cherry red (700-800°C)—this ensures the entire cross-section exceeds the Curie temperature. Use temperature-indicating crayons to verify proper heating levels, as visual estimation alone often falls short. Critical note: heating must be uniform across the entire circumference to prevent re-magnetization during cooling.
Proper Cooling Techniques to Prevent Re-Magnetization
After reaching target temperature, slow cooling is non-negotiable. Rapid quenching creates thermal stresses that encourage re-magnetization. Allow the pipe to cool naturally in a draft-free environment, ideally wrapped in insulating ceramic fiber blankets. For maximum effectiveness, orient the pipe east-west during cooling to minimize Earth’s magnetic field influence. Never move or handle the pipe until it drops below 200°C—premature disturbance can partially re-magnetize the material.
AC Demagnetization Methods for Drill Pipe in the Field

When thermal treatment isn’t feasible, AC demagnetization delivers effective results with common welding equipment. This technique works by subjecting the pipe to a gradually decreasing alternating magnetic field that randomizes magnetic domains. Proper execution requires attention to coil placement and current reduction rates.
Step-by-Step Cable Wrapping Technique for Pipe Sections
- Wrap 4-6 turns of heavy-duty welding cable around the magnetized pipe section
- Connect the cable ends to your AC welding machine set to 150-200 amps
- Energize the coil for 30 seconds to establish the alternating field
- Gradually reduce amperage to zero over 45-60 seconds using the machine’s remote control
- Verify results with a gaussmeter before welding
Critical mistake to avoid: Never abruptly cut power—this leaves residual magnetism. The current reduction must be smooth and gradual. For longer pipe sections, move the coil incrementally along the pipe, overlapping each treated zone by 50%.
How to Gradually Reduce Current to Zero for Effective Demagnetization
The key to successful AC demagnetization lies in the current reduction phase. Set your machine to deliver sufficient initial current (150-200A for 4-6″ pipe), then use a variable transformer or remote control to steadily decrease amperage. Count slowly to 60 as you reduce power—this 60-second decay period allows magnetic domains to randomize completely. Test with a gaussmeter; if residual field exceeds 5 gauss, repeat the process with tighter coil spacing.
DC Welding Techniques That Work on Magnetized Drill Pipe
When demagnetization isn’t possible, your welding technique must compensate for magnetic interference. These specialized approaches counteract arc blow through strategic electrode manipulation and parameter adjustments—turning potential failures into successful welds.
Optimal 7018 and 6010 Electrode Selection for Magnetic Conditions
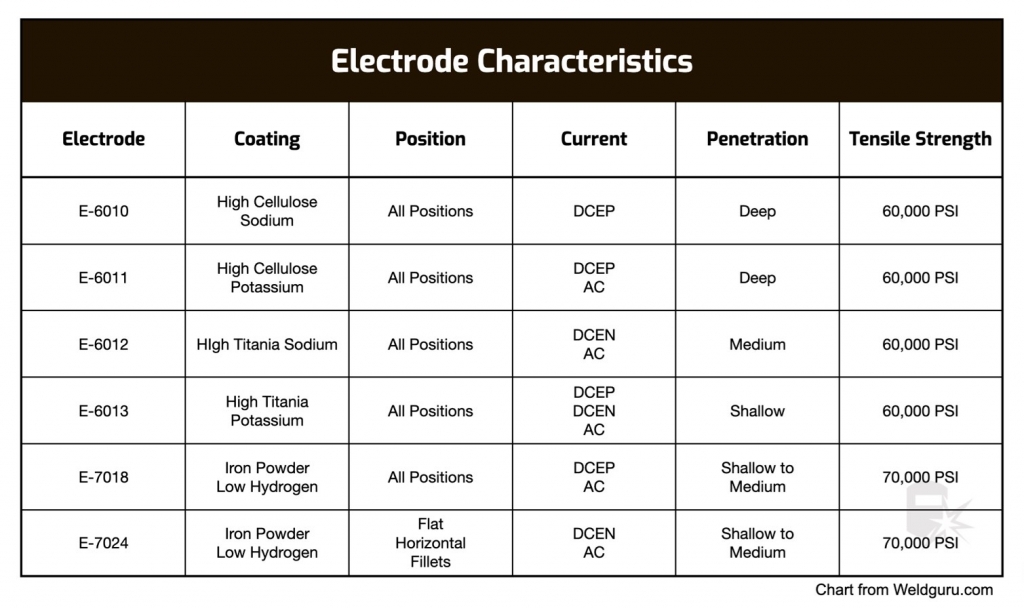
For root passes on magnetized drill pipe, E6010 electrodes deliver the deep penetration and fast-freeze characteristics needed to overcome arc deflection. Their cellulose coating generates a stiff, penetrating arc that fights magnetic forces better than most alternatives. For fill passes, switch to E7018 rods—their lime-titania coating creates a stable, quiet arc that handles magnetic interference with minimal spatter. Never use basic low-hydrogen electrodes without verifying their magnetic field tolerance.
Adjusting Amperage and Travel Speed to Counteract Arc Blow
Increase your amperage setting by 10-15% above normal parameters—this “arc blast” power helps punch through magnetic deflection. Pair this with a 15-20% slower travel speed to maintain consistent heat input as the arc fights magnetic forces. Crucially, shorten your arc length by 1/8″ to improve directional control. When arc blow pushes the arc forward, angle your electrode 10-15 degrees against the travel direction to counteract the deflection.
How to Weld Magnetized Drill Pipe Without Demagnetizing
Sometimes you must weld immediately despite significant magnetization. These field-proven techniques stabilize the arc and produce acceptable welds when proper demagnetization isn’t an option—though they should never replace proper magnetism removal for critical applications.
The “C” and “J” Weave Patterns That Defeat Arc Blow
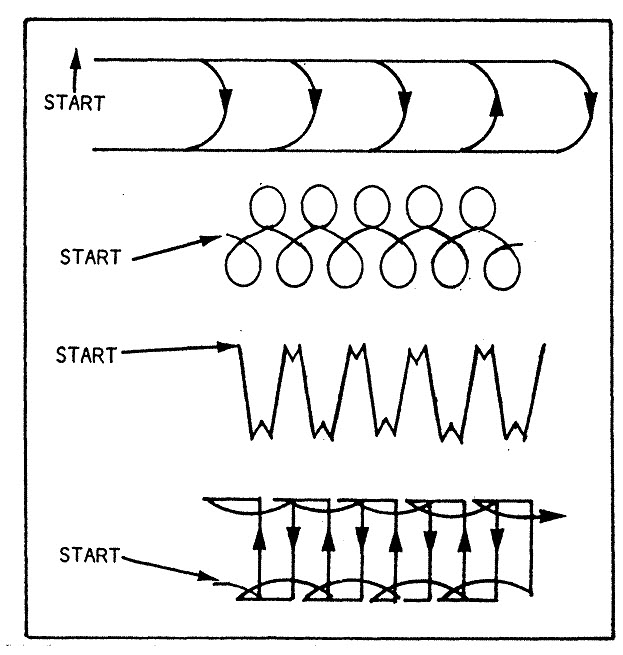
Abandon straight stringer beads and adopt controlled weave patterns that disrupt magnetic field influence. The “C” weave involves moving the electrode in a continuous C-shaped pattern, spending slightly more time on the leading edge to counteract arc blow. For severe magnetism, use the “J” weave—a modified crescent pattern where you briefly pause at the tail of each stroke to allow the puddle to catch up. Maintain a consistent 3/8″ maximum weave width to prevent cold laps.
Strategic Tack Welding Every 2-3 Inches for Stability
Place tack welds every 2-3 inches around the pipe circumference—twice as many as normal—to create a continuous conductive path that minimizes magnetic field distortion. Each tack should be 3/4″ long with complete root penetration. Before welding between tacks, verify they’ve cooled below 300°F to prevent burn-through. These strategic tacks stabilize both the joint alignment and the magnetic field distribution, giving your main weld a fighting chance.
Proper Joint Preparation for Magnetized Drill Pipe Welding
Magnetized pipe demands flawless joint preparation—any imperfection gets magnified by arc blow. Spend extra time cleaning and beveling to create the optimal conditions for successful welding despite magnetic interference.
Cleaning Methods to Remove Contaminants Before Welding
Remove all oil, grease, and moisture from the joint area using acetone and stainless steel wire brushes dedicated to carbon steel. Critical step: Clean 2 inches beyond the bevel on both inside and outside surfaces—magnetic fields can draw contaminants into the weld zone from surprising distances. Never use compressed air for cleaning; moisture and oil from the compressor will contaminate the surface.
Root Gap Specifications for Magnetized Pipe Joints
Set your root gap to 1/16″ wider than normal specifications (typically 3/16″ instead of 1/4″) to accommodate the slightly erratic arc behavior. This extra space allows the weld pool to form properly despite magnetic deflection. Verify gap consistency with a tapered gauge at multiple points around the circumference—magnetism often causes uneven joint alignment that must be corrected before welding begins.
Post-Weld Quality Control for Magnetized Pipe Welds
Your work isn’t finished when the last bead cools. Magnetized pipe welds require enhanced inspection protocols to catch defects that might escape standard checks.
Visual Inspection Checklist for Magnetic Interference Defects
Examine welds under bright lighting for these magnetism-specific flaws:
– Asymmetric bead profiles indicating uneven arc deflection
– Localized undercut on one side of the weld
– Irregular spatter patterns concentrated in specific zones
– Incomplete fusion at the 3 and 9 o’clock positions where magnetic fields are strongest
Non-Destructive Testing Methods for Critical Welds
For API-specification drill pipe, always follow visual inspection with magnetic particle testing (MT)—ironically, the same magnetic principles that caused your welding problems now help verify weld integrity. The magnetic field from MT can serve as a final demagnetizing step when performed correctly: apply particles, inspect, then gradually reduce the magnetizing current to zero. Document residual field measurements below 5 gauss as proof of successful demagnetization.
Welding magnetized drill pipe successfully requires understanding the invisible forces working against you and implementing precise countermeasures. Always measure magnetism first, prioritize demagnetization when possible, and adapt your technique with strategic tacks, specialized electrodes, and controlled weave patterns when time forces immediate welding. By mastering these methods, you’ll transform frustrating magnetic interference into consistently strong, code-compliant welds that stand up to the toughest inspections. For critical applications, treat magnetism removal as non-negotiable—your weld’s structural integrity depends on it.


