
Your toilet won’t flush, water is rising dangerously close to the rim, and the plunger just isn’t cutting it. That sinking feeling hits when you realize this is no ordinary clog—it’s one of those stubborn blockages that laughs at basic tools. When paper piles, foreign objects, or hardened waste refuse to budge, your Husky toilet auger becomes the unsung hero of bathroom emergencies. This specialized tool tackles what plungers can’t, navigating tight curves without scratching porcelain. In this guide, you’ll learn exactly how to use a Husky toilet auger to eliminate clogs fast, avoid costly plumber visits, and restore your toilet’s function with confidence. Forget chemical cleaners that damage pipes—within minutes, you’ll master this simple, effective technique.
Most homeowners waste time on repeated plunging or dangerous drain chemicals when a Husky auger solves 90% of clogs in a single attempt. Unlike generic drain snakes, its flexible coiled cable and protective sleeve are engineered specifically for toilet trapways. The retractable hook grabs non-flushable items like wipes or toys, while the manual crank safely breaks up dense paper blockages. I’ve seen DIYers accidentally crack toilets by forcing cables or skipping safety checks—mistakes you won’t make after reading this. By the end, you’ll know precisely where to position the J-shaped cable, how much force to apply, and when to call professionals. Let’s transform that overflowing nightmare into a smoothly flushing reality.
Why a Husky Toilet Auger Beats Plungers for Deep Clogs
Toilets have a sharp 180-degree P-trap curve that traps debris just inches below the bowl. Standard plungers can’t generate enough focused pressure here, and their rubber cups often lose seal on stubborn blockages. The Husky auger’s magic lies in its 3-foot coiled steel cable with a protective plastic sleeve—it glides through the curve where plungers fail. When you crank the handle clockwise, the cable’s retractable hook either snags clumps of paper or breaks apart hardened waste. Crucially, the sleeve shields your porcelain from scratches that cheaper augers cause. For clogs beyond the trap (like mainline blockages), this tool reaches farther than any plunger while giving you tactile feedback through the handle—so you feel when you’ve hit the obstruction. Never waste another dollar on enzyme cleaners; this $25 tool clears what they can’t touch.
Must-Wear Safety Gear Before Touching the Auger
Skip this step, and you risk injury or unsanitary messes. Always wear thick waterproof rubber gloves that cover your wrists—raw sewage contains E. coli and hepatitis viruses. Pair them with safety glasses; water can splash unexpectedly when breaking clogs. I once skipped glasses during a severe blockage and spent 20 minutes rinsing my eyes—that mistake cost me more than the $3 eyewear. Never attempt this barehanded or with cotton gloves that soak through. Keep a dedicated “plumbing kit” under your sink with these items so you’re ready when disaster strikes. If you don’t have proper gear, stop immediately—your health isn’t worth saving five minutes.
Clearing the Bathroom Floor for Emergency Access
Water overflow can ruin floors and subflooring in minutes. Before touching your Husky auger, remove all rugs, bath mats, and nearby items within a 3-foot radius of the toilet. Pull the shower curtain fully inside the tub to avoid splashes. Place old towels along the baseboard as overflow barriers—they’ll buy critical time if water rises. Keep a bucket and sponge within arm’s reach for emergency bailing. I’ve seen homeowners trip over wastebaskets while frantically cranking an auger, spilling contaminated water everywhere. This 30-second prep prevents secondary disasters and gives you clear movement space to operate the tool safely.
Verifying Toilet Stability to Prevent Cracks
A wobbly toilet base means the bolts are loose or the wax ring failed—attempting auger use could crack the porcelain. Press down firmly on opposite sides of the bowl rim. If it rocks even slightly, stop immediately. Tightening bolts now might force the bowl off-center, causing leaks. Instead, place towels around the base to absorb overflow and call a plumber. For stable toilets, wipe the rim dry with a paper towel; moisture makes the auger sleeve slip during use. This check takes 10 seconds but prevents $300+ repairs from a shattered bowl. Remember: force belongs on the auger handle, not the toilet itself.
Safely Lowering Water Level in Overflowing Toilets
If water sits within 2 inches of the rim, you need breathing room before inserting the auger. Scoop water into a bucket using a small container (like a yogurt cup), filling it only halfway to avoid spills. Never flush to lower water—that risks overflowing. Work slowly; dumping too much water at once creates suction that might push the clog deeper. Your goal is 3-4 inches of clearance below the rim. For severely blocked toilets, you may need to bail 2-3 buckets. Pro tip: Add a cup of dish soap to the bowl—it lubricates the trapway and helps break up grease-based clogs while you work.
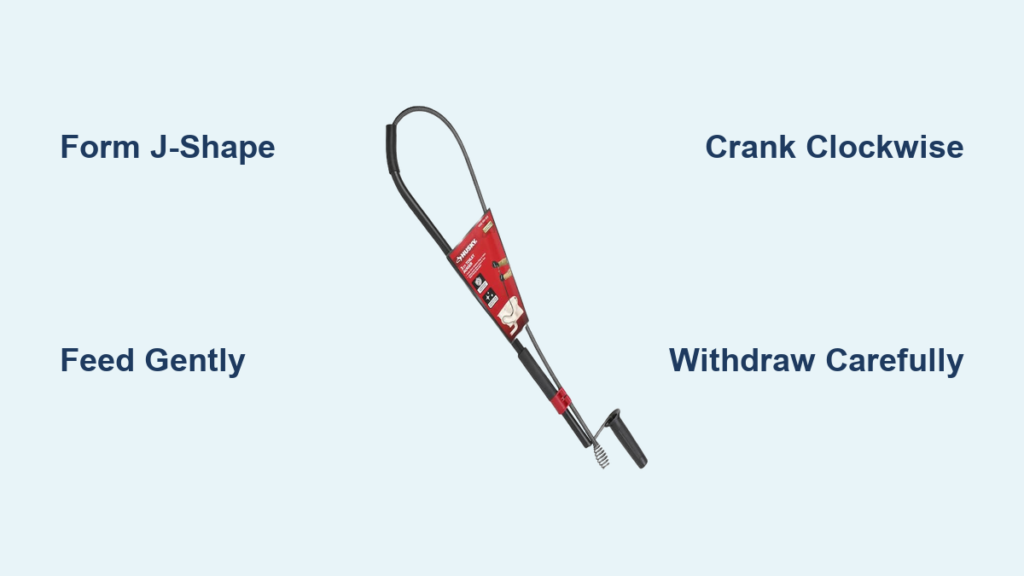
Step 1: Forming the J-Shape for Effective Cable Entry
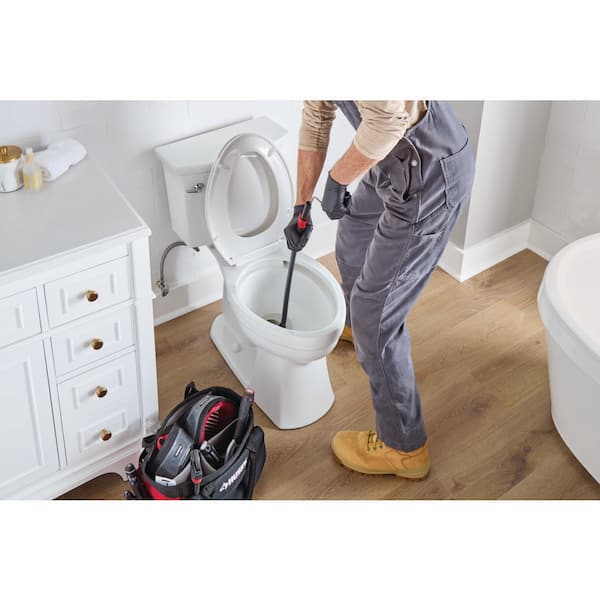
Extend 8-10 inches of the Husky auger’s cable, bending it into a tight “J” shape with the hook facing upward. This curve mirrors your toilet’s P-trap, guiding the cable smoothly into the drain instead of jamming against the porcelain. Hold the protective sleeve firmly against the bowl rim—this rubber guard prevents scratches. If your sleeve slides, wrap a rubber band around its base for grip. Never force a straight cable; it’ll scrape enamel and get stuck. The J-shape should fit neatly into the drain opening like a key in a lock. Test the bend by holding it over the bowl before insertion—you’ll feel resistance drop instantly when it’s perfect.
Step 2: Feeding the Cable Through the Toilet Drain Opening
With your non-dominant hand stabilizing the sleeve against the rim, slowly feed the J-shaped cable into the drain with your dominant hand. Apply gentle downward pressure while rotating the handle clockwise in quarter-turn increments. You’ll feel the cable navigate the P-trap curve—this should take 10-15 seconds. If you hit sudden resistance after 6-8 inches, you’ve found the clog. Stop immediately—forcing further can damage pipes. For deeper clogs (beyond 18 inches), extend more cable but maintain light pressure. If the cable won’t advance past the trap, the blockage may be a non-dissolvable object like a toy; skip to Step 4 and prepare for retrieval.
Step 3: Cranking Techniques to Break Up or Hook Clogs
Once the cable contacts the obstruction, your approach depends on clog type:
– For paper/waste clogs: Crank clockwise steadily while applying light forward pressure. The rotating hook shreds material into flushable pieces. You’ll feel resistance decrease as it breaks up.
– For solid objects (wipes, toys): Crank slowly while gently pulling back. The hook will snag the item—stop cranking when you feel tension to avoid dislodging it deeper.
Critical warning: Never attach a drill to the Husky auger. Power tools can snap cables or crack porcelain. Always use manual cranking—it gives you control to sense clog composition. If resistance remains after 30 seconds of cranking, the blockage is likely too dense; withdraw and restart with more cable extension.
Step 4: Withdrawing the Auger Without Spilling Debris
After breaking or hooking the clog, reverse the crank counterclockwise while slowly pulling the cable upward. Keep the sleeve pressed against the rim to catch drips. As the cable emerges, wipe debris off with a rag held in your non-dominant hand—never let it dangle over the bowl. For hooked objects, pull steadily until the item clears the rim, then drop it into a plastic bag. If sludge coats the cable, retract it fully into the auger tube before cleaning to avoid messes. This step takes 20 seconds but prevents biohazard spills on your floor.
Step 5: Testing Flush Success After Auger Use
Flush once and watch the water level. It should drop rapidly and refill normally within 30 seconds. If water drains slowly, repeat Steps 2-4 with 2 extra inches of cable extension—the clog may have shifted. Never flush multiple times consecutively; this risks overflow if debris remains. After a successful flush, run water in the sink to confirm mainline clearance. For persistent issues, wait 10 minutes before retrying—sometimes broken-up material needs time to disperse. If two attempts fail, the blockage is likely beyond your reach; call a plumber to avoid worsening it.
3 Costly Mistakes That Crack Toilets During Auger Use
Forcing the cable when stuck: Applying excessive pressure cracks porcelain at the bowl base. If the cable won’t advance after gentle cranking, withdraw and restart—don’t “muscle through.”
Skipping the protective sleeve: Operating without the rubber guard leaves deep scratches that harbor bacteria. Always ensure it’s seated firmly against the rim before insertion.
Using chemical drain cleaners first: These corrode rubber seals inside the tank and create toxic fumes when mixed with waste. Never combine chemicals with mechanical tools—they weaken pipes, making cracks more likely during augering.
When to Stop and Call a Professional Plumber Immediately
Put down the Husky auger if you encounter:
– Cable resistance within 3 inches of insertion: Indicates a broken pipe or collapsed mainline—DIY attempts will flood your bathroom.
– Water leaking around the toilet base during use: Signals a failed wax ring; continuing auger pressure worsens leaks.
– Repeated clogs in 48 hours: Suggests a main sewer line blockage requiring a 100-foot auger or hydro-jetting.
– Non-flushable objects stuck deep: Like phones or jewelry—plumbers have retrieval cameras to avoid damaging fixtures.
A professional call costs $150-$300 but prevents $1,000+ water damage repairs. If you’re unsure after two auger attempts, stop—you’ve done all a homeowner safely can.
Mastering how to use a Husky toilet auger saves you $200+ per plumber visit while giving instant relief from bathroom emergencies. Remember the core sequence: lower water → form J-shape → feed gently → crank manually → withdraw carefully → test flush. Store your auger under the sink with gloves and glasses for next time. For recurring clogs, install a toilet-specific strainer to catch non-flushable items before they cause disasters. Most importantly, never fear the auger—its simplicity makes it the most reliable tool in your plumbing arsenal. When that dreaded gurgle starts next time, you’ll clear it before your coffee gets cold.


