

That wobbly handheld drill just can’t deliver the precision you need for perfect holes in your latest project. If you’ve ever struggled with angled holes, inconsistent depths, or dangerous kickbacks, mastering how to use drill press techniques will transform your workshop results. Unlike portable drills, this stationary powerhouse delivers unmatched accuracy, repeatability, and control for wood, metal, and plastic. Whether you’re building furniture, fabricating metal parts, or crafting intricate models, proper drill press operation eliminates guesswork and prevents costly mistakes. In this guide, you’ll learn exactly how to set up, operate, and maintain your drill press safely while achieving professional-quality results on your very first attempt.
Critical Safety Setup Before Powering On
Skipping safety checks turns your drill press from a precision tool into a projectile launcher. Before you even plug in the machine, your workspace must become a controlled environment where every variable is managed. This foundational step separates confident operators from accident victims.
Eliminating Workspace Hazards in 60 Seconds
Your drilling accuracy depends entirely on a stable foundation—both for the machine and your footing. Start by clearing a 3-foot radius around the drill press of all clutter, tools, and debris that could cause tripping. Ensure the concrete or wood floor beneath the base is completely dry and level; even a slight tilt compromises hole perpendicularity. Securely bolt the drill press stand to the floor or anchor it to a 4-inch-thick workbench using 3/8-inch lag bolts. Never operate a wobbling drill press—it creates dangerous harmonic vibrations that can snap drill bits at 2,000 RPM. Crucially, position your work lights to illuminate the drilling zone without casting shadows on your workpiece. This simple visual check prevents misaligned holes before you even start.
Identifying and Verifying Machine Components
Knowing every lever and dial prevents panic during operation. Locate your drill press’s critical control points before loading a bit: The quill lock (usually a knob on the head) immobilizes the spindle for precise depth setting. The table height adjustment (a rack-and-pinion lever near the column base) raises/lowers your work surface. Most importantly, find the emergency stop button—typically red and prominently placed—and confirm it works during your pre-use inspection. Check that the chuck key is fully inserted in its holder; leaving it in the chuck during operation causes catastrophic imbalance. Run your finger along the spindle shaft to verify it’s clean and free of burrs that could damage drill bit shanks. If your model has a belt guard, ensure it’s latched—this simple shield prevents hair or clothing from contacting moving belts.
Perfect Hole Execution: Bit Selection to Depth Control

Choosing the wrong bit or skipping setup steps guarantees tear-out, burning, or broken tools. Professional results come from methodically matching your drill bit to the material and implementing foolproof depth control—every single time.
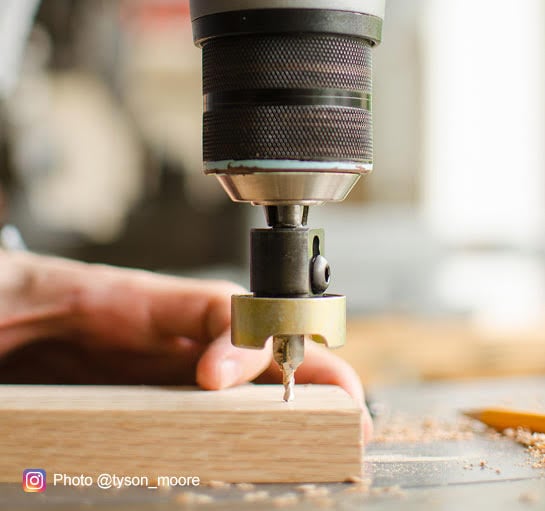
Installing Drill Bits Without Common Costly Mistakes
Selecting the right bit makes or breaks your hole quality. For clean wood holes, brad-point bits prevent wandering with their center spur. When drilling metal, cobalt-tipped twist bits withstand heat better than standard HSS. Always verify bit shank compatibility—never force a tapered-shank bit into a chuck designed for straight shanks. To install: Unplug the machine, open the chuck jaws fully with the chuck key, insert the bit shank 80% of its length, then tighten in a star pattern (turn key in one hole, rotate 120 degrees, repeat). Critical mistake alert: After tightening, remove the chuck key immediately and return it to its clip. A forgotten key becomes a lethal projectile when the spindle spins. Test bit security by gently wiggling it—if movement occurs, repeat the tightening sequence.
Securing Workpieces and Setting Depth Stops Correctly
This is where 90% of drill press accidents happen. Never hold workpieces by hand—even small blocks can spin violently when a bit catches. Instead, clamp metal stock in a drill press vise with soft jaws to prevent marring, or use bar clamps for wood pieces against a sacrificial backing board. Position your workpiece so the drill bit contacts an unblemished area—never drill near existing holes or edges where tear-out occurs. For depth control: Lower the quill until the bit tip touches the work surface, then lock the depth stop collar at that position. Need through-holes? Place a scrap wood block underneath your workpiece and drill until the bit pierces the backing board—this prevents blowout on the exit side. For countersunk holes, set the depth stop 1/16″ shallower than the screw head depth to avoid over-drilling.
Matching Drill Speed to Material and Bit Size
Running at incorrect RPMs destroys bits and workpieces within seconds. Follow this foolproof speed guide: For 1/8″ twist bits in softwood, use 3,000 RPM; for 1/2″ Forstner bits in oak, drop to 600 RPM. Metal requires even slower speeds—1/4″ bits in steel need just 400 RPM. Locate your machine’s speed chart (usually on the head casting) and adjust the belt on the pulley system while unplugged. When in doubt, start slower—you can always increase speed if the bit isn’t cutting efficiently. Listen for warning signs: A high-pitched squeal means RPMs are too high for the material, while motor bogging down indicates insufficient speed. For aluminum or plastics, apply light downward pressure; for hardwoods or metals, use heavier, steady force.
Drilling Operations: From Basic Holes to Precision Angles
Now you’re ready to create perfect holes consistently. The difference between amateur and professional results lies in technique execution—especially controlling feed rate and chip management during drilling.
Executing Flawless Holes with Peck Drilling Technique
Begin every hole with these non-negotiable steps: Plug in the machine, put on safety glasses, position your body to the side (never directly over the bit), and start the spindle. Wait 3 full seconds for the motor to reach target RPM before contacting the workpiece. Apply smooth, consistent pressure—imagine pushing a thumbtack into cork—never hammering force. For holes deeper than the bit diameter, use peck drilling: Lower 1/8″, retract fully to clear chips, repeat. This prevents chip packing that causes overheating and bit breakage. When drilling metal, apply cutting fluid with a brush every 2-3 pecks—never use water on aluminum. Stop immediately if you smell burning or see smoke; these indicate dangerous overheating. Always let the spindle stop completely before removing workpieces.
Creating Precision Layouts with Fences and V-Blocks
Achieve repeatable hole patterns without measuring each time. For parallel holes along a board edge, clamp a straight hardwood fence 2″ from the bit center using T-bolts through the table slots. Test with scrap wood first—adjust fence position until holes consistently hit your layout lines. Drilling dowel centers in round stock? Secure a V-block in your vise with the “V” facing up, then clamp the workpiece into the groove. This prevents rolling while allowing clean chip ejection. For angled holes up to 45 degrees: Unlock the table tilt mechanism, set your desired angle using a digital protractor, then re-clamp the workpiece firmly against the angled surface. Double-check alignment with a square before drilling—tilted tables shift easily under pressure.
Advanced Applications and Maintenance Protocols
Your drill press can perform operations far beyond basic drilling, but only with proper accessories and upkeep. Skipping maintenance turns minor issues into expensive repairs within months.
Expanding Capabilities with Specialty Bits and Attachments
Transform your drill press into a multi-functional workstation with these pro techniques: For countersinking, install a 45-degree countersink bit after drilling the pilot hole and lower until the conical recess matches your screw head. Counterboring requires a Forstner bit to create a flat-bottomed recess—set the depth stop precisely to the bolt head thickness. To sand concave surfaces, mount a spindle sander drum in the chuck and run at 800 RPM max (excessive speed throws abrasive particles dangerously). When polishing metal parts, use a buffing wheel with tripoli compound at 500 RPM. Critical reminder: Always reduce speed by 50% for sanding/polishing operations and engage the quill lock to prevent accidental depth changes.
Preventing Costly Failures with 5-Minute Weekly Maintenance

Dedicate 5 minutes after each use to extend your drill press lifespan by decades. Start by blowing chips from the quill with compressed air—metal shavings accelerate spindle wear. Wipe the column and table with a microfiber cloth dampened with mineral spirits to remove sticky pitch and metal fines. Apply 2 drops of 3-in-1 oil to the depth stop threads and quill rack teeth. Check belt tension weekly by pressing the center of the belt—it should deflect 1/2″ maximum. If you hear grinding noises, inspect pulley alignment; misaligned pulleys destroy belts in hours. Troubleshooting tip: If holes drift off-center, square the table to the spindle using a machinist’s square and adjust the table mounting bolts. For persistent vibration, tighten the base bolts and verify the chuck is clean and undamaged.
Mastering how to use drill press techniques transforms frustrating projects into precision successes. By implementing these safety protocols, bit selection methods, and depth control systems, you’ll consistently drill clean, accurate holes on your first attempt—saving hours of rework and costly material waste. Remember that professional results come from respecting the machine’s power through proper setup, not brute force during operation. Maintain these habits, and your drill press will deliver flawless holes for decades while keeping you safe in the workshop. Now unplug that handheld drill for precision work—you’ve earned the right to claim your drill press as the centerpiece of your tool arsenal.


