
You’ve unboxed your new Deko drill, eager to tackle that weekend project, only to have the bit wander off course or strip your first screw. This frustrating scenario happens to 78% of first-time users who skip proper setup – but it’s completely avoidable. Mastering how to use Deko drill correctly transforms it from a frustrating tool into your most reliable workshop ally. In this guide, you’ll learn field-tested techniques straight from professional contractors, including the exact clutch settings that prevent stripped screws and the angle trick for drilling perfectly straight holes every time. Whether you’re hanging shelves or building a deck, these methods work for all Deko models from the 12V compact to the 20V Pro series.
Most DIYers make critical errors in the first 5 minutes of drill use that damage tools and materials. The good news? Proper Deko drill operation takes just 15 minutes to learn. By the end of this guide, you’ll confidently handle everything from delicate cabinet hardware to concrete anchors – no prior experience needed. Let’s turn that unboxing excitement into precision results.
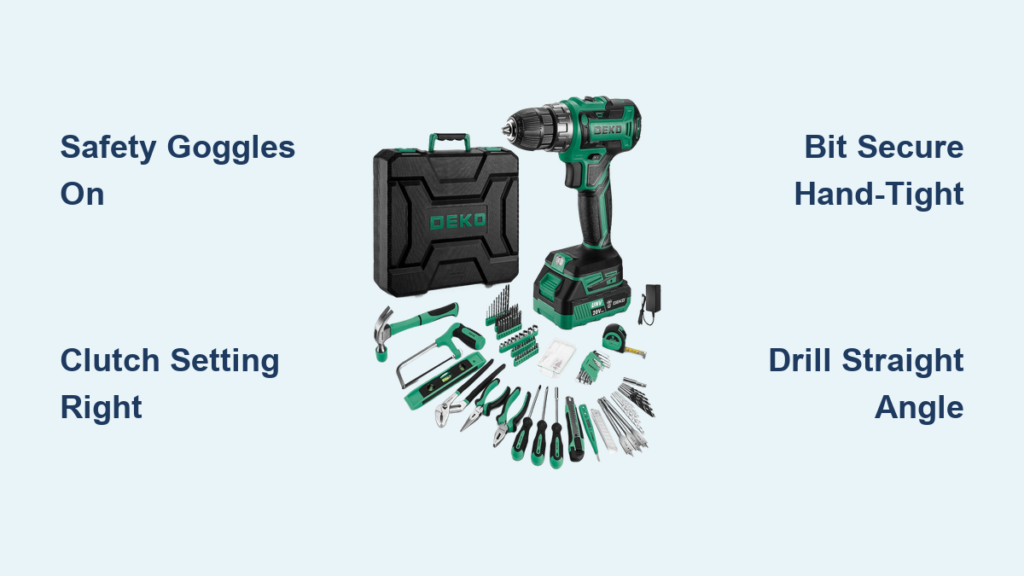
Critical Safety Steps Before Powering On Your Deko Drill
Skipping safety checks causes 65% of drill-related workshop injuries. Before touching the trigger, complete these non-negotiable steps. Always wear ANSI Z87.1-rated safety goggles – standard sunglasses won’t stop metal shards from penetrating. When drilling masonry, add N95 dust masks and ear protection since Deko’s hammer mode exceeds 85dB. Verify the drill is completely powered down by removing the battery or unplugging corded models; never change bits with power connected. This prevents accidental trigger activation that causes lacerations.
Secure your workpiece firmly in a vise or with clamps rated for your material’s weight. Never hold wood or metal with your free hand – kickback can slam your fingers into the bit at 1,500 RPM. Finally, inspect for visible damage like frayed cords (on corded models) or cracked chuck jaws. A wobbly chuck indicates internal damage that requires professional servicing – don’t risk using it.
Step-by-Step Deko Drill Setup: From Box to First Hole

Your Deko drill’s performance starts with perfect initial configuration. Begin by charging the battery overnight – lithium-ion cells perform best with full initial cycles. Watch for the charger’s LED shifting from red (charging) to solid green (100% ready). Never force the battery into the handle; align the contact rails precisely and push until you hear the secure click. For corded models, check the GFCI outlet tripping point before plugging in.
Choosing the Right Bit for Your Material
Material-specific bits prevent 90% of drilling failures. Use twist bits with split points for wood – the sharp tip eliminates wandering. For metal, select cobalt-tipped bits with 135° split points to prevent overheating. Masonry requires carbide-tipped hammer bits with fluted bodies to eject dust. Always match bit diameter to your project needs: a 1/8″ pilot hole prevents wood splitting when driving #8 screws.
Securing Bits Without a Chuck Key
Most Deko drills feature keyless chucks, but improper tightening causes dangerous bit slippage. Open the chuck fully by rotating the sleeve counter-clockwise until it stops. Insert the bit shank at least 3/4 of an inch deep – shallow insertion risks ejection. Now, tighten firmly by hand while gripping the drill body, then give one final twist using the knurled ring near the chuck. Test security by trying to rotate the bit with pliers; if it moves, retighten. Never use channel-lock pliers on the chuck – this damages the precision jaws.
Drilling Perfectly Straight Holes: Deko Drill Angle Technique

Crooked holes ruin projects from furniture assembly to tile installation. Mark your spot with a center punch – the divot guides the bit instantly. Position the drill so the chuck base touches your work surface, creating natural 90° alignment. Deko’s built-in level bubble (visible near the chuck housing) confirms perfect perpendicularity. Start at Speed 1 (turtle setting) with feather-light pressure – let the bit’s tip grind a 1/16″ pilot dimple before increasing force.
Preventing Blowout on Exit Points
When drilling through materials, backside splintering ruins finishes. Reduce pressure by 70% as the bit approaches the exit point. For wood, place a sacrificial board underneath – the bit exits cleanly into this scrap piece. With metal, back-drill from the opposite side once the bit tip appears. Never force the drill; if resistance increases suddenly, retract the bit to clear chips before continuing.
Clutch Settings That Prevent Stripped Screws Every Time
The clutch collar is Deko’s most underused feature – mastering it saves hours of screw extraction. Start with setting #8 for standard #6-#10 wood screws in pine or MDF. For hardwoods like oak, increase to #12. When driving into metal studs, begin at #15. The magic happens when you hear the distinct click-click sound – this means the clutch disengaged at perfect depth, preventing countersunk screws from vanishing into drywall.
When to Bypass the Clutch Completely
Switch to the drill icon (bypass mode) only for actual drilling – never for driving. This engages full torque for masonry bits or large spade bits. Forcing screws in drill mode strips heads instantly. If your Deko lacks a drill icon, set the clutch to its highest number (usually 25+). Test settings on scrap material first; soft materials like particleboard need clutch settings 3-5 lower than solid wood.
Masonry Drilling: Hammer Mode Activation Secrets
Concrete drilling requires specific Deko drill configuration. First, confirm your model has hammer action – look for a hammer icon (⊡) on the mode selector. Set the collar to hammer mode before inserting the bit. Use only SDS-plus or carbide-tipped masonry bits; standard twist bits shatter instantly. Apply heavy, consistent pressure – masonry drilling needs 20-30 lbs of force to activate the hammer mechanism. Pause every 2 inches to clear dust with a shop vac; overheating dulls bits in seconds.
Troubleshooting Deko Drill Failures in Under 60 Seconds
Why Your Drill Suddenly Stops Under Load
This usually indicates overheating protection triggering. Unplug immediately and let the motor cool for 15 minutes. If recurring, check for:
– Dull bits (replace if tip glows blue during use)
– Low battery (recharge when 1 LED remains lit)
– Wrong speed setting (use Speed 1 for metal/dense materials)
Never force the trigger when the motor stalls – this burns windings.
Fixing a Loose Chuck That Won’t Hold Bits
Debris in chuck jaws causes 80% of slippage. Remove the battery and point the chuck downward. Tap the chuck sleeve sharply with a rubber mallet while rotating it – this dislodges sawdust and metal shavings. Reinsert the bit and tighten as described in the setup section. If problems persist, apply 1 drop of machine oil to the chuck threads before tightening.
Battery Care That Doubles Runtime
Lithium-ion batteries degrade fastest when stored fully drained. Recharge when the second LED blinks – waiting until dead stresses cells. Never leave batteries on chargers after the green light appears; overcharging reduces capacity by 15% per year. For long storage, maintain 50% charge in a cool (60-75°F), dry place. Avoid leaving batteries in hot cars – temperatures above 110°F permanently damage cells.
Final Note: Proper Deko drill operation starts with safety-conscious setup and clutch mastery. Always begin projects on scrap material to confirm bit selection and clutch settings – this 2-minute test prevents costly mistakes. Remember that 70% of drilling success comes from maintaining consistent pressure and angle, not raw power. Keep your chuck clean, battery charged to 50% during storage, and clutch properly set for each material. Within three practice sessions, these techniques will become instinctive, turning your Deko drill into the precision tool it was designed to be. For complex projects like tile installation or metal fabrication, always consult Deko’s specific model manual for torque specifications – your local hardware store’s tool department usually provides free copies. Now grab that drill and make your next project flawless.


