
You’ve stared at that concrete wall, drill in hand, watching your standard drill bit skitter uselessly across the surface. That frustrating bounce-back happens because concrete demands specialized technology—not brute force. An SDS drill solves this with its unique slotted drive system and piston-powered hammer action, delivering up to 4,500 impacts per minute to pulverize masonry efficiently. Whether you’re installing conduit in a basement or mounting shelves on brick, how to use an SDS drill properly separates professional results from DIY disasters. This guide cuts through the confusion with field-tested techniques for clean, straight holes every time—no more wandering bits or shattered anchors.
Most beginners make the critical error of treating an SDS drill like a heavy-duty version of their cordless drill. That mistake leads to dangerous kickback, ruined bits, and uneven holes that compromise anchor strength. The reality? SDS drills require specific handling: controlled forward pressure, mode selection discipline, and bit maintenance that standard drills don’t demand. By the end of this guide, you’ll confidently tackle concrete, brick, and stone with techniques that save hours of rework while extending your tool’s lifespan. Let’s transform your masonry drilling from guesswork to precision.
Essential Safety Steps Before Touching That Trigger
Skipping proper safety prep with an SDS drill risks serious injury from kickback or silica dust inhalation. Unlike regular drills, the hammer mechanism generates violent rotational forces that can twist the tool from your grip if improperly handled. Always implement these non-negotiable precautions before powering on.
Mandatory Personal Protective Equipment Checklist
Wear ANSI Z87.1-rated safety goggles—standard glasses won’t stop concrete fragments from high-speed impacts. Pair these with an N95 respirator or P100 cartridge mask; drilling concrete releases crystalline silica dust linked to lung disease. Add hearing protection for sessions over 15 minutes, as SDS drills operate at 90+ decibels. Never skip the auxiliary handle attachment; it provides critical leverage to control sudden torque reversals during bit binding.
Pre-Use Tool Inspection Protocol
Unplug corded models or remove batteries before inspection. Check for cracked housing near the chuck—this indicates internal hammer mechanism damage. Test the chuck sleeve action: it should slide back smoothly without sticking. Verify the mode selector clicks firmly between positions. Examine the power cord for nicks exposing copper wires; frayed cords cause electrocution risks in damp environments. If your drill vibrates excessively during test runs, stop immediately—this signals failing bearings.
Decoding Your SDS Drill’s Critical Components
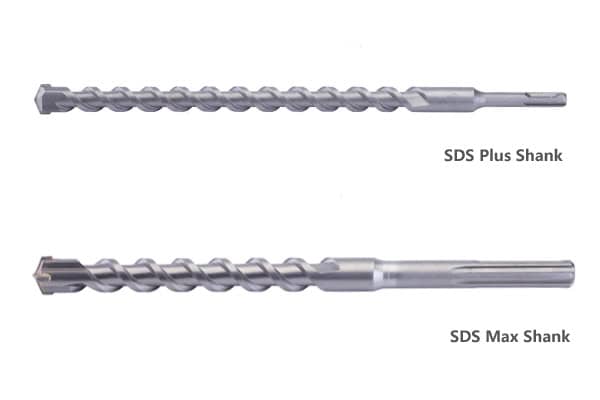
Understanding what makes an SDS drill unique prevents costly operational errors. The “SDS” (Slotted Drive System) refers to the specialized shank design that allows bits to slide within the chuck while delivering hammer blows. Confusing SDS-Plus with SDS-Max components can destroy your tool.
Identifying SDS Chuck Types and Compatibility
Your drill’s chuck determines bit selection: SDS-Plus (10mm shank) handles bits up to 1-1/8″ diameter for residential work, while SDS-Max (18mm shank) tackles 2″+ bits for demolition. Never force an SDS-Plus bit into an SDS-Max chuck—this damages the locking mechanism. Look for the chuck type stamped near the sleeve. Pro tip: SDS-Plus is 95% of DIY needs; if you’re not breaking up sidewalks, avoid oversized SDS-Max models.
Hammer Mechanism vs. Rotation: When to Use Which
The hammer function (depicted by a hammer icon) engages a piston that delivers forward impacts—essential for concrete but disastrous on wood or metal. The drill-only mode (single rotating circle icon) disengages hammering for clean holes in softer materials. Critical mistake alert: running hammer mode on steel overheats bits and strips screw heads. Always match the mode to your material—concrete requires both icons active.
Selecting and Installing the Correct SDS Bit

Using the wrong bit type or installation method causes 70% of SDS drilling failures. Masonry bits feature tungsten carbide tips brazed to SDS shanks, while regular twist bits shatter under hammer action. Your anchor size dictates the bit diameter—not vice versa.
Matching Bit Size to Anchor Requirements
For 1/4″ concrete anchors, drill a 3/16″ hole; for 1/2″ anchors, use a 7/16″ bit. This 1/16″ oversize accommodates dust clearance and ensures proper anchor expansion. Deep holes (>2″) require stepped bits or extensions—never force standard bits beyond their flute length. Always choose carbide-tipped bits; cheaper alternatives wear 3x faster in abrasive concrete.
Proper Bit Insertion and Removal Technique
Pull the chuck sleeve fully rearward, insert the bit until it clicks (you’ll feel two distinct detents), then release the sleeve. To remove, pull the sleeve back and yank the bit straight out—no twisting. If the bit sticks, lightly tap the chuck rearward with a rubber mallet before pulling. Never hammer on the bit shank to remove it; this damages the chuck’s internal balls.
Preventing Bit “Walking” on Smooth Surfaces
The moment your SDS bit contacts concrete determines hole accuracy. Unmarked surfaces cause bits to skate dangerously across the material, creating crescent-shaped entry points that ruin anchor grip. This isn’t a drill power issue—it’s physics.
Creating a Positive Bite Point
Use a center punch and hammer to make a 1/8″ deep divot at your mark. On polished concrete, first drill a 1/4″ pilot hole with a masonry bit in drill-only mode to create a starting recess. Hold the drill perpendicular and apply light pressure while triggering at 25% speed until the bit bites 1/4″ deep—then increase to full power. This initial “bite” phase prevents 90% of wandering.
Mastering Drill Pressure and Technique
SDS drills require counterintuitive handling: too little pressure causes bit overheating, while excessive force stalls the hammer mechanism. Concrete drilling isn’t about muscle—it’s about rhythm and feedback interpretation.
The Goldilocks Pressure Principle
Apply just enough forward force to maintain consistent dust ejection from the hole. You’ll feel the drill “pulse” rhythmically in your hands—that’s optimal pressure. If the drill bogs down with a grinding noise, reduce pressure; if it skitters without penetrating, increase slightly. For vertical holes, let the drill’s weight provide pressure—don’t lean into it.
Dust Clearing Rhythm for Deep Holes
Every 1-1/2″ of depth, retract the bit halfway while maintaining rotation. This clears the flutes of concrete dust that otherwise causes binding and overheating. For holes over 4″, pause drilling every 10 seconds to fully withdraw the bit and blow debris from the hole. Skipping this step jams bits 3x more frequently according to contractor field reports.
Diagnosing Drilling Sounds for Instant Troubleshooting
Your SDS drill communicates through sound—learn its language to prevent bit breakage and motor strain. Ignoring audio cues leads to unnecessary tool damage.
Critical Sound Signatures Decoded
A high-pitched whine with slow progress means a dull bit—replace immediately. A rhythmic “thump-thump” indicates proper hammer engagement; a muffled thud suggests excessive pressure. If the drill suddenly speeds up with no resistance, the bit has snapped inside the hole. Never continue drilling—extract the broken piece with needle-nose pliers before restarting.
Emergency Bit Jam Response Protocol
If the bit binds mid-drill: release the trigger, switch to reverse mode, and gently pull while triggering at 10% power. If stuck, tap the chuck rearward with a mallet to free internal balls. For deep jams, insert a screwdriver through the chuck vents and lever the bit loose. Never force rotation—that strips the SDS shank.
Optimizing Bit Longevity with Smart Practices
SDS bits cost $15-$50 each, but improper use cuts their life by 80%. Carbide tips fracture when overheated or misused, turning expensive bits into dust collectors.
Heat Management for Maximum Bit Life
Drill for 15 seconds, then withdraw for 5 seconds to cool. In dense concrete, use water misting (not soaking) to reduce temperatures below 300°F—the point where carbide begins to degrade. Never drill continuously beyond 30 seconds; thermal shock cracks the brazed joint. Store bits in foam-lined cases—tossing them in toolboxes chips the delicate carbide edges.
Anchor Installation: The Final Critical Step
A perfect hole means nothing if anchors aren’t set correctly. Dust contamination is the #1 cause of anchor failure, yet most DIYers skip this step.
Hole Preparation Checklist for Anchor Success
Blow debris from holes using an air compressor or hand blower—never your mouth (silica risk). For oil-lubricated anchors, wipe the hole with a clean rag. Drill holes 1/8″ deeper than anchor length to capture settling dust. Insert anchors with a rubber mallet; hammering directly on plastic anchors cracks them. Test anchor strength by applying gradual torque before final installation.
Mastering how to use an SDS drill transforms intimidating concrete projects into routine tasks. Remember: proper PPE prevents injury, matching bits to anchors ensures hold strength, and listening to your drill avoids costly mistakes. Keep bits sharp, modes correctly set, and dust cleared—these small disciplines deliver professional results. For your next project, start with a center-punched divot and let the hammer action do the work; within minutes, you’ll drill cleaner holes than you thought possible. Now grab your SDS drill and conquer that concrete wall—you’ve earned the confidence.


