
That frustrating moment when your power drill shreds delicate model parts or sends tiny jewelry components flying is why precision craftsmen swear by the humble pin vise hand drill. This indispensable tool delivers surgical accuracy for drilling holes under 1/8 inch where power tools fail—whether you’re building scale models, setting gemstones, or assembling circuit boards. Unlike electric drills that spin at dangerous speeds for micro-work, the pin vise puts you in complete control through hand-powered rotation. In this guide, you’ll discover exactly how to use a pin vise hand drill to achieve clean, straight holes every time, avoiding the broken bits and crooked holes that plague beginners. Forget generic advice—you’ll learn field-tested techniques for bit selection, grip methods, and troubleshooting that transform this simple tool into your most trusted precision instrument.
Critical Safety Steps Before Using Your Pin Vise Hand Drill
Skipping safety measures with a pin vise risks injury and ruined projects. Always secure your workpiece in a bench vise or third-hand tool—never hold small items in your palm while drilling, as sudden bit engagement can cause dangerous slippage. Position your body so the drill axis aligns with your dominant eye for optimal perpendicularity. Wear ANSI-approved safety glasses to protect against microscopic shavings that can fly unexpectedly when drilling metals or hard plastics. Crucially, verify your drill bit is fully seated in the chuck before applying pressure; a loose bit can eject at high speed during rotation. These non-negotiable steps prevent the most common workshop injuries associated with micro-drilling tasks.
Why Hand-Holding Workpieces Guarantees Disaster
Holding components manually while drilling creates fatal instability. Even slight hand tremors translate to significant bit wobble at microscopic scales, causing bits to snap or drill off-axis. When pressure builds during metal penetration, the workpiece can suddenly spin free—a 3mm brass gear fragment propelled by drill rotation can cause serious eye injury. Always use non-marring jaws in your vise to protect delicate surfaces. For irregular shapes, embed parts in sticky wax or vise compound before securing.
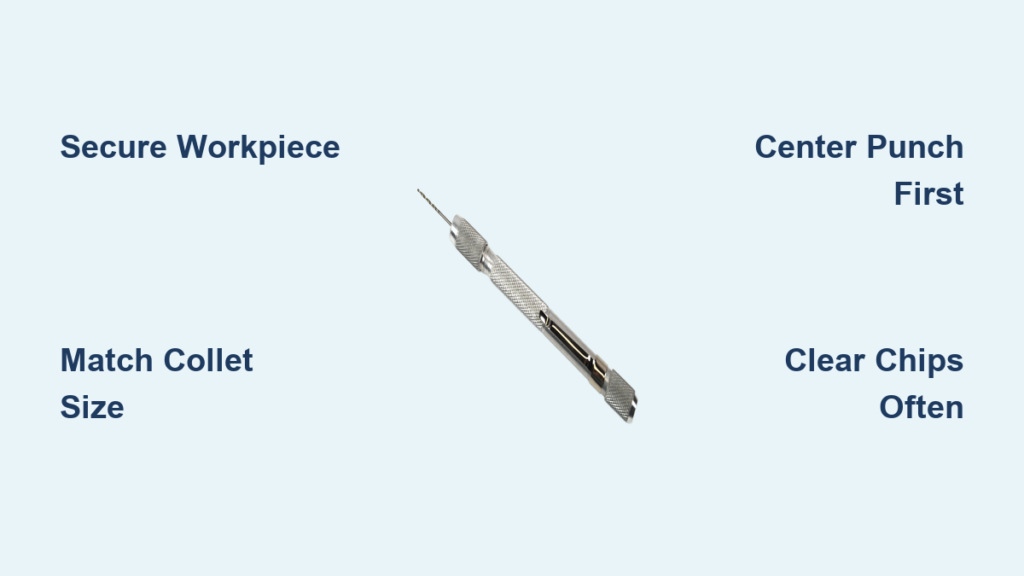
Pin Vise Anatomy: Chuck, Collets, and Handle Explained

Your pin vise isn’t just a simple chuck—it’s an engineered system where each component enables micro-precision. The rotating front section is the chuck, housing precision-ground jaws that tighten around drill bits. Inside sits the critical collet: a tapered sleeve with split sides that contracts when tightened to grip specific shank diameters. Most quality vises include multiple collets (typically 0.5mm to 3mm) to accommodate different bit sizes. The handle provides torque leverage, while the rear cap often doubles as a tightening wrench. Understanding this interplay prevents the #1 beginner mistake: forcing mismatched bits into incorrect collets.
How Collet Mismatch Causes 90% of Bit Failures
Forcing a 1.0mm shank bit into a 1.5mm collet creates dangerous wobble that multiplies centrifugal force at high hand-rotation speeds. This misalignment concentrates stress on microscopic weak points in the bit, causing sudden fractures. Always match bit shank diameter to collet size—measure both with digital calipers if uncertain. A properly fitted bit will rotate without visible runout when viewed against a straight edge. Never use pliers to tighten the chuck; uneven pressure distorts collets permanently.
Perfect Grip Technique for Steady Pin Vise Drilling
Achieve surgical control with this two-handed grip method proven by master jewelers. Cradle the pin vise barrel firmly in your dominant hand’s palm, fingers wrapped around the handle near the chuck. Place your non-dominant hand’s thumb and forefinger on the rear cap, applying gentle forward pressure while stabilizing the tool’s axis. Keep elbows braced against your torso to eliminate arm tremors. For overhead work, rest your dominant wrist on a stable surface. This “pistol grip plus stabilizer” technique maintains perpendicularity better than single-handed approaches.
Drilling Perpendicular Holes on Vertical Surfaces
When working on wall-mounted projects like model train scenery, use a right-angle drill guide block clamped to your workpiece. Mark the hole location with a fine-tip scribe, then rest the pin vise against the guide’s horizontal surface while applying downward pressure. For curved surfaces like jewelry rings, wrap the piece in thin copper wire before securing in a flex-shaft vise—the wire prevents marring while providing a flat drilling platform.
Drill Clean Holes: 4-Step Pin Vise Technique
Follow this battle-tested sequence for professional results on your first attempt. This method works for plastics, woods, and soft metals like brass—critical for model railroaders drilling tie plates or hobbyists assembling RC aircraft.
Create an Unbreakable Starting Point
Skip the center punch dimple and you’ll battle bit wander every time. Use a hardened steel scriber to mark your exact hole location, then press a sharp center punch into the mark with a jeweler’s hammer. For metals, create a 0.2mm deep conical starter—deep enough to anchor the bit tip but shallow enough to avoid distorting thin materials. On acrylic or balsa wood, substitute a pin prick from a sewing needle.
Secure Workpiece and Align Bit
Clamp your material in a machinist’s vise with soft jaws, ensuring zero movement. Position the bit tip precisely in the starter dimple. Hold the pin vise perpendicular using a digital angle gauge app on your phone—many smartphones have built-in levels accurate to 0.5 degrees. For absolute precision, rest the vise barrel against a machinist’s square.
Execute the Perfect Drilling Motion
Apply gentle thumb pressure while rotating the handle with a smooth back-and-forth “rocking” motion (not continuous rotation). Start with 10-15 RPM—about one full turn per second. After 3-4 rock cycles, pause to clear chips by reversing direction. For holes deeper than 3x the bit diameter, use the “drill 2 turns, reverse 1 turn” rhythm to prevent chip packing. Let the bit’s cutting edges shear material—never force downward pressure.
Chip Management for Deep Holes
Clogged flutes cause 70% of bit breakages in deep drilling. After every 0.5mm of penetration, fully withdraw the bit while rotating to eject chips. For holes exceeding 5mm depth, flood the area with mineral oil using a syringe to lubricate and float debris. In aluminum, beeswax applied to the bit shank reduces galling—never use water-based lubricants that cause corrosion.
Fix These 3 Common Pin Vise Hand Drill Problems

Stop Bits From Walking on Metal Surfaces
When your bit skitters across polished brass or stainless steel, increase your starter dimple depth to 0.3mm using a spotting drill bit in your pin vise. Apply downward pressure while rotating the spotting bit for 5 seconds to create a conical guide. For stubborn materials, chill the workpiece in a freezer for 10 minutes—the thermal contraction improves bit bite.
Prevent Micro Bit Breakage (#80 and Smaller)
Bits under 0.3mm diameter snap from three culprits: misalignment, excessive pressure, or poor collet fit. Verify concentricity by rotating the chuck against a magnifying lamp—any visible wobble requires collet replacement. Drill with feather-light pressure—your thumb should barely indent softwood. For #80 bits (0.29mm), use the Starrett 162A vise with its precision micro-collet. Never attempt to drill hardened steel with micro bits; pre-anneal the area with a soldering iron.
Rescue a Stuck Bit in the Chuck
When bits seize from heat or corrosion, grip the chuck firmly in padded vise jaws and tap the rear cap counterclockwise with a brass hammer. If threads are frozen, apply a single drop of penetrating oil to the collet seam and wait 15 minutes. Never use heat—the chuck’s temper will be ruined. For prevention, apply a micro-thin layer of anti-seize compound to bit shanks before insertion.
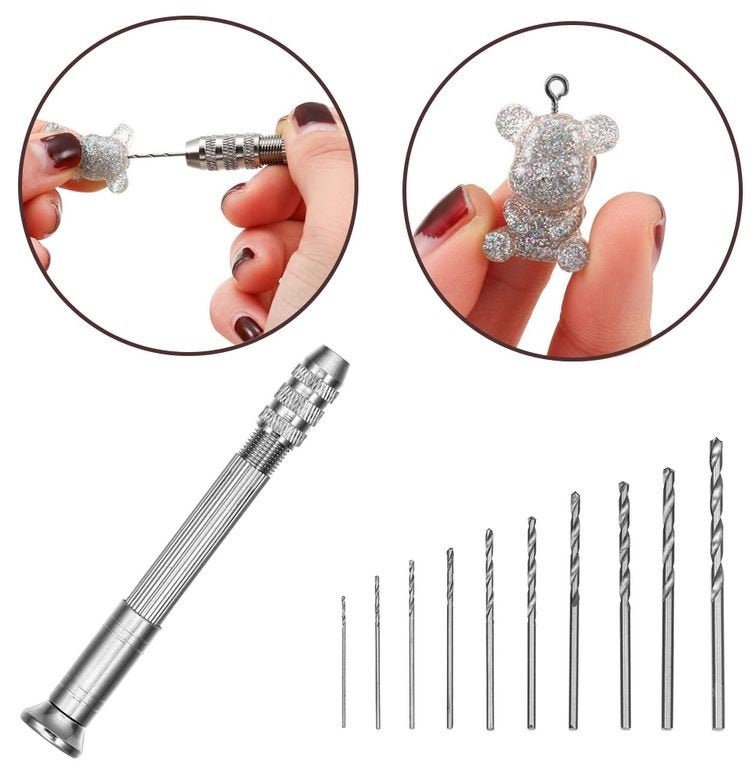
Selecting the Best Pin Vise and Drill Bits for Your Project
Choose your tool based on bit size requirements, not price. For general model work (0.8-2.0mm holes), the Xuron 47512 with five precision collets offers best value. When drilling watch components or PCB vias under 0.5mm, invest in the Starrett 162A—it maintains 0.002mm runout accuracy critical for micro-drilling. Match bits to your material: use brad-point bits for clean wood holes, split-point for metals, and carbide-tipped for fiberglass. Always buy premium HSS bits—dull or cheap bits require destructive force that defeats the pin vise’s purpose.
Emergency Fixes for Missing Micro Collets
Without the correct collet for #70-80 bits, wrap the shank once with 0.05mm-thick Kapton tape—never electrical tape which compresses under pressure. For temporary jewelry repairs, drill a 0.5mm hole in brass rod, then press your micro bit into the hole as a makeshift collet. Remember: these are field fixes only; precision work demands properly sized collets.
Mastering the pin vise hand drill transforms frustrating micro-projects into satisfying successes. By implementing these specific techniques—especially the critical center punch step and chip-clearing rhythm—you’ll achieve professional results where power tools fail. Remember that 90% of success comes from proper bit-to-collet matching and perpendicular alignment; speed and pressure matter far less than precision setup. For ongoing success, store your pin vise with a protective cap over the chuck to prevent collet damage, and inspect bits under 10x magnification before use—microscopic nicks cause catastrophic failures. Now that you know how to use a pin vise hand drill correctly, tackle those delicate projects with new confidence. Ready to advance? Explore precision center punch techniques for curved surfaces in our companion guide to micro-assembly.


