
A dull drill bit can turn even the simplest project into a frustrating ordeal. You’ve likely experienced the telltale signs: excessive heat, wandering bits, oversized holes, or that unpleasant squealing sound as the drill struggles to cut. The secret to solving these common drilling problems lies not just in sharpening your bits, but in sharpening them correctly—and that’s where a drill point gauge becomes indispensable. Knowing how to use a drill point gauge transforms your sharpening from guesswork into a precise science, ensuring your drill bits cut cleanly, last longer, and deliver professional results every time. Whether you’re a weekend DIYer or a professional craftsman, this guide will show you exactly how to use a drill point gauge to achieve perfectly sharpened drill bits that perform like new.
Drill bits lose their edge quickly when working with tough materials, and improper sharpening is one of the most common reasons for premature tool failure. Many people sharpen their bits by eye, only to find the drill wanders off course or produces rough holes. The truth is, a drill bit’s performance depends entirely on its geometry—specifically the angles at the point. Without proper measurement, you’re essentially sharpening blind. This comprehensive guide will walk you through the exact process of using a drill point gauge to verify and correct your drill bit geometry, giving you the confidence to sharpen bits that cut straight, stay cool, and deliver clean holes in any material.
Why Drill Point Geometry Determines Your Drilling Success
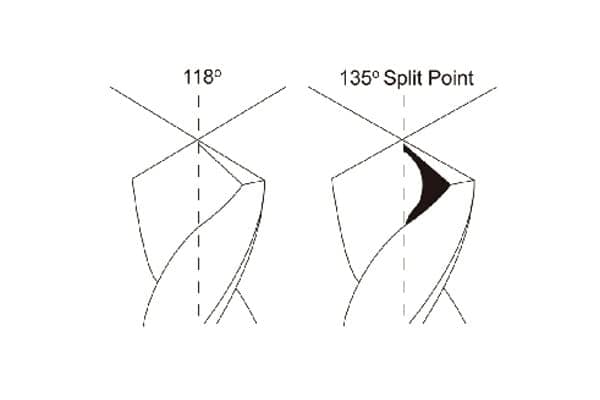
The angles at your drill bit’s tip aren’t arbitrary—they’re carefully engineered specifications that directly impact performance. When you understand how to use a drill point gauge to check these critical angles, you gain complete control over your bit’s cutting ability. A standard 118° point angle works best for most general-purpose drilling in steel and metals, while a 135° angle offers improved self-centering action for harder materials. For wood and plastics, a 90° point provides cleaner entry with less splintering. The lip clearance angle—typically 8-12° for high-speed steel drills—is equally important; without proper clearance, the heel of your drill will rub against the workpiece instead of cutting, generating excessive heat and causing premature wear.
When geometry is off even slightly, everything suffers. An incorrect point angle causes poor chip evacuation, leading to clogged flutes and overheating. Uneven lip lengths make the drill cut an oversized hole or “walk” off your intended mark. And without proper chisel edge centering, your drill will experience excessive thrust force and wander during operation. By learning how to use a drill point gauge properly, you’ll consistently achieve the precise 59-61° lip angle that creates the perfect 118° point, ensuring both cutting edges engage the material simultaneously for straight, accurate drilling.
How Different Materials Require Specific Drill Geometry
Your drill bit’s performance varies dramatically based on the material you’re working with, and the right geometry makes all the difference. For aluminum, use a 130-140° point angle with polished flutes to prevent gumming. Stainless steel demands a 135-140° point with web thinning to reduce thrust and prevent work hardening. When drilling plastics, a 90-100° point with polished flutes prevents melting and delamination. Hard materials like titanium or Inconel require specialized 135-140° points with significant web thinning to manage heat and reduce cutting forces. The drill point gauge is your key to verifying these material-specific geometries—simply select the appropriate angle notch and check your bit against it before drilling critical work.
Essential Safety Steps Before Using Your Drill Point Gauge
Before handling any drill bits or sharpening equipment, implement these critical safety measures. Always wear ANSI Z87.1 safety glasses to protect against microscopic metal particles that can fly during inspection. When working near a grinder, upgrade to a full face shield for maximum protection. Ensure your drill is completely powered off and unplugged (or the battery removed) before handling bits. Remember that freshly sharpened drill points are extremely sharp—handle them by the shank only, never the tip. Keep a first aid kit nearby with supplies for treating minor cuts, as even experienced users occasionally get nicked by these precision tools.
Selecting and Preparing the Right Gauge for Your Needs
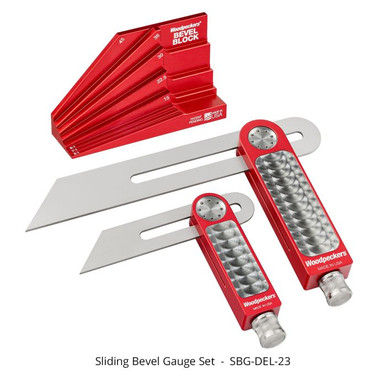
Not all drill point gauges work the same way, and choosing the correct one makes how to use a drill point gauge much more effective. Fixed-angle gauges like the classic Mechanix Mate DPG1 (though now discontinued) feature precise V-notches cut at standard angles—typically 118° and 135°—for quick visual verification. These simple tools work best for general-purpose sharpening but lack flexibility for specialty applications. For greater versatility, a sliding T-bevel gauge allows you to set and lock any angle between 0-180°, making it perfect for checking lip clearance angles or creating custom geometries for specific materials. Some professionals fabricate custom gauges from 1/16″ steel plate, achieving ±0.5° accuracy through careful filing and finishing—ideal for production environments where consistency is critical.
Preparing Your Workspace for Accurate Measurements
Create optimal conditions for using your drill point gauge by following these setup steps. Start with a clean, well-lit work surface—natural daylight or a bright LED task light (at least 5000K color temperature) makes angle discrepancies immediately visible. Clean both your gauge and drill bit thoroughly with a dry cloth to remove any oil, grease, or metal filings that could affect measurement accuracy. Position your gauge on a stable surface where you can comfortably hold the drill bit at eye level for precise visual comparison. Keep a small flashlight nearby to shine light through any gaps between the bit and gauge—this dramatically improves your ability to detect even minor angle discrepancies.
Step-by-Step Guide to Using a Drill Point Gauge Correctly
Mastering how to use a drill point gauge properly requires attention to detail at every stage. Follow this precise methodology for consistent, professional results that transform your drill bit performance.
Positioning and Checking the Point Angle
Hold your drill bit firmly by the shank and bring the point toward the appropriate V-notch on your gauge. For standard HSS bits, use the 118° notch; for harder materials, select 135°. Position the bit so the cutting lips contact the gauge surfaces simultaneously. Properly sharpened bits will sit perfectly within the V-notch with no visible gaps. If you see light between the bit and gauge, the angle is incorrect—either too steep or too shallow. Rotate the bit 180° and check the opposite side; both sides must match perfectly for symmetrical cutting. This simple check reveals whether your point angle meets the critical 59-61° specification needed for optimal performance.
Verifying Lip Length Symmetry and Clearance Angles
The true test of professional sharpening lies in lip symmetry—both cutting edges must be identical in length to within 0.1mm tolerance. Place your bit in the gauge and look for any difference in how the cutting lips contact the reference surfaces. If one lip sits higher than the other, you have an imbalance that will cause the drill to cut oversized holes. Next, check the lip clearance angle (typically 8-12°) by viewing the heel of the cutting edge against the gauge. Proper clearance shows a slight gap behind the cutting lip—no gap means insufficient clearance, while excessive gap indicates over-grinding. This clearance is crucial; without it, the drill will rub rather than cut, generating dangerous heat and wearing out prematurely.
Integrating the Gauge into Your Sharpening Routine
The real power of how to use a drill point gauge comes from incorporating it throughout your sharpening process, not just as a final check. After each 2-3 second grinding session on your bench grinder (6-8″ wheel with 60-100 grit aluminum oxide), stop and verify your progress with the gauge. This frequent checking prevents over-grinding, which ruins the bit’s temper and shortens its life. When correcting imbalances, grind only the longer lip in tiny increments—1-2 seconds at a time—then recheck. For the critical lip clearance angle, use the side of the grinding wheel rather than the face for more precise control. Remember to cool the bit frequently by dipping it in water; overheating beyond 600°F (315°C) destroys the steel’s hardness.
Creating Custom Gauges for Specialty Applications
For specialized drilling needs, consider fabricating custom gauges from 1/16″ steel plate. To make one, mark your desired angle (e.g., 140° for stainless steel) using a precision protractor, cut the V-notch with a hacksaw, then carefully file to the exact angle. Hardening and tempering the gauge (if using tool steel) ensures long-term accuracy. For extremely precise work, create multiple gauges—one for point angle, one for lip clearance, and one for chisel edge verification. Production shops often maintain sets of gauges calibrated for specific materials, allowing workers to quickly verify geometry before critical operations. This customization elevates how to use a drill point gauge from basic maintenance to precision tool management.
Common Mistakes to Avoid When Using a Drill Point Gauge
Even with a gauge in hand, improper technique can undermine your sharpening efforts. The most frequent error is checking only the point angle while ignoring lip symmetry—this creates bits that cut oversized holes despite appearing correctly sharpened. Another common mistake is failing to verify the lip clearance angle, which causes excessive heat and poor chip evacuation. Many users grind too aggressively between checks, removing more material than necessary and ruining the bit’s temper. And crucially, few remember to check the chisel edge centering, which affects the drill’s ability to start holes accurately. When learning how to use a drill point gauge effectively, remember that all three elements—point angle, lip symmetry, and clearance—must be perfect for optimal performance.
Maintaining Your Drill Point Gauge for Long-Term Accuracy
Your gauge is only as good as its condition, so implement these maintenance practices. Clean the V-notch regularly with a soft brush to remove grinding debris that can affect accuracy. Store your gauge in a protective case to prevent nicks and scratches on the critical reference surfaces. Periodically verify its calibration against a known standard—many machine shops have precision angle blocks you can borrow. For custom-fabricated gauges, check for wear after every 50-100 uses, as the soft steel can gradually deform with repeated contact. A well-maintained gauge will provide accurate measurements for years, making it one of the most cost-effective tools in your workshop.
Using a drill point gauge properly transforms your sharpening from an imprecise art into a repeatable science. By following these detailed steps on how to use a drill point gauge, you’ll consistently achieve drill bits that cut cleaner holes, last longer, and perform like factory-new tools. The small investment in time and technique pays dividends in improved drilling accuracy, reduced tool costs, and greater confidence in every hole you make. Whether you’re working with steel, aluminum, or exotic alloys, proper gauge usage ensures your drill bits deliver professional results every time—proving that sometimes, the simplest tools make the biggest difference in your workshop success.


