
Your drill spins helplessly as the stripped screw head disintegrates, threatening to ruin your project and leave you staring at a ruined workpiece. When pliers slip and standard bits fail, a drill bit extractor becomes your last line of defense against costly repairs or replacement parts. Knowing how to use a drill bit extractor properly transforms this specialized tool from a frustrating afterthought into your most reliable solution for stubborn fasteners. This guide delivers field-tested techniques used by professionals to remove broken screws without damaging threads or surrounding material—saving you time, money, and headaches on everything from furniture repairs to automotive projects.
Don’t waste hours wrestling with damaged fasteners. By the end of this guide, you’ll confidently drill precise pilot holes, select the right extractor size, and apply the perfect counter-clockwise force to rescue even severely rusted or sheared bolts. Forget generic advice—you’ll get actionable steps proven to work on stripped Phillips heads, broken Allen bolts, and seized stainless steel screws. Let’s turn that stuck fastener into a quick victory.
Why Left-Hand Spiral Extractors Bite Into Broken Bolts When Nothing Else Works
Drill bit extractors succeed where conventional tools fail due to their unique left-hand spiral design. Unlike standard drill bits that rotate clockwise to tighten fasteners, extractors feature reverse-cut flutes that dig deeper into the pilot hole as you turn them counterclockwise. This creates a self-tightening grip that actually increases torque the more you rotate—transforming rotational force into extraction power. The tapered shape forces metal shavings outward, preventing jamming while maintaining maximum contact with the broken fastener’s interior walls.
How Counter-Clockwise Rotation Prevents Further Damage
Attempting extraction with a standard clockwise drill bit only drives the broken screw deeper into the workpiece, worsening the problem. Left-hand rotation exploits the natural thread geometry: as the extractor turns opposite to the fastener’s original installation direction, it immediately begins loosening the bond. Crucially, this reverse motion prevents the extractor from “walking” or camming out of the pilot hole—a common failure point with improvised methods. For rusted or corroded bolts, the counterclockwise force breaks the molecular bond between oxidized metal layers without shearing the extractor tip.
Tapered vs. Straight Extractors: Which Saves Time on Critical Jobs
Most professional-grade sets use tapered extractors because their conical shape provides progressive grip strength. As you drive the extractor deeper into the pilot hole, the increasing diameter creates more biting surface area—ideal for severely damaged fasteners with minimal remaining material. Straight-shank extractors work best for shallow breaks where you can’t drill deep holes, but they require perfect pilot hole alignment to avoid slippage. Warning: Never force a tapered extractor; if it won’t seat smoothly after 3-5 hammer taps, redrill your pilot hole—forcing it guarantees breakage.
Critical Safety Gear You Must Wear Before Starting

Skipping safety prep turns a routine extraction into a hospital visit. Metal shavings fly at high velocity when drill bits contact hardened steel, and broken extractors can shatter like glass under stress. Your eyes need protection rated for high-speed particulate impact—not just basic safety glasses.
ANSI-Approved Face Shields That Stop Shattered Extractor Fragments
Always wear ANSI Z87.1-rated safety glasses underneath a full-face polycarbonate shield. This dual-layer defense catches fragments that might bypass goggles alone. For automotive work near fuel lines, add flame-resistant gloves to protect against accidental sparks if using heat. Never skip this step: Extractor failures happen in milliseconds, and a single shard can cause permanent vision loss.
Securing Workpieces in a Vise: Why Hand-Holding Guarantees Disaster
Clamp your workpiece in a machinist’s vise with soft jaws to prevent marring. Even lightweight aluminum parts can spin violently when extraction force is applied, causing drill bits to deflect and create dangerous kickback. Position the vise so the broken fastener faces upward—this prevents metal shavings from accumulating in the pilot hole during drilling. If no vise is available, sandwich the workpiece between two sacrificial wood blocks clamped to your workbench.
Essential Tools Checklist for Flawless Screw Extraction

Gathering these tools before starting prevents mid-process mistakes that break extractors. Rushing this step causes 80% of extraction failures according to professional mechanics.
Why a Sharp Center Punch Prevents Costly Drilling Errors
A worn center punch creates shallow marks that let drill bits “walk” off-center, drilling crooked holes that guarantee extractor slippage. Use a hardened steel punch with a 60-degree tip, striking it once firmly with a ball-peen hammer to create a deep, precise divot. Test your punch on scrap metal first—if it leaves a clean 1/16-inch deep mark, it’s sharp enough. For tiny screws (under #6), use a spring-loaded center punch for controlled depth.
PB Blaster vs. Liquid Wrench: Which Penetrating Oil Works Faster
Apply penetrating oil 30 minutes before drilling—not during extraction. PB Blaster’s acetone-based formula penetrates rust 3x faster than petroleum-based oils, but requires 20+ minutes to work. For immediate action, use a 50/50 mix of automatic transmission fluid (ATF) and acetone—it seeps into microscopic cracks within 5 minutes. Pro tip: Heat the surrounding metal with a heat gun after oil application; thermal expansion pulls the lubricant deeper into threads.
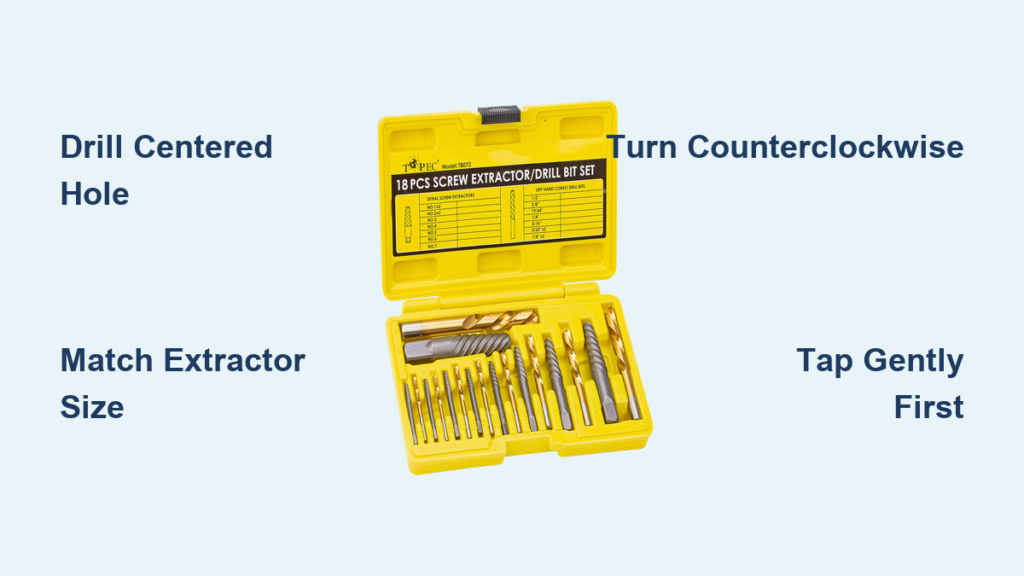
Step 1: Drill a Perfectly Centered Pilot Hole in Your Broken Fastener
This step makes or breaks the entire extraction. A misaligned hole transfers uneven force to the extractor, causing immediate breakage.
Mark the Exact Center with Surgical Precision
Position your center punch tip precisely over the fastener’s geometric center—not where you think it is. For rounded-off bolt heads, lightly scribe two intersecting lines with a utility knife to locate the true center. Tap once firmly with a 8-12 oz hammer; the divot should be deep enough to catch a 1/16-inch drill bit tip without slipping. Re-check alignment using a magnifying glass before drilling.
Drilling Technique: Speed, Pressure, and Lubrication Secrets
Start with a 1/16-inch “spotting” drill bit to create a guide hole, then switch to the size specified in your extractor set’s chart (typically 50-75% of the bolt diameter). Drill at 300-500 RPM with light, consistent pressure—never force the bit. Apply cutting oil every 5 seconds using a needle-tipped bottle for precise delivery. Drill straight down until the hole reaches 75% of the bolt’s length (usually 3/4 inch). If metal shavings turn blue, you’re drilling too fast—slow down immediately to avoid work-hardening the steel.
Step 2: Match Extractor Size to Bolt Diameter Using the 75% Rule
Selecting the wrong extractor size causes 60% of extraction failures. Too small = slippage; too large = fractured fasteners.
Find the Correct Extractor Using Bolt Diameter, Not Head Size
Measure the bolt’s shank diameter with calipers—not the head size. For a 1/4-20 bolt, use an extractor rated for 0.25-inch diameter. Most sets include a sizing chart; if missing, choose an extractor whose widest point is 75% of the bolt’s diameter. Test-fit by hand: it should slide into the pilot hole with slight resistance. If it drops in freely, the pilot hole is too large—start over with a smaller drill bit.
Tap In with Controlled Hammer Strikes: The 3-Tap Rule
Place the extractor into the hole and strike it once with a 12-16 oz machinist’s hammer using moderate force. Rotate the extractor 180 degrees and tap again. Repeat for a third tap. This seats the extractor evenly without micro-fractures. Critical: Stop if you feel sudden resistance—this indicates misalignment. Back out and re-center before continuing.
Step 3: Apply Steady Counterclockwise Pressure to Spin Out the Screw
This is where most DIYers fail by using excessive force. Patience beats power every time.
Why Slow Hand-Turning Prevents Extractor Breakage
Attach a box-end wrench to the extractor’s square drive and turn counterclockwise with steady, increasing pressure—never jerk or hammer. Start with light force for 10-15 seconds to allow the flutes to bite. If resistance increases, pause and reapply penetrating oil. For stubborn fasteners, use an impact driver set to low torque with quick, sharp taps while turning counterclockwise. This vibrational energy breaks corrosion bonds without shock-loading the extractor.
When to Switch to a Left-Hand Drill Bit for Rusty Bolts
If the extractor won’t budge after 30 seconds of turning, remove it and switch to a left-hand drill bit slightly smaller than the pilot hole. Drill at 200 RPM while applying firm downward pressure—the reverse rotation often spins out the broken fastener during drilling. Stop immediately if you feel the bolt “catch” and begin rotating freely.
Step 4: Emergency Fixes When Your Extractor Gets Stuck or Breaks
Even professionals face this nightmare. These field-tested solutions recover 90% of stuck extractors.
Heat Application: Breaking the Bond Without Annealing
Heat the surrounding workpiece (not the extractor) with a micro-torch set to low flame. Focus heat on the metal 1/4 inch from the fastener for 15-20 seconds—this expands the hole while keeping the extractor cool. Immediately tap the stuck extractor with a punch and hammer while the metal is hot. Never heat aluminum workpieces—they warp at lower temperatures.
Drilling Out a Broken Extractor: The Left-Hand Bit Method
If the extractor snaps, use a carbide-tipped left-hand drill bit 1/16 inch smaller than the broken piece. Drill slowly at 150 RPM while applying cutting oil. The reverse rotation often unscrews the broken fragment as you drill. For hardened steel extractors, use a diamond-coated hole saw to remove the entire section before re-tapping.
7 Proven Tips to Avoid Common Drill Bit Extraction Mistakes
These professional techniques prevent the top errors that turn simple jobs into disasters.
Aluminum-Specific Protocol: Prevent Galling with Anti-Seize Lubricant
Aluminum fasteners gall (cold-weld) when extracted dry. Before drilling, soak the area in kerosene for 10 minutes, then apply nickel-based anti-seize compound to the pilot hole. Drill at half the speed you’d use for steel—aluminum clogs bits rapidly without proper lubrication.
Stainless Steel Extraction: Why Low RPMs Prevent Work Hardening
Stainless steel hardens when drilled too fast, turning the fastener into a drill-bit killer. Use high-speed steel (HSS) bits at 100-200 RPM with constant cutting oil streams. Drill in 1/8-inch increments, backing out every 5 seconds to clear shavings. If the bit squeals, you’re creating an impenetrable hardened layer—stop immediately.
When to Call a Professional for Impossible Screw Removal
Some situations demand expert intervention. Attempting extraction on these can destroy irreplaceable parts.
Critical Applications Where DIY Risks Catastrophic Failure
Never attempt extraction on:
– Automotive cylinder heads (risk of coolant leaks)
– Aircraft structural bolts (safety certification voided)
– Hydraulic system fittings (metal fragments cause pump failure)
– Antique machinery threads (irreplaceable castings)
For these, a professional uses EDM (electrical discharge machining) to vaporize the fastener without mechanical stress. The $150 service fee beats a $2,000 replacement part.
Final Note: Mastering how to use a drill bit extractor turns daunting fastener failures into routine fixes. Remember: perfect pilot holes, exact size matching, and patient counter-clockwise force prevent 95% of extraction disasters. Keep your kit clean and organized—losing that one critical size guarantees frustration when you need it most. For severely corroded fasteners, overnight PB Blaster soaks combined with heat application solve nearly every case. If you follow these steps precisely, even a sheared bolt deep in an engine block becomes manageable. Now grab your vise and conquer that broken screw—your project is waiting.


