
Your hands are shaking from the cold. The storm rolled in faster than expected, and your lighter just flickered out. In this critical moment, knowing how to use a bow drill could mean the difference between survival and disaster. This ancient fire-making method requires no modern tools—just wood, cordage, and technique—but mastering it demands precise execution. Forget unreliable flint strikes or damp matches; the bow drill creates fire through pure friction science. In this guide, you’ll learn exactly how to use a bow drill to generate embers consistently, even as a beginner. We’ll break down the exact wood selections, pressure techniques, and ember transfer secrets that transform frustrating dust into life-saving flame.
Why Your Bow Drill Fails Before You Start: Top 3 Material Mistakes
Most beginners waste hours drilling only to produce cold dust because they skip critical material checks. Your spindle and fireboard must be crafted from the same wood species—this compatibility creates the right charred powder consistency. Using mismatched woods (like cedar spindle on basswood fireboard) prevents ember formation entirely. Equally critical is wood dryness: “greenish” or damp wood won’t char properly, no matter your technique. Test by snapping a twig; if it bends instead of cracking cleanly, it’s too moist. Finally, avoid hard woods like oak or maple—they generate minimal dust and excessive heat at the bearing block instead of the fireboard.
How to Test Wood Readiness in Under 60 Seconds
Check three key indicators before carving: First, the wood should feel lighter than green counterparts of the same size. Second, snap a small branch; dry wood breaks crisply with a clean fracture line. Third, scrape the surface with your knife—the shavings should be powdery, not stringy. If any test fails, keep searching. This verification step saves 30+ minutes of futile drilling.
Why Resinous Woods Like Pine Sabotage Your Efforts
Pine and other resinous woods create sticky, black gunk instead of fluffy ember dust. The sap gums up your notch and insulates heat rather than concentrating it. White pine is the only exception, but even then, use it only for fireboards with non-resinous spindles like basswood. Stick to proven options: mullein, cedar, or aspen for reliable results.
Selecting the Perfect Wood: From Cedar to Mullein (Avoid Oak!)

Your fireboard and spindle must come from medium-density softwoods. White cedar and mullein consistently outperform others—mullein’s hollow stems create ideal dust consistency. Basswood and poplar work well for beginners due to their even grain. Aspen is excellent but less common. Crucially, skip hickory, oak, and maple; these woods require superhuman effort and rarely produce embers. For coastal areas, driftwood often works if completely dry and non-resinous.
Step-by-Step Wood Sourcing Checklist
- Identify dead standing trees (not fallen logs which absorb ground moisture)
- Break off small branches to test dryness (as above)
- Carve a tiny test notch on your fireboard wood—dust should be fine and powdery
- Check for insect damage (avoid wood with visible tunnels)
- Prioritize dead branches still attached to trees—they’re drier than ground litter
Crafting a Spindle That Generates Hot Embers, Not Dust
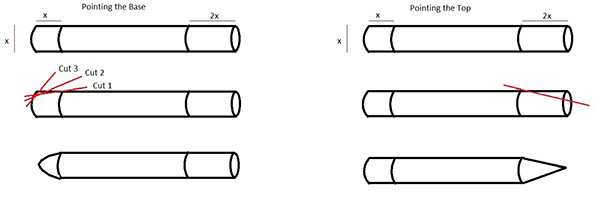
Your spindle must be 6-8 inches long and ¾ inch thick—thinner spindles snap under pressure, while thicker ones require excessive force. Carve both ends to a blunt pencil point (not sharp) using smooth, even knife strokes. The top end fits into your bearing block; the bottom rotates in the fireboard. Remove all bark and ensure perfect straightness—any bend causes wobbling that kills momentum. For beginners, basswood spindles at ¾ inch diameter provide the ideal balance of softness and durability.
Critical Spindle Dimensions for First-Time Success
- Length: 7 inches (17.8 cm) – stores optimal rotational energy
- Diameter: ¾ inch (1.9 cm) – beginner-friendly grip and rotation
- Tip angle: 30 degrees – maximizes surface contact without digging in
- Surface smoothness: Sanded with dry grass (no ridges!) – prevents string slippage
Fireboard Design: The Critical Notch for Ember Collection

Your fireboard needs a V-shaped notch cut precisely from the spindle hole to the edge. The notch must be wide enough to let charred dust accumulate but narrow enough to concentrate heat. For ¾-inch spindles, carve a ¼-inch wide notch tapering to a point at the edge. The spindle hole should be shallow—only deep enough to hold the tip securely. Place the notch near the board’s edge so embers fall cleanly onto your waiting tinder. Test by blowing through the notch; air should flow freely to oxygenate the ember.
Why Notch Width Determines Ember Success
Too narrow (⅛ inch): Dust jams, heat dissipates.
Ideal (¼ inch): Dust piles into a glowing coal.
Too wide (½ inch): Heat scatters, no ember forms.
Use your knife blade as a guide—standard blades are ¼ inch wide at the tip.
Bow and String Setup: Achieving Perfect Tension
Your bow should match your arm length (24-36 inches) with a slight natural curve. String it with ¼-inch cotton rope or paracord—synthetic cord works but requires waxing. Tie with a bowline knot, then wrap the string once around the spindle. The critical test: pull the string sideways—it should deflect only ½ inch maximum. Any more, and the spindle won’t spin fast enough. Apply pine sap or wax to the string where it contacts the spindle to prevent slipping. Never use stretchy cord like rubber bands; they absorb rotational energy.
String Tension Troubleshooting Flowchart
- Dust but no smoke? → String too loose → Re-tighten by 1 inch
- String slips off spindle? → Apply pine sap to contact point
- Spindle jerks violently? → String wrapped too many times → Use single wrap only
- Bow bends excessively? → String over-tightened → Loosen until bow holds shape
Bearing Block Lubrication: The Top Friction Reducer
Your bearing block must minimize friction at the spindle’s top while maximizing it at the fireboard. Carve a smooth ¼-inch deep socket in hardwood, stone, or soapstone. Lubricate with earwax, pine sap, or animal fat—this reduces heat loss by 40%. Without lubrication, up to 70% of your energy dissipates at the top instead of creating fire. Hold the block firmly against the spindle with palm pressure (not fingers) to maintain downward force during drilling.
Why Soapstone Beats Wood for Bearing Blocks
Soapstone’s low thermal conductivity keeps heat focused downward. In tests, soapstone blocks produced embers 3x faster than wood blocks without lubrication. If using wood, carve a deeper socket (⅜ inch) and apply extra lubricant. Never use bare hands—they sweat, increasing friction.
Preparing Tinder That Ignites at First Breath
Your tinder bundle must be the size of a baseball—small nests fail 90% of the time. Shred cedar bark into hair-thin strands or use dry grass teased into “mouse nest” fluff. The key test: hold a strand vertically; it should collapse under its own weight. Place tinder in a shallow depression lined with bark to contain the ember. Add “feather sticks” (thin wood shavings) around the nest—they catch flame faster than loose tinder alone.
Tinder Readiness Checklist
- ✅ Completely dry (snaps when bent)
- ✅ Finer than 1/16 inch strands
- ✅ At least 6 inches in diameter when fluffed
- ✅ Protected from wind/moisture until use
- ✅ Positioned under fireboard before drilling starts
Step-by-Step: How to Use a Bow Drill from Setup to First Smoke
Kneel with your dominant foot on the fireboard (right foot if right-handed). Place the spindle tip in the fireboard notch, then position the bowstring around it with one wrap. Rest the spindle top in your lubricated bearing block. Apply 10-15 pounds of downward pressure—enough to dent soft wood with your thumb. Begin with slow, full-stroke bows (shoulder to hip), keeping the bow parallel to the ground. After 10 seconds, increase to a steady 2-second per stroke rhythm. Watch for smoke thickening from the notch—that’s your signal to maintain pressure.
Drilling Pressure Guide by Wood Type
| Wood Hardness | Downward Pressure | Bow Speed |
|---|---|---|
| Soft (Mullein) | Light (5-10 lbs) | Fast (1.5 sec/stroke) |
| Medium (Cedar) | Medium (10-15 lbs) | Moderate (2 sec/stroke) |
| Hard (Aspen) | Firm (15-20 lbs) | Slow (2.5 sec/stroke) |
When to Stop Drilling: Identifying a Viable Ember
Continue drilling until you see a distinct glowing coal the size of a match head in the notch—not just smoke or dust. This takes 20-90 seconds depending on skill. The ember will pulse with heat visible as a bright orange spot in the charred dust pile. If you stop at the first wisp of smoke, you’ll get cold dust. A viable ember survives 5+ seconds of blowing without dimming. Use a knife blade to gently lift the ember from the notch—if it glows brighter, it’s ready for transfer.
Ember Readiness Visual Cues
- Not ready: Gray dust with faint smoke (keep drilling)
- Ready: Orange glow visible through dust (stop immediately)
- Over-drilled: Ember crumbles when touched (reduce pressure next time)
Transferring the Ember Without Smothering It
Slide a flat stick under the ember while it’s still in the notch. Lift it horizontally to avoid dislodging dust. Place the ember directly into the center of your tinder nest—never drop it. Gently fold the nest around the ember without compressing it. Hold the bundle with both hands, thumbs up, creating a small air gap at the bottom. Blow gently from 6 inches away, aiming at the nest’s base where ember contacts tinder. Increase airflow as smoke thickens.
Critical Transfer Mistake to Avoid
Never touch the ember with fingers—it cools instantly. If using a knife, cool the blade in water first. Transfer within 3 seconds of stopping drilling; embers cool 50% in 10 seconds.
Blowing Techniques for Flame: From Ember to Fire
Start with soft puffs (like fogging glasses) for 5 seconds. As smoke intensifies, switch to steady 2-second breaths. Your goal is to see the ember spread through the tinder like glowing veins. When flames appear at the nest’s edge, cradle the bundle and blow upward to feed oxygen to the base. Never blow directly onto the ember—that cools it. If flames die, reopen the nest slightly and resume blowing. Success typically occurs within 15 seconds of proper blowing.
Troubleshooting Smoke Without Ember and Other Failures
Smoke but no ember? Widen your notch by 1/16 inch—dust is escaping instead of piling. Spindle flies out? Deepen the bearing block socket by 1/8 inch and add lubricant. String slips? Apply pine sap to the spindle contact point. For persistent failures, add a pinch of fine sand to the fireboard notch—it acts as a friction booster during initial rotation. Remember: consistent motion beats speed. Jerky strokes waste 60% more energy than smooth, full-length bows.
Emergency Fix for Damp Conditions
If wood is slightly moist, carve a new spindle/fireboard set from inner bark layers. Place your fireboard on a warm rock near existing coals for 2 minutes before drilling. This evaporates surface moisture and doubles success rates.
Mastering how to use a bow drill transforms primitive fire making from frustrating myth to reliable skill. Focus on perfecting your notch design and ember transfer—these cause 80% of beginner failures. Practice the bowing motion for 10 minutes daily without pressure until your arms move as one unit. Within 3 weeks of consistent drilling, you’ll create fire in under 45 seconds. Keep your first successful ember in a sealed container as motivation; when storms hit, you’ll know exactly how to use a bow drill to turn wood into warmth. For deeper practice, try the hand drill method next—it builds the wrist control that makes bow drills effortless. Your next fire is only one perfect stroke away.


