
That frustrating moment when you’re wrestling with stubborn wire ends, fingers cramping as you try to create a secure twist for your fence repair or construction project. What if you could transform this tedious chore into a 10-second job? Using your cordless drill to tighten wire isn’t just a clever hack—it’s a professional technique that saves hours on fencing, rebar tying, and bundling tasks. This guide reveals exactly how to leverage your drill’s power for clean, professional wire twists every time, whether you’re securing livestock fencing or tying concrete reinforcement bars. You’ll discover which wire types work best, avoid dangerous snapping hazards, and master four field-tested methods that turn wire twisting from a pain point into your quickest job.
Essential Tools and Materials Checklist

Grabbing the right gear before starting prevents frustration and keeps you safe during wire-tightening operations. Your drill must have variable speed control and reverse functionality—these features let you start slowly and correct mistakes without kinking the wire. For the wire itself, 14- to 16-gauge galvanized soft annealed tie wire is non-negotiable for most projects; its pliability allows clean twisting without snapping, unlike brittle high-tensile wire that demands specialized tools. Always use heavy-duty work gloves to protect against razor-sharp cut ends and safety glasses to shield your eyes from whipping wire fragments—these aren’t optional extras but critical barriers against common injuries.
Critical Tool Additions by Method
The direct chuck method requires nothing beyond your drill and pliers, but the hook technique needs one simple addition: a cup hook screwed into the chuck or a dedicated rebar tie wire twister bit. For heavy-duty applications like tensioning high-tensile fencing wire, Vise-Grip locking pliers become essential—they clamp parallel to the wire to prevent slippage while the drill rotates the adjustment screw. Never attempt this job with dead-hard wire; its brittleness guarantees snapping under drill torque. Keep fencing pliers nearby for clean cuts and final hand-twisting—the drill gets 90% of the work done, but those last two twists with pliers create a snag-free pigtail that won’t unravel.
Choosing the Right Wire and Method for Your Project
Selecting incompatible wire or technique causes 80% of failed twists. Soft annealed galvanized wire (often called tie wire) is your go-to for 95% of projects—it’s rust-resistant, bends easily, and creates uniform twists. Reserve high-tensile wire only for permanent fence lines where maximum strength matters, but understand it requires the Vise-Grip method and higher torque settings. Baling wire works identically to tie wire for temporary bundling jobs. Match your method to the task: direct chuck twisting excels for rapid fence repairs where speed trumps perfection, while the hook method delivers consistent results for rebar tying where uniform tension prevents concrete shifting.
Why the Hook Method Outperforms for Most Applications
| Method | Best Project Fit | Wire Compatibility | Critical Success Factor |
|---|---|---|---|
| Direct Chuck | Emergency fence fixes, baling | Soft annealed only | Constant backward tension on main wire |
| Hook Attachment | Rebar grids, pipe bundles | All soft wires | Hook must engage wire loop securely |
| Vise-Grip Drill | High-tension fencing | High-tensile wire | Clamp parallel to wire direction |
| Spanish Windlass | Load securing, fence loops | Baling wire/rope | Immediate end-securing after tensioning |
The hook attachment method dominates professional construction sites for good reason—it eliminates the #1 cause of failure in direct chuck twisting: wire slippage. By creating a shepherd’s crook bend in your wire and hooking it onto a cup hook in the chuck, you maintain perfect alignment throughout the twist. This prevents the “corkscrewing” effect that kinks wire when ends shift in the chuck. For DIYers, this method costs less than $5 (a simple cup hook from the hardware aisle) but delivers results matching $50 dedicated twister bits. Save direct chuck twisting for when you’re stranded at a remote fence line with only your drill—otherwise, the hook technique’s reliability makes it worth the 10-second setup.
Step-by-Step Twisting Methods That Actually Work
1. Direct Chuck Method: The Emergency Fix
When you’re stranded with only your drill at a broken livestock fence, this no-tools method saves the day. First, straighten and align the last 3 inches of both wire ends, then fold them together into a tight bundle. Insert this bundle into the drill chuck, backing off the chuck jaws slightly to grip the wire without crushing it—overtightening causes immediate snapping. With your off hand, pull the main wire length firmly backward to create tension. Start the drill at absolute lowest speed (1-2 on variable dials), pulsing the trigger in 1-second bursts while maintaining tension. After 4-5 clean twists form, stop immediately. Use pliers to complete the final 2 twists by hand, then fold the twisted tail over to prevent snags. Skip this step and your “repair” will unravel within days.
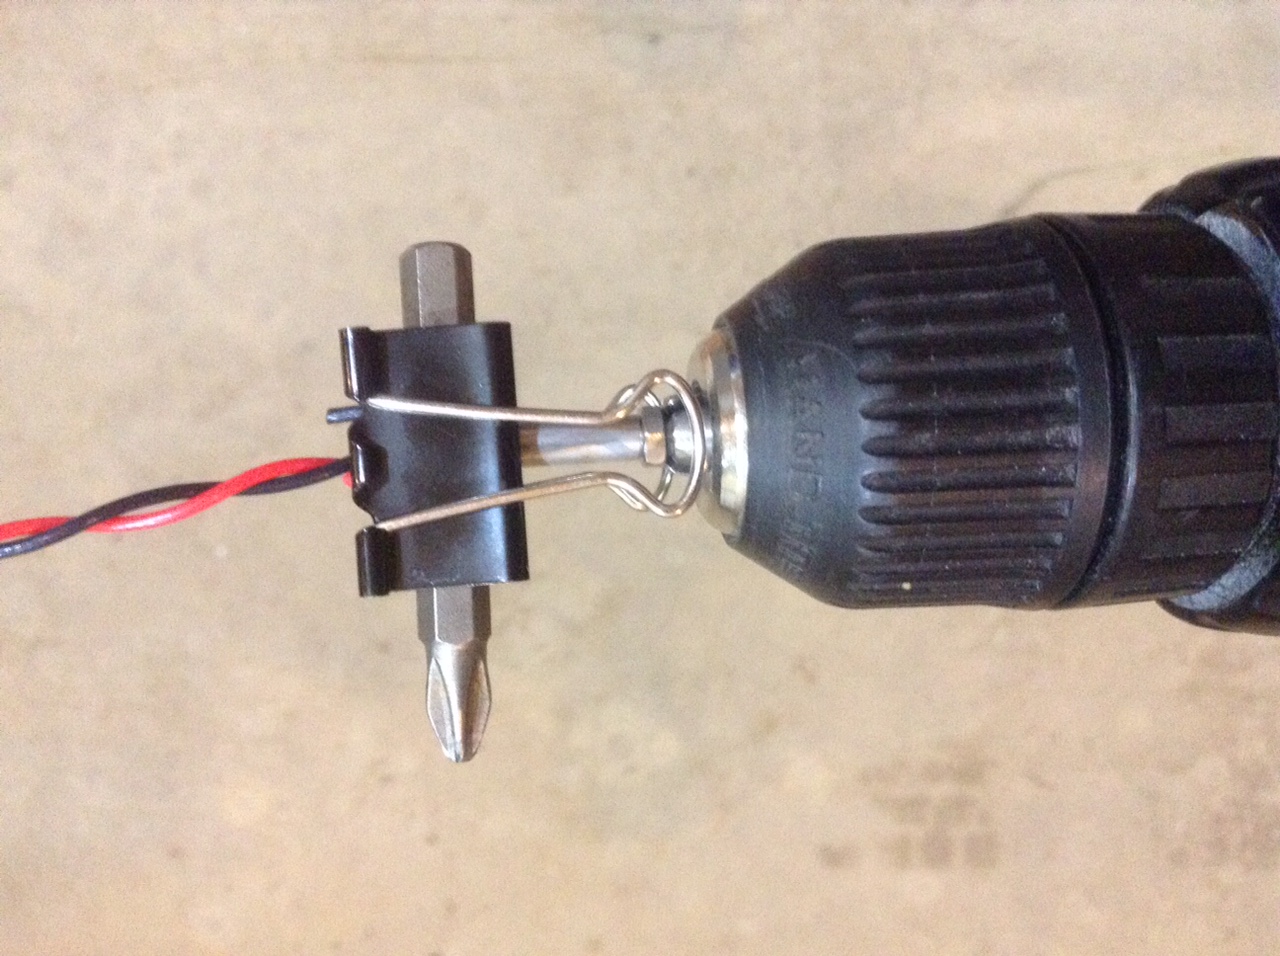
2. Hook Attachment Method: Professional Results in Seconds
This is the technique construction crews use for tying rebar grids efficiently. Screw a standard cup hook into your drill chuck (or use a dedicated L-shaped twister bit). Create a U-shaped shepherd’s crook bend in your wire ends, then hook this loop over the cup hook’s point. Stand with your feet shoulder-width apart, gripping the main wire firmly behind the twist point to maintain backward tension. Trigger the drill at low speed while watching the twist form—stop when you see 5-6 uniform spirals. The hook prevents wire slippage that causes kinks, delivering consistent tension across hundreds of ties. For rebar work, leave a 1-inch twisted tail; for fencing, fold the tail over the wire strand to eliminate tripping hazards. This method works flawlessly with 14-gauge galvanized wire but fails with stiff high-tensile varieties.
3. Vise-Grip and Drill Technique for Heavy-Duty Jobs
When tightening 9-gauge high-tensile fence wire that resists hand twisting, combine brute force with drill precision. Clamp Vise-Grips onto the wire ends with the jaws parallel to the wire direction—this prevents crushing and slipping. Attach your drill chuck to the Vise-Grip’s adjustment screw (or loop a short wire piece through the screw hole). With your off hand, pull the main wire taut while slowly triggering the drill. The Vise-Grips rotate the wire without kinking, creating tension impossible to achieve manually. Critical safety note: Always position your body to the side of the wire path—never stand in line with potential snap points. After achieving desired tension, immediately secure the wire ends with pliers before releasing the Vise-Grips.
4. Spanish Windlass for Loop Tightening
To cinch wire loops around fence posts or secured loads with massive force, adapt this ancient technique. Create a loop in your baling wire, then insert a sturdy rod (like a 6-inch Allen key) through it. Clamp the rod in your drill chuck while holding the loop’s base taut. Trigger the drill slowly—the rod rotates, winding the wire tighter like a tourniquet. Stop when the loop reaches maximum tension, then immediately secure both wire ends with pliers before releasing the rod. Never walk away from a windlass-tightened loop; the stored energy will violently unwind if not secured. This method generates extreme tension but requires absolute focus—distractions cause wire snapping at dangerous velocities.
Pro Tips for Flawless Twists Every Time
Start every job with your drill’s clutch set to its lowest setting (1-3)—this prevents wire snapping by disengaging torque if resistance spikes. Always maintain backward tension with your off hand; watching professionals, you’ll notice their arms form a straight line from drill to wire anchor point. For tricky starts, fold the wire ends into a tiny “T” shape before chucking—it gives the jaws more surface area to grip. Pulse the trigger in 0.5-second bursts rather than holding it down; this gives you visual control as the twist forms. Crucially, finish the last 2-3 twists with pliers—this creates the mechanical lock that prevents unraveling. Clip excess wire close to the twist, then use pliers to flatten the stub against the main strand; protruding ends snag clothing and cause injuries.
Troubleshooting Common Wire Twisting Failures
Wire snapping during twisting always stems from excessive speed or torque—immediately drop to your drill’s lowest setting and pulse the trigger gently. If wire kinks instead of twisting evenly, you’re not maintaining sufficient backward tension; reposition your stance to pull the main wire taut before restarting. When the drill chuck slips on wire, create a small folded “flag” at the wire end for better grip, or insert a thin drill bit shank alongside the wire as a shim. Uneven twists indicate inconsistent tension—practice maintaining steady pressure by bracing your off hand against your hip for stability. For high-tensile wire that won’t twist, switch to the Vise-Grip method; soft annealed wire solves 90% of twisting problems but won’t work for permanent fence lines requiring high-tensile strength.
Safety First: Avoiding Life-Threatening Hazards
Wire under tension stores dangerous energy—always wear ANSI Z87.1 safety glasses and heavy leather gloves. Position your body perpendicular to the wire path so snapping fragments deflect away from you. Never point the twisting direction toward people, animals, or vehicles. Test tension on scrap wire first to calibrate your drill settings—high-tensile wire can snap with enough force to penetrate skin. When using the Spanish windlass method, secure loop ends before releasing the rod; uncontrolled unwinding causes severe lacerations. Keep spectators 10 feet away during all wire-tightening operations. One snapped wire can cause permanent eye damage—this isn’t cautionary advice but documented reality from emergency room data.
Mastering these drill-based techniques transforms wire work from a dreaded chore into your fastest task. Start every job with soft annealed wire and the hook attachment method for foolproof results, reserving direct chuck twisting for emergencies. Remember that tension control matters more than drill speed, and those final hand-twisted loops with pliers make the difference between a lasting repair and a rework headache. Within one project, you’ll save enough time to justify the safety gear—and protect your eyes while doing it. For rebar tying specialists, investigate dedicated L-hook twister bits; they pay for themselves after 50 ties through reduced wrist strain. Now grab your drill and turn that frustrating wire job into a 30-second victory.


