
You’re standing in front of a concrete wall, drill in hand, ready to hang that new TV mount. You grab a drill bit from your toolbox, start drilling, and within seconds—sparks fly, the bit screeches, and you’ve barely scratched the surface. Frustrating? Absolutely. The culprit isn’t your drill’s power; it’s the bit you chose. Using a standard metal or wood bit on masonry is like trying to slice frozen butter with a plastic knife—it simply won’t work. Masonry materials like concrete, brick, and stone demand a specialized tool designed to pulverize, not cut. Knowing how to tell a masonry drill bit from other types is the make-or-break skill for any DIY project involving hard surfaces. This guide cuts through the confusion with foolproof identification techniques, so you’ll never waste time or money on the wrong bit again.
Imagine drilling into a brick patio to secure a pergola. If your bit lacks the right features, you’ll overheat the motor, shatter the bit, or worse—damage the structure. The difference between success and disaster lies in four critical visual cues most beginners overlook. Unlike generic hardware store advice, this isn’t theory; it’s battle-tested knowledge from hundreds of drilling projects. You’ll learn to spot a genuine masonry bit in under 10 seconds, avoid costly mistakes, and tackle any masonry job with confidence. By the end, you’ll have a reliable system to identify these bits blindfolded (though we don’t recommend that part).
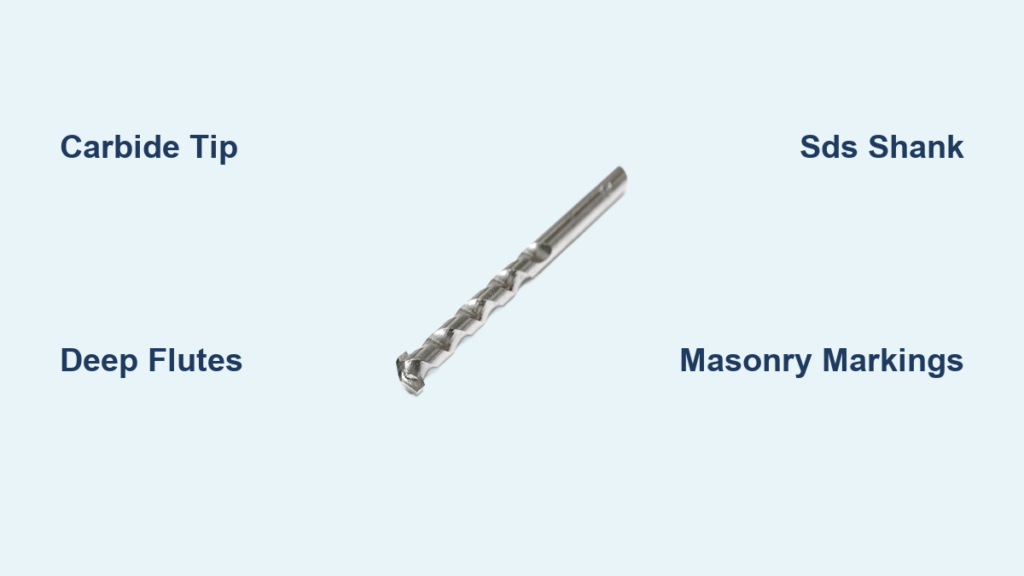
Spot the Carbide Tip: Your #1 Identification Clue
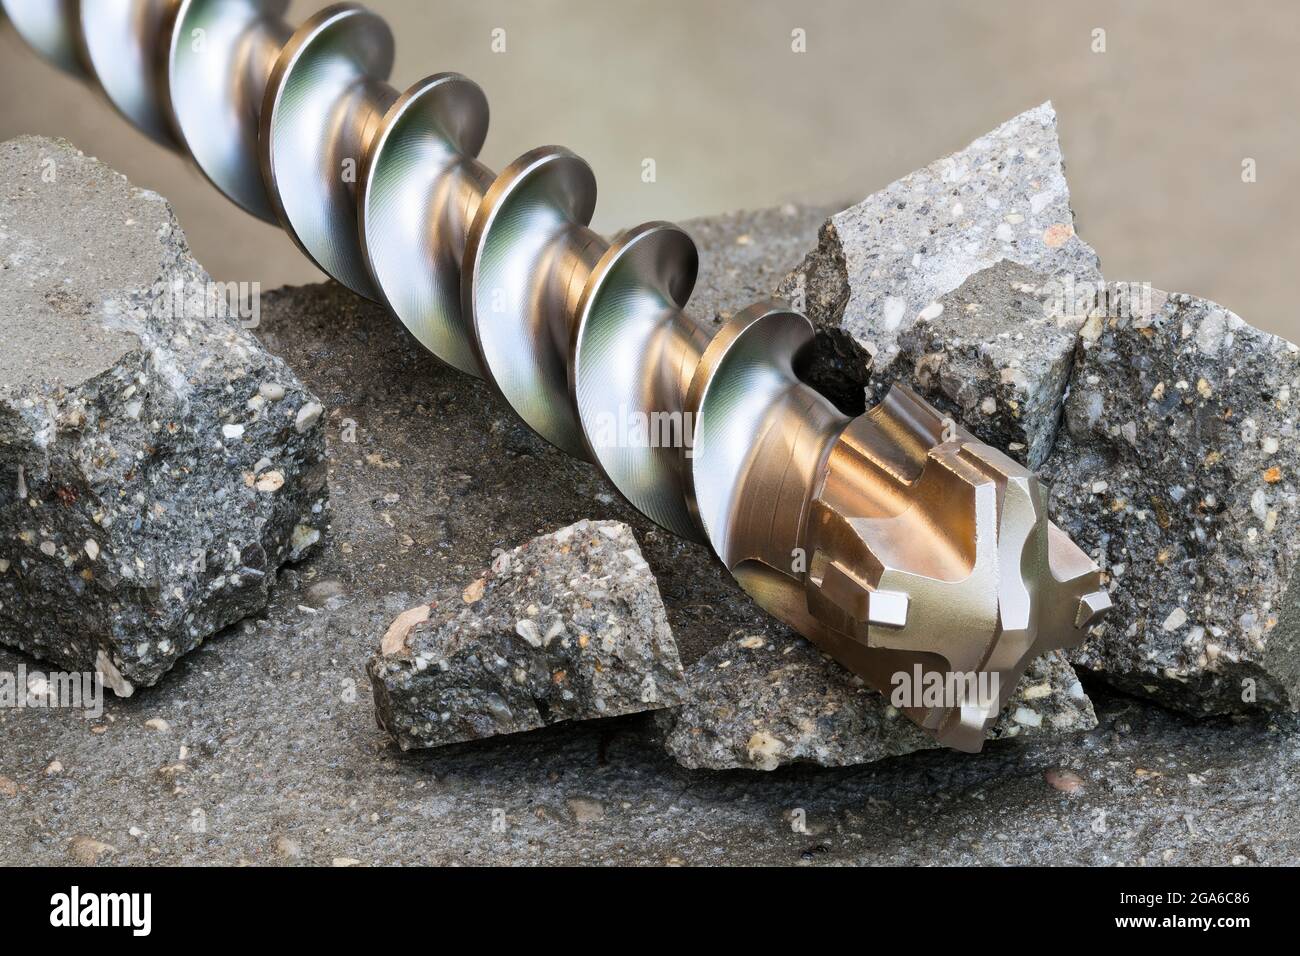
The tungsten carbide tip isn’t just a feature—it’s the masonry bit’s secret weapon. Forget the sharp, pointed tips of standard drill bits. A true masonry bit has a flat or chisel-shaped carbide insert brazed onto its nose. This isn’t a minor detail; it’s non-negotiable. When you hold the bit up to light, the tip should look like a miniature bulldozer blade—broad, blunt, and aggressively textured. That rough, matte-black surface is the carbide grinding through rock-hard material. If the tip is shiny, smooth, or needle-sharp? It’s not for masonry.
Why Carbide Makes All the Difference
Carbide is 3x harder than steel, letting it pulverize concrete instead of bouncing off. Here’s what to check:
– Color and texture: Genuine carbide tips are dark gray or black with a gritty, sandpaper-like finish.
– Shape: They form a 90-110° chisel edge—not a point. Run your finger (carefully!) along the tip; it should feel slightly rounded, not sharp.
– Braze line: Look for a visible silver or copper-colored weld seam where the carbide meets the steel body. No seam? It’s likely a cheap imitation.
Pro Tip: Hold the bit against a brick. A real masonry bit will leave a faint gray dust smudge from the carbide, while HSS bits leave shiny metal shavings. Never test this under power—just a light rub.
Common Carbide Tip Mistakes DIYers Make
- Confusing it with a tile bit: Tile bits have spear-shaped carbide tips for clean entry, not grinding. Masonry tips are wider and flatter.
- Ignoring micro-chips: Even a hairline crack in the carbide means the bit is done. Replace it—forcing a damaged bit risks shattering.
- Assuming all “hard” bits are masonry: Some glass bits have carbide but lack the chisel shape. Always verify the tip geometry first.
Decode Shank and Flute Design Like a Pro
Masonry bits don’t just look different—they’re engineered for chaos. Standard twist bits have gentle, shallow flutes to evacuate wood or metal shavings. Masonry flutes are deep, wide, and aggressively tapered—think of them as miniature conveyor belts for concrete dust. When drilling, these flutes should visibly eject powdery debris, not packed sludge. If your bit clogs after 2 inches, the flutes are too narrow or shallow for masonry work.
The Shank Tells a Critical Story
The shank is where masonry bits reveal their true purpose:
– Round shanks: Feature knurled (textured) grips near the tip for standard drill chucks. Check for size markings like “6mm” or “1/4” etched near the base.
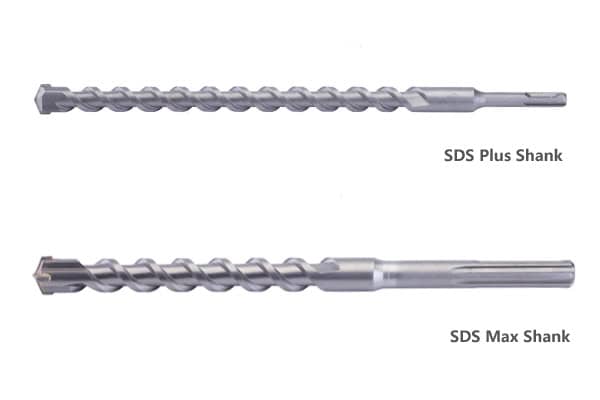
– SDS-Plus shanks: Have distinctive “W” grooves and a spring-loaded collar. These only fit rotary hammer drills—never force them into a regular chuck.
– Color coding: Gold (TiN-coated) or silver (uncoated) shanks signal masonry use. Blue or black oxide? That’s for wood.
Warning: If the shank has no markings or a smooth, polished finish, it’s likely a cheap multipurpose bit. These fail catastrophically in concrete.
Flute Red Flags You Can’t Ignore
- Flutes narrower than the bit diameter: Can’t clear dust → overheating → snapped bit.
- Shallow spirals: Less than 3 full rotations? Useless for deep holes. Real masonry flutes wrap 5-7 times around the bit.
- Clogged flutes: If old concrete dust is baked into the grooves, the bit is spent. Soak in vinegar overnight to revive it—never use a wire brush (scratches ruin performance).
Read Manufacturer Markings: The Foolproof Shortcut
When in doubt, follow the markings—they’re your cheat code. Quality masonry bits laser-etch critical info into the shank:
– “MASONRY” or “CONCRETE”: Explicit labels like these are gold. Skip bits labeled “universal” or “multi-material.”
– Diameter and length: Should match packaging (e.g., “8x100mm”). Mismarked bits indicate counterfeits.
– Carbide grade: Look for “WC” (tungsten carbide) or “HM” (hard metal). Absence means it’s steel-only.
Decoding Color Codes and Symbols
- Gold coating: Titanium Nitride (TiN) for reduced friction. Lasts 2-3x longer in abrasive materials.
- Silver bits: Uncoated carbide—ideal for wet drilling but prone to rust if stored damp.
- Red rings: Some brands (like Bosch) use red bands to denote masonry-specific bits.
Pro Tip: Shine a flashlight along the bit’s length. Authentic markings are deeply etched, not painted on. Painted labels wipe off with a fingernail—run from those bits.
Masonry vs. Metal/Wood Bits: Side-by-Side Reality Check

Hold a masonry bit next to a standard HSS metal bit. The differences scream at you:
– Tip angle: Metal bits have a 135° split point for clean metal entry. Masonry bits are 90° chisels.
– Flute depth: Metal bit flutes are shallow and smooth; masonry flutes look like canyons.
– Shank texture: Metal bits have smooth shanks; masonry shanks are knurled for grip.
Why Mixing Them Up Ruins Projects
- Using a wood bit on brick: The sharp spur tip snaps instantly. You’ll hear a “ping!” as it breaks.
- Using a metal bit on concrete: It glazes over in seconds, creating dangerous sparks. One minute of drilling can dull it permanently.
- The “universal bit” trap: These compromise on carbide thickness. They survive 2-3 small holes before failing mid-project.
Real-World Test: Drill into scrap concrete with both bits. A metal bit will smoke and stall at 1/4″ depth. A masonry bit drills smoothly to 2+ inches with steady dust ejection.
When Only a Masonry Bit Will Save Your Project
Don’t guess—know when masonry bits are non-negotiable:
– Hanging heavy objects: TV mounts, cabinets, or shelves on concrete walls.
– Outdoor installations: Mailbox posts in brick, deck anchors on stone patios.
– Electrical/plumbing: Running conduit through concrete foundations.
If you’re drilling into anything harder than drywall, how to tell a masonry drill bit becomes critical. For mortar joints between bricks? Use a masonry bit 1/8″ smaller than your anchor. For solid concrete? Go full masonry protocol. Ignore this, and anchors will pull out under load.
Safety-First Drilling Protocol: Avoid Costly Errors
5 Non-Negotiable Safety Steps
- Eye and lung protection: Silica dust from concrete causes incurable lung disease. Wear N95 masks and sealed goggles—never skip this.
- Hammer mode is mandatory: Standard “drill” mode won’t work. Engage hammer action even on light-duty drills.
- Pressure control: Push firmly but let the hammer do the work. Excessive force = shattered bits. If the drill struggles, pull out and clear dust.
- Pilot holes for big jobs: For bits over 1/2″, start with a 1/4″ masonry bit. Prevents wandering and reduces motor strain.
- Cooling breaks: Drill 10 seconds, rest 5. Concrete dust compacts when overheated, jamming the bit.
Time-Saving Shortcuts Pros Use
- The “dust color” test: Gray powder = good drilling. White dust means you’re hitting limestone—reduce speed to avoid bit binding.
- Water trick: For deep holes, drip water into the flutes. Cools the bit and binds silica dust (but never use water with SDS drills—damages seals).
- Anchor fit check: After drilling, drop your anchor in. If it slides smoothly, you’ve got a clean hole. Sticking means flutes were clogged—redrill.
Final Verification Checklist Before You Drill
Before firing up your drill, run this 10-second test:
1. Tip check: Flat chisel edge? ✅
2. Flute check: Deep, wide grooves? ✅
3. Shank check: “MASONRY” marking or SDS grooves? ✅
4. Carbide check: Dark, gritty tip with braze line? ✅
If any box isn’t checked, stop. Using the wrong bit risks tool damage, ruined surfaces, and serious injury from shattering metal. A $5 masonry bit saves $200 in drill repairs.
Identifying a masonry drill bit isn’t about memorizing specs—it’s about recognizing the visual language of durability. That carbide tip, aggressive flutes, and explicit markings exist for one reason: to conquer materials that laugh at ordinary bits. Now you know how to tell a masonry drill bit from pretenders in seconds. Keep this guide in your toolbox, and your next concrete project will be smooth, safe, and shockingly fast. For ongoing success, store bits in a dry case with silica gel packs—moisture is the silent killer of carbide edges. Ready to drill? Grab that masonry bit and make your mark.


