
Tired of hand-cranking wire strippers until your knuckles ache? You’re not alone. Every electrician and DIYer knows the frustration of prepping dozens of wires for a home project—only to face blisters and inconsistent strips that jeopardize connections. What if you could strip wire with a drill in under five seconds per piece, achieving factory-perfect results without hand fatigue? This game-changing technique transforms your cordless drill into a high-speed stripping machine, cutting prep time by 70% on bulk wiring jobs. Forget tedious manual methods; in this guide, you’ll master the professional’s secret for flawless wire preparation using tools you already own. Discover why contractors swear by this method for extension cords, circuit installations, and custom wiring projects.
The magic lies in leveraging rotational force to cleanly separate insulation from conductors. Unlike manual strippers that require precise jaw alignment, a drill delivers consistent torque that slides insulation off without nicking copper strands—a critical factor for safe electrical connections. I’ve seen DIYers strip 50 wires in the time it takes to manually prep 10, making “how to strip wire with a drill” essential knowledge for serious electrical work. Before we dive into the step-by-step process, understand this isn’t a gimmick—it’s a proven technique used on job sites worldwide when speed and uniformity matter most.
Why Your Drill Outperforms Manual Strippers for Bulk Wire Work
Stripping 30 wires for a new lighting circuit shouldn’t take 20 minutes. With a drill, you’ll finish in under 6 minutes while avoiding hand strain injuries common with pliers-style strippers. The rotational stripping action creates perfectly uniform exposed conductors every time—no more frayed strands or insulation tears that cause short circuits. This consistency is why electricians use this method for commercial installations where hundreds of identical connections are needed. You’ll also eliminate the “sweet spot” guessing game of manual tools; the drill bit’s calibrated grooves ensure precise exposure for your specific wire gauge. For projects requiring 10+ identical wires—like building multiple extension cords or wiring a breaker panel—this technique pays for itself in time saved before you finish your first bundle.
Critical Tools You Must Have (No Substitutions!)

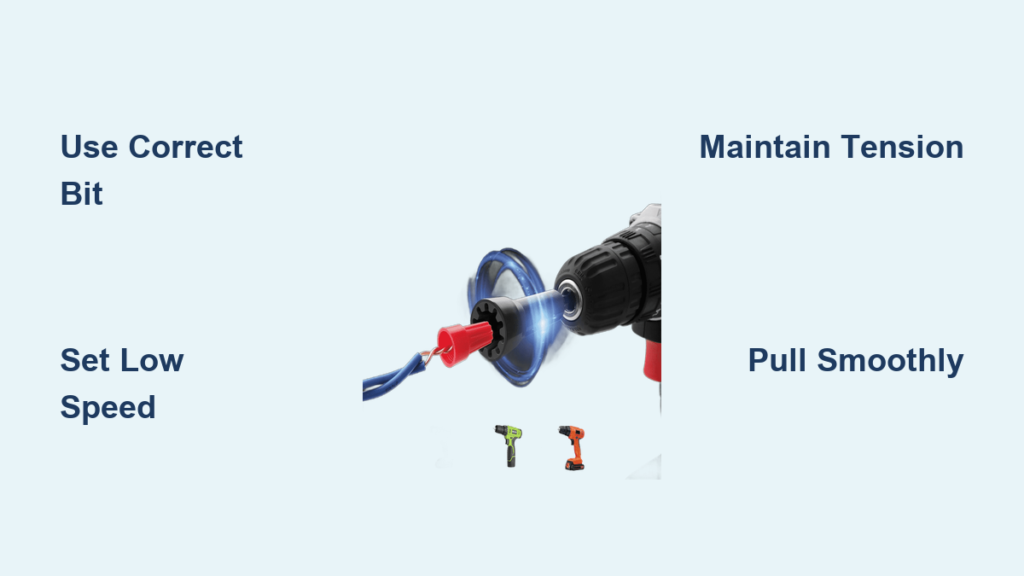
Skipping the right stripping bit guarantees disaster. Here’s exactly what you need to strip wire with a drill safely:
- Cordless Drill (12V+): Must have variable speed trigger and reversible rotation. A 20V model handles thick cables best.
- Specialized Wire Stripping Bit: Non-negotiable. Look for “3-in-1 wire stripping and twisting bits” with gauge-specific notches (e.g., 10-18 AWG). Brands like Klein Tools or Irwin make reliable versions.
- Wire Gauge Chart: Tape this to your drill case. Using the wrong bit size for your wire gauge causes conductor damage.
- Safety Glasses: Mandatory—spinning insulation becomes sharp projectiles.
Critical Warning: Never substitute a standard drill bit or screwdriver bit. These lack the precision grooves needed to grip insulation without shredding copper strands. I’ve seen beginners destroy $50 in THHN wire trying to “make it work” with regular bits—don’t learn this lesson the hard way.
Step-by-Step: Stripping Wire with a Drill in 5 Seconds Flat
How to Prepare the Wire End for Perfect Drill Stripping
Start by manually stripping just 1/2 inch of insulation from the wire end using standard strippers. Why this crucial half-inch? It creates a clean conductor “handle” that grips securely in the drill chuck without slipping. For stranded wire, twist these exposed strands tightly by hand—loose strands will fray when spinning. Measure your wire gauge against the stripping bit’s sizing chart; mismatched gauges cause either incomplete stripping (bit too large) or conductor damage (bit too small). Pro electricians always verify gauge with calipers for critical circuits.
Correct Wire Insertion Technique to Prevent Slippage
Position the wire so the bare conductor tip extends 3/8 inch past the stripping bit’s front edge. The insulation must sit flush against the bit’s stripping groove—this alignment determines your exposed conductor length. Hold the wire perpendicular to the drill axis; angling causes uneven stripping. As you tighten the chuck, pinch the conductor just behind the chuck with your free hand to prevent wire twist. Test grip by gently tugging the wire—if it spins freely with the chuck, you’ve achieved the goldilocks tightness.
Optimal Drill Settings for Flawless Stripping
Set drill rotation to forward (clockwise) and speed to low (300-500 RPM). Higher speeds melt insulation on thin wires; lower speeds won’t overcome friction on thick cables. Hold the drill horizontally with your dominant hand while gripping the wire insulation firmly 6 inches from the chuck with your other hand. Your non-dominant hand must maintain steady backward tension—this is where beginners fail. Too little tension leaves insulation partially attached; too much stretches conductors. Feel for the “sweet spot” where insulation slides off smoothly like a banana peel.
Executing the Strip: The Pull-and-Release Motion
Squeeze the trigger to start rotation, then smoothly pull the wire backward while maintaining tension. The entire motion should take 2-3 seconds. When insulation clears the bit, release the trigger immediately—continuing rotation after separation damages strands. For optimal results, stop pulling when 1/4 inch of bare conductor remains visible; the final bit of insulation slides off with residual spin. If insulation sticks, your bit size is wrong or tension was inconsistent. Never force the wire—recheck alignment instead.
Pro Electrician Shortcuts You Won’t Find in Manuals
- The Tape Measure Trick: Wrap painter’s tape around the stripping bit at your desired exposure length (e.g., 3/4 inch for outlets). This creates a visual stop point so every wire gets identical striping.
- Stranded Wire Savior: After stripping, dip the bare end in liquid electrical tape before twisting. Prevents strand separation during insertion.
- Drill Stand Jig: Mount your drill vertically in a bench vise with a scrap wood “stop block” set to your exposure length. Feed wires one-handed for production-line speed.
- Bit Maintenance: Clean groove residue with a toothpick after every 10 wires. Built-up plastic insulation causes slippage.
Costly Mistakes That Destroy Wires (And How to Avoid Them)

Over-Tightening the Chuck: Crushing conductors increases resistance at connection points—a fire hazard. Test by spinning the wire by hand before drilling; it should rotate freely but not wobble.
Ignoring Wire Type: Solid-core wire requires 20% less tension than stranded. THHN needs slower speeds than Romex sheathing. Always do a test strip on scrap wire first.
Skipping Safety Gear: One incident I witnessed involved insulation shards embedding in an installer’s forearm. Safety glasses aren’t optional—they’re OSHA-mandated for good reason.
Rushing the Pull Motion: Jerking the wire causes spiral nicks in conductors. Your pull speed must match drill RPM—practice with 12-gauge wire until it feels like “peeling an apple in one continuous motion.”
Non-Negotiable Safety Protocol for Drill Stripping
Always unplug corded drills or remove battery packs when loading/unloading wires. A coiled extension cord once triggered a corded drill unexpectedly, sending a stripped wire through a contractor’s workbench. Keep your non-dominant hand clear of the chuck rotation path—position it behind the stripping groove. Work in a clear 3-foot radius with no bystanders; flying insulation travels 10+ feet at drill speeds. For outdoor work, cover the drill motor with a plastic bag to prevent sawdust contamination. If your drill lacks a safety clutch, set torque to minimum to prevent wire whipping if it jams.
When This Method Beats All Alternatives

Choose drill stripping exclusively for:
– Preparing 10+ identical wires (e.g., solar panel arrays)
– Tight deadlines where hand-stripping would delay project completion
– Thick cables (6 AWG+) that fatigue hands with manual tools
– Production environments like wiring harness manufacturing
Never use this method for:
– Damaged or frayed wires (requires precision hand stripping)
– Coaxial or data cables with delicate shielding
– Wires already installed in walls (access limitations)
– Projects requiring <5 stripped wires (manual is faster)
When Manual Strippers Are Actually Better
For single-wire tasks like replacing an outlet, a $15 manual stripper with auto-gauge detection gives superior control. The ratcheting action of tools like the Ideal VDV226-165 ensures zero conductor damage on fragile strands. For automotive work with ultra-fine wires (20+ AWG), precision scissors provide cleaner cuts than rotational methods. And if you’re an apprentice still building muscle memory, master manual stripping first—drill stripping hides improper technique that becomes dangerous on live circuits.
Mastering how to strip wire with a drill transforms tedious prep work into a 30-second task per wire. The key is respecting the technique’s precision requirements: correct bit sizing, controlled tension, and strict safety protocols. Start with scrap Romex on low speed until you achieve consistent 3/4-inch exposures, then scale to your project. Within an hour, you’ll strip wires faster than any manual method while producing connections that pass electrical inspections flawlessly. Remember—the drill is just a tool; your understanding of wire behavior under rotation makes the difference between a pro finish and a hazardous mess. Now grab that drill and turn your next wiring job into a speed demonstration.


