
That cluster of small holes from a misplaced picture hook or a single gaping hole left by a removed shelf bracket is a universal homeowner headache. Whether you’re prepping for a rental inspection or getting your house ready to sell, knowing how to repair drill holes in wall surfaces properly is non-negotiable. Many DIYers attempt quick fixes only to end up with shiny patches that scream “here’s where I tried to hide something.” The truth? With the right techniques, you can make drill holes disappear completely—even if you’ve never held a putty knife before.
This guide cuts through the confusion with battle-tested methods straight from professional drywall repairers. You’ll learn why toothpaste fails as a long-term solution, how to match any wall texture perfectly, and the critical priming step 90% of DIYers skip that ruins their repair. By the end, you’ll transform those ugly drill holes into invisible patches that survive tenant inspections and real estate showings.
Safety First: Preparing Your Wall Repair Workspace
Before touching any tools, protect yourself and your space from drywall’s messy reality. Drywall dust contains fine particles that irritate lungs and eyes while coating every surface like toxic snow. Skipping prep turns a 30-minute job into a 3-hour cleanup nightmare.
Clear the Area and Protect Floors from Drywall Dust
Move furniture at least 6 feet from the wall and cover everything with canvas drop cloths (not plastic—they trap moisture). Tape plastic sheeting to the ceiling to catch falling debris. For holes near baseboards, apply painter’s tape along the trim to prevent sanding scratches. Pro tip: Lay down a second drop cloth you can fold inward when sanding—this traps 80% of escaping dust.
Essential Safety Gear for Sanding Drywall Repairs
Never sand without an N95 respirator mask and safety goggles. Drywall compound contains crystalline silica, a known carcinogen when inhaled. Keep a window open for ventilation but avoid fans that spread dust. Wear old clothes you can discard afterward—drywall dust embeds permanently in fabric fibers. Warning: If repairing pre-1978 walls, test for lead paint before sanding.
Identify Your Hole Type: Small, Medium, or Large Drill Damage
:max_bytes(150000):strip_icc()/standard-drywall-sizes-and-thicknesses-1822827_final-370b17269b774557950cf617db98717a.png)
Your repair method depends entirely on the hole’s size. Measuring incorrectly leads to failed repairs that crack or show through paint. Use a tape measure against the hole while wearing gloves to avoid spreading drywall dust.
Small Holes (1/4-inch or less): Nail and Pin Holes
These pinprick holes from picture hooks or small nails need minimal intervention. The telltale sign? You can’t fit a toothpick through it. Attempting heavy-duty repairs here creates raised bumps that stand out more than the original hole. Visual cue: Shine a flashlight sideways across the wall—if the hole casts no shadow, it’s small.
Medium Holes (1/4-inch to 2 inches): Anchor and Screw Damage
This is the most common drill hole size from TV mounts or curtain rods. They’re too big for spackle alone but don’t require structural backing. The critical threshold? Holes wider than 1/2 inch need mesh tape reinforcement. Check: Insert a standard pencil eraser—if it fits snugly, you’re in medium territory.
Large Holes (Over 2 inches): When You Need Advanced Repair
Caused by misdrilled holes for heavy shelves or accidental impacts, these expose the wall cavity. Anything over 6 inches usually requires professional help, but 2-6 inch holes are DIY-able. Red flag: If you see insulation or studs through the hole, you’re dealing with large-damage territory.
Select the Right Spackle or Compound for Your Drill Hole Size
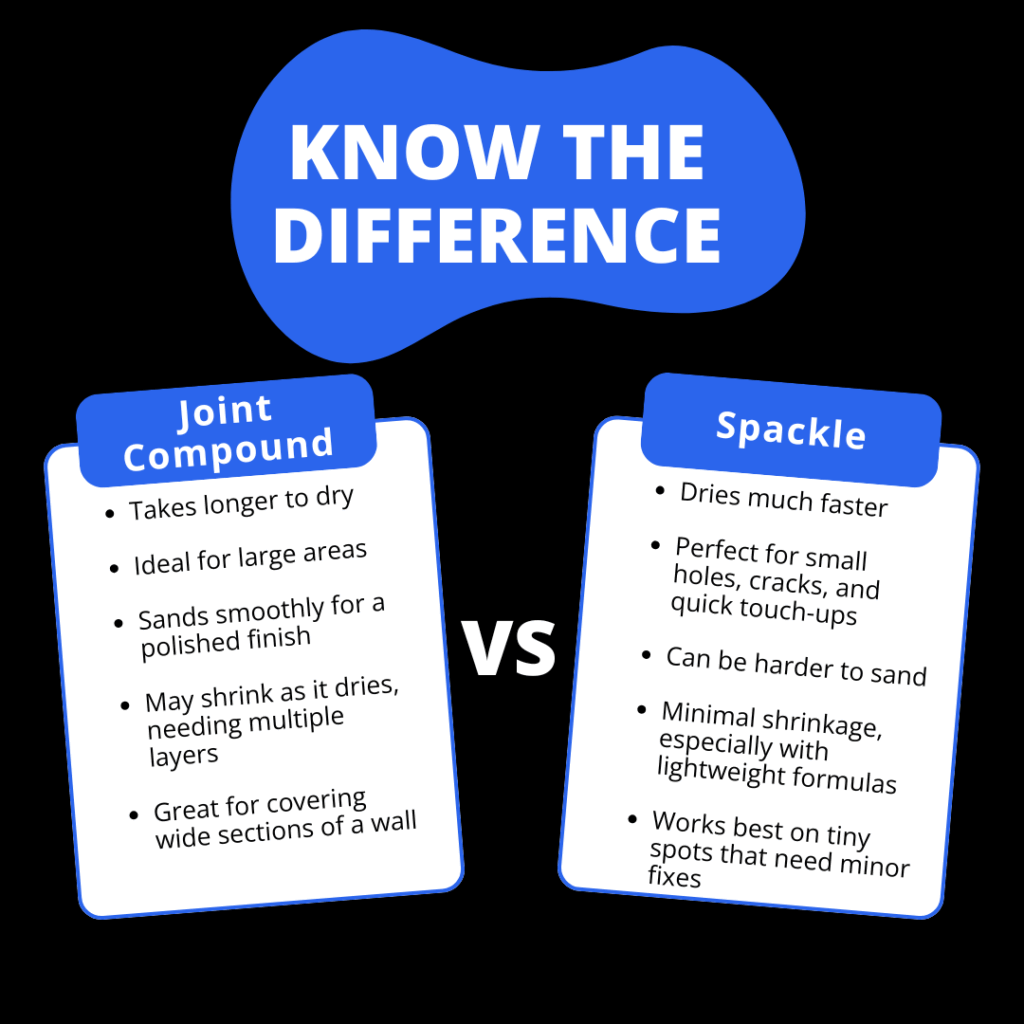
Choosing the wrong filler guarantees visible repairs. Many homeowners grab the cheapest spackle only to watch it crack days later. Your hole size and timeline dictate the perfect material.
Best Fillers for Pinholes Under 1/4-inch
Use lightweight spackle (not all-purpose) for true pinholes. It dries in 15-30 minutes and sands smooth without shrinking. Avoid: Vinyl-based spackles—they stay rubbery and won’t accept paint properly. Scoop with a 1-inch putty knife and apply in one thin layer. Time-saver: Keep a tube of pre-mixed spackle in your emergency kit for last-minute rental inspections.
Why Joint Compound Beats Spackle for Holes Over 1/2-inch
For medium and large holes, lightweight drywall joint compound (“mud”) is non-negotiable. It bonds stronger to drywall paper and shrinks less than spackle. Critical tip: Buy pre-mixed “lightweight” compound—it’s easier to sand than traditional heavy mud. Standard mud takes 24 hours to dry; rushing this causes peeling paint later.
Toothpaste as a Last-Resort Temporary Fix
Only consider white, non-gel toothpaste for pinholes when you have 10 minutes before a rental inspection. It dries hard enough to pass visual checks but will wash out with moisture. Never use for: Holes over 1/8-inch, textured walls, or any repair meant to last. This is purely a 24-hour emergency cover-up.
Fill Small Drill Holes in 3 Minutes with Spackle
Small holes are the easiest to fix but最容易 to mess up through overfilling. The goal isn’t perfect smoothness yet—it’s creating a solid base for sanding.
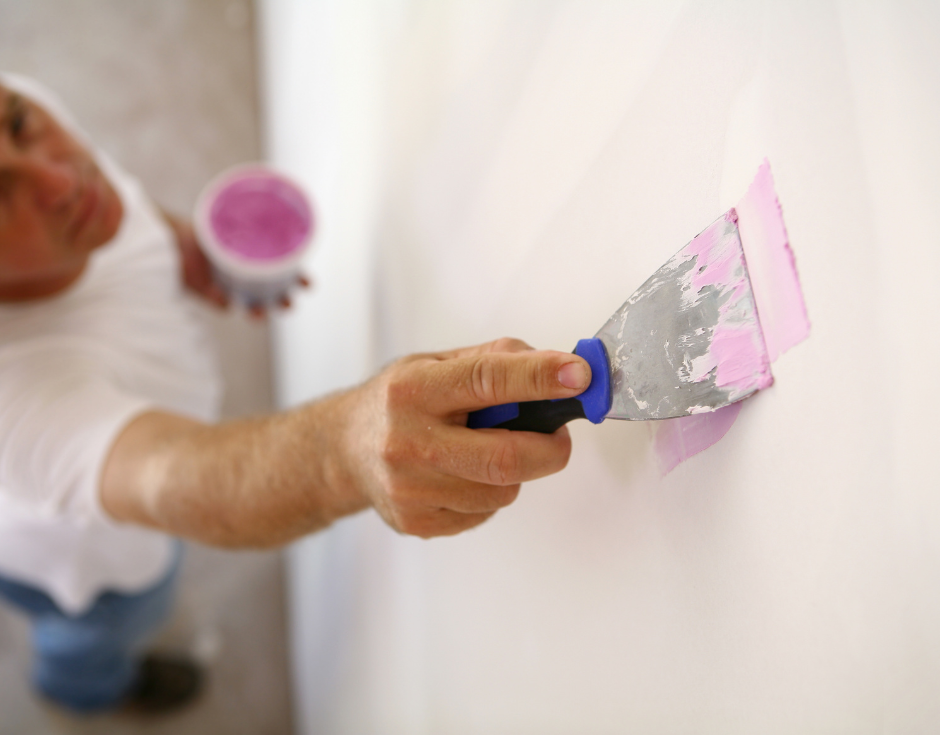
Clean the Hole and Apply Spackle Correctly
Wipe the hole with a dry microfiber cloth to remove dust (damp cloths weaken drywall paper). Load your putty knife with a pea-sized spackle amount. Press firmly into the hole at a 45-degree angle, forcing material deep into the cavity. Key technique: Scrape the knife flat across the wall in one motion to remove excess—don’t dab or you’ll create ridges.
Why Slightly Overfilling Prevents Sanding Craters
Leave the patch 1/32-inch proud of the wall surface. This compensates for sanding shrinkage. If you scrape perfectly flush initially, sanding creates a dip that shows as a shadow after painting. Pro move: For clustered pinholes, fill all holes simultaneously with one broad stroke of your knife.
Sand Drywall Repairs Smooth Without Creating New Damage
Most failed repairs happen here. Aggressive sanding creates heat that melts compound, while insufficient sanding leaves ridges. The difference between invisible and obvious repairs is this step.
The Right Grit Sandpaper for Each Repair Stage
Start with 120-grit sandpaper wrapped around a sanding sponge for initial leveling. Switch to 220-grit for final smoothing. Never use: Power sanders on small patches—they remove material too quickly. Hold the sponge flat against the wall and use light circular motions. Stop immediately if you see brown drywall paper—the patch is too thin.
How to Check for Imperfections with a Work Light
Hold a flashlight parallel to the wall (not pointing at it). Shadows reveal dips and bumps invisible under normal light. Run your palm over the patch—if you feel any texture change, keep sanding. Critical rule: Sand only when compound is bone-dry. Testing too soon creates sticky gunk that ruins sandpaper.
Prime and Paint to Hide Drill Hole Repairs Completely
Skipping primer is the #1 reason repairs “flash” (show as darker spots). Patched areas absorb paint differently than undamaged walls, creating a permanent spotlight on your fix.
Why Skipping Primer Causes Flashing After Painting
Unprimed patches act like sponges, soaking up paint and leaving a dull, flat spot. Science fact: Drywall compound is more porous than factory-finished drywall. Apply a stain-blocking primer like Kilz Original with a 1-inch brush, extending 2 inches beyond the patch. Let dry 2 hours minimum—rushing this step voids all your previous work.
Feather Paint Beyond the Patch for a Seamless Blend
Use a small foam roller for textured walls or an angled brush for smooth walls. Apply paint in a “W” motion, starting from the center of the patch and feathering outward 6-8 inches. Never paint just the patch—it creates a visible circle. For best results, repaint the entire wall section between corners.
Avoid These 4 Common Drill Hole Repair Mistakes
Applying Thick Coats That Crack and Shrink
Thick compound layers dry unevenly—outside hardens while inside remains wet, causing cracks. Fix: Apply three thin coats instead of one thick coat. Let each dry 4 hours (minimum) before sanding and reapplying.
Rushing Drying Time Between Sanding and Priming
Moisture trapped under primer causes bubbling. Fix: Wait 24 hours after final sanding before priming. In humid climates, extend to 48 hours.
Ignoring Texture Matching for Visible Repairs
Smooth patches on textured walls stand out dramatically. Fix: Spray texture compound (like Homax Easy Touch) from 18 inches away, then lightly knock down peaks with a drywall knife.
Painting Without Priming the Patch
This guarantees flashing. Fix: Always prime—even if using “paint and primer in one” products. The primer layer is essential for sealing porosity.
Maintain Your Repaired Wall: Prevention Tips for Future Holes
Prevent future damage with strategic planning. Use a stud finder for anything over 5 pounds—hitting studs avoids anchor holes entirely. For non-stud locations, choose the right anchor: plastic anchors for light items (<10 lbs), toggle bolts for heavy objects. Keep leftover wall paint in labeled containers for touch-ups, and store texture samples in Ziploc bags taped inside your closet.
With these professional techniques, your drill hole repairs will become invisible—not just today, but through years of living. The secret isn’t expensive tools; it’s respecting drying times, matching textures, and never skipping that critical primer coat. Grab your putty knife and reclaim your walls—one perfect patch at a time.


