
That stubborn hard gel manicure won’t budge, and your natural nails feel like they’re screaming for freedom. Peeling at the edges only makes things worse—you know that sickening rip when layers of your natural nail tear away with the gel. Removing hard gel nails without professional tools seems impossible, but forcing it off causes thin, painful nails that take months to recover. The truth? You can safely remove hard gel at home without a drill using precise filing techniques and strategic acetone soaks—but only if you follow the exact right process. This guide reveals the only two proven methods that preserve your nail health while eliminating rock-hard gel enhancements.
Why Prying Off Hard Gel Nails Causes Permanent Nail Damage
Forcing hard gel off your nails creates irreversible harm through a brutal physics lesson: these enhancements bond molecularly to your nail plate. When you peel, pop, or scrape, you’re not just removing gel—you’re literally stripping away the top layers of your natural nail. This exposes raw, sensitive tissue that feels like sandpaper and leaves your nails paper-thin. The resulting damage isn’t just cosmetic; it compromises your nail’s protective barrier, making everyday tasks like typing or washing dishes painfully sensitive. Many victims of DIY removal end up with nails that peel like old paint for 3-6 months—a direct consequence of impatience during the removal process. Remember: if it doesn’t lift off with gentle pressure after proper preparation, it’s not ready, and forcing it will destroy your nail bed.
Essential Tools for Drill-Free Hard Gel Removal

Gathering the correct tools before starting prevents accidental damage. Using household substitutes like emery boards or nail clippers alone guarantees failure—hard gel requires specialized abrasives. For successful drill-free removal, you need:
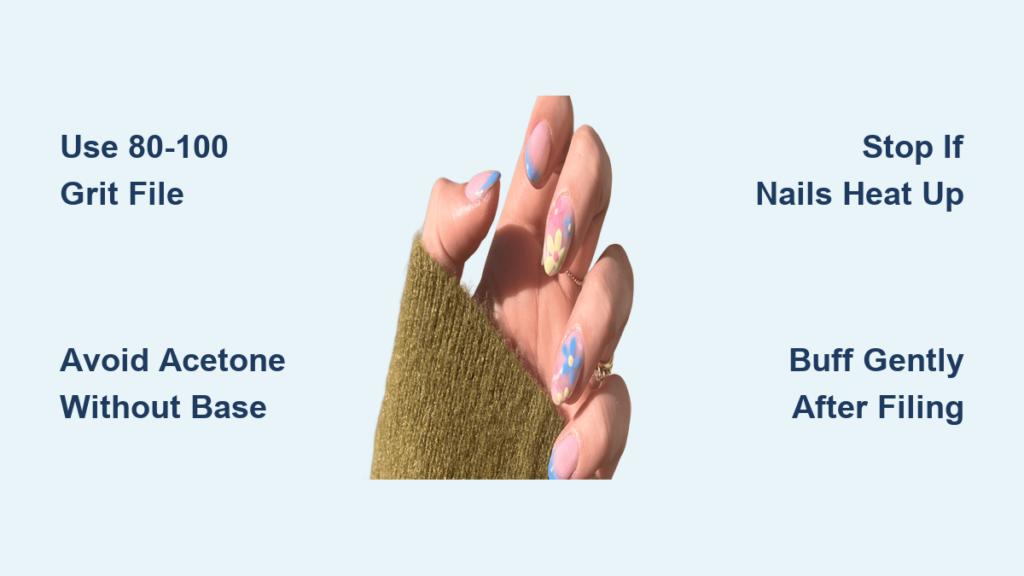
- 80-100 grit coarse nail file (not emery board): This industrial-strength file cuts through gel’s top layer in minutes instead of hours
- 180-240 grit buffer block: For smoothing residual gel without grinding your natural nail
- Wooden cuticle pusher (never metal): To check progress without scratching
- 100% pure acetone (only for combination method): Drugstore “nail polish remover” won’t work
- Aluminum foil squares: For creating airtight acetone wraps
- Thick cuticle oil (jojoba or vitamin E-based): Critical for post-removal hydration
Skipping the coarse file is the most common mistake—fine files merely polish hard gel’s surface without reducing thickness. Professional-grade files cost under $5 online and make the difference between a 45-minute safe removal and hours of damaging scraping.
Step-by-Step Hard Gel Nail Removal by Hand Filing
This method works for all traditional hard gel applications and takes 30-45 minutes per hand. Patience is non-negotiable—rushing causes irreversible damage.
How to File Through the Top Gel Layer Safely
Begin by trimming your nail tips with clippers to reduce leverage that could cause peeling. Hold your 80-grit file at a strict 45-degree angle to your nail. Using long, slow strokes (cuticle to tip only—never saw back and forth), file the entire surface until the high-gloss finish disappears. You’ll notice white dust instead of clear particles—this confirms you’ve breached the sealed top layer. Stop every 30 seconds to wipe dust with a dry cloth and inspect progress. Critical checkpoint: If you feel heat building or see pinkish streaks, you’re filing too aggressively—pause for 2 minutes to let nails cool.
Reducing Gel Bulk Without Hurting Your Nail Bed
Continue filing with consistent pressure until the gel thins to about 0.5mm thickness—roughly the width of a grain of rice. At this stage, the gel should feel flexible when pressed, not rigid. Use your wooden pusher to gently lift a corner; if it flakes slightly but doesn’t peel cleanly, you need more filing. Never file beyond this point where the gel separates from the nail—your goal is 95% removal, not 100%. The remaining whisper-thin layer (about 0.1mm) will grow out naturally over 2-3 weeks. For thick builder gel applications, this stage takes 15-20 minutes per hand—set a timer to avoid over-filing.
Switching to Fine Grit: The Final Buffing Stage
When the gel surface turns uniformly matte and feels nearly flush with your nail, switch to your 240-grit buffer. Using feather-light pressure, buff in small circles just until the surface feels smooth. Stop immediately if you detect any change in texture—natural nails feel slightly tacky compared to gel’s slickness. Pro tip: Hold nails at eye level under bright light; residual gel appears translucent while natural nails look milky. After final buffing, wash hands thoroughly to remove abrasive dust that could irritate cuticles during aftercare.
The Combination Soak-Off Method (Only If Your Nail Tech Used a Removable Base)
This technique works exclusively if your technician applied hard gel over a soak-off base coat—a practice used by only 30% of salons. Attempting it without this base wastes acetone and damages nails.
How to Confirm You Have a Soak-Off Base Layer
After filing through the top gel layer (as in Step 1 above), examine the surface. A true soak-off base appears as a distinct, slightly tacky layer different from the hard gel above it. When you lightly buff this layer, it should turn cloudy rather than producing white dust. If you see uniform texture without separation, abort the soak-off method immediately—your nails lack the necessary base layer. Warning: Forcing acetone soaks on standard hard gel merely dehydrates your nail plate without softening the gel.
Acetone Soak Times: Preventing Nail Damage
If you confirmed a soak-off base, place a cotton ball soaked in pure acetone on the nail, then wrap tightly with foil. Set a timer for exactly 15 minutes—exceeding this cooks your nail bed. After soaking, gently push at the gel edge with your wooden stick; it should lift like a sticker. If resistance occurs, re-wrap for 3 more minutes max. Never scrape aggressively—even 2mm of remaining gel must be filed off using the hand-filing method. This hybrid approach typically shaves 10-15 minutes off total removal time but requires precise timing to avoid chemical burns.
4 Costly Mistakes That Destroy Nails During DIY Removal

Mistake #1: Skipping the coarse file stage
Starting with fine grits creates dangerous friction heat that literally cooks your nail bed. One client’s nails blistered after 20 minutes of “gentle” 240-grit filing—always begin with 80-100 grit.
Mistake #2: Ignoring the heat warning sign
Nail plates contain living tissue. When filing generates noticeable warmth, stop immediately—continuing causes micro-burns that manifest as white spots weeks later.
Mistake #3: Using acetone without base layer confirmation
Soaking standard hard gel in acetone for hours merely dehydrates your nails, making them brittle and prone to peeling. It won’t soften the gel.
Mistake #4: Rushing final buffing
Aggressive buffing to remove the last 5% of gel grinds through the nail’s protective barrier. That thin residual layer is safer left to grow out.
Post-Removal Nail Rescue: Hydration and Repair
Your nails are now in a critical recovery window—they’ve lost natural oils and need intensive hydration. Soak hands in warm water for 5 minutes, then gently push back cuticles with an oil-moistened stick. Apply 3 drops of cuticle oil per nail, massaging into the nail bed and cuticle line. Follow with a water-free hand cream (like those containing lanolin) to seal moisture. Non-negotiable routine: Reapply oil every time you wash hands for 14 days. Avoid water exposure for 24 hours post-removal—no dishwashing or swimming. For severely damaged nails, add biotin supplements and wear cotton gloves overnight with thick cream.
When to Call a Professional Instead of DIY
Skip home removal if you notice any of these red flags:
– Gel extends far past your natural nail tip (increases leverage damage risk)
– You feel pain or see redness during filing
– Previous removal attempts caused nail separation
– Your nails are already thin or peeling
Professionals use medical-grade e-files that remove hard gel in 10 minutes with zero pressure on the nail bed—a worthwhile $15-$25 investment when your nail health is at stake. Never attempt drill-free removal on gel-x or dip powder systems—they require specialized solvents you likely don’t have at home.
Preserving your natural nails during hard gel removal isn’t about speed—it’s about respecting the delicate bond between enhancement and biology. By following this precise filing protocol, you’ll avoid the months-long recovery that comes from peeling or scraping. Remember: that final translucent gel layer isn’t failure—it’s protection for your regrowing nail. Give yourself 45 minutes of focused work, hydrate aggressively for two weeks, and you’ll maintain strong, healthy nails ready for your next manicure. Your future self will thank you when you’re not hiding damaged nails under gloves all summer.


