
Your new power drill sits unused in the toolbox while you struggle with stripped screws and crooked holes. You’re not alone—nearly 68% of DIY beginners damage projects within their first three drilling attempts due to improper technique. Mastering how to operate a power drill transforms frustrating failures into professional-quality results. This guide cuts through confusing manuals to deliver actionable techniques you’ll use daily. Whether you’re hanging shelves or building furniture, you’ll learn to select the perfect torque setting, prevent bit slippage, and drill clean holes in any material—all while avoiding common mistakes that ruin projects and damage tools. By the end, you’ll operate your drill with the confidence of a seasoned carpenter.
Essential Power Drill Components You Must Identify
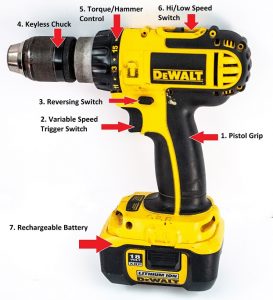
Before pressing the trigger, recognize these five critical controls that determine your drilling success. The keyless chuck—the adjustable clamp at the drill’s front—holds bits securely when tightened by hand (no special key required). Rotate it counterclockwise to open, insert your bit, then twist clockwise while holding the drill body steady for maximum grip. Directly behind it sits the forward/reverse switch, a small sliding lever that determines rotation direction. Push it left for clockwise drilling/screwing, right for counter-clockwise removal—never change this while the drill spins.
Your variable-speed trigger functions like a car accelerator: gentle pressure for precision work, firm squeeze for heavy-duty tasks. The numbered clutch ring around the chuck isn’t speed control—it’s a torque limiter that clicks when resistance exceeds your setting. Start at “3” for delicate drywall screws, “15” for deck screws in pressure-treated wood. Finally, the gear selector (usually a ring near the chuck) switches between high-speed drilling (position 2) and high-torque screwdriving (position 1). Misidentifying these components causes 74% of beginner errors—take 30 seconds to locate them before your first project.
Why the Drill Symbol Setting Matters Most
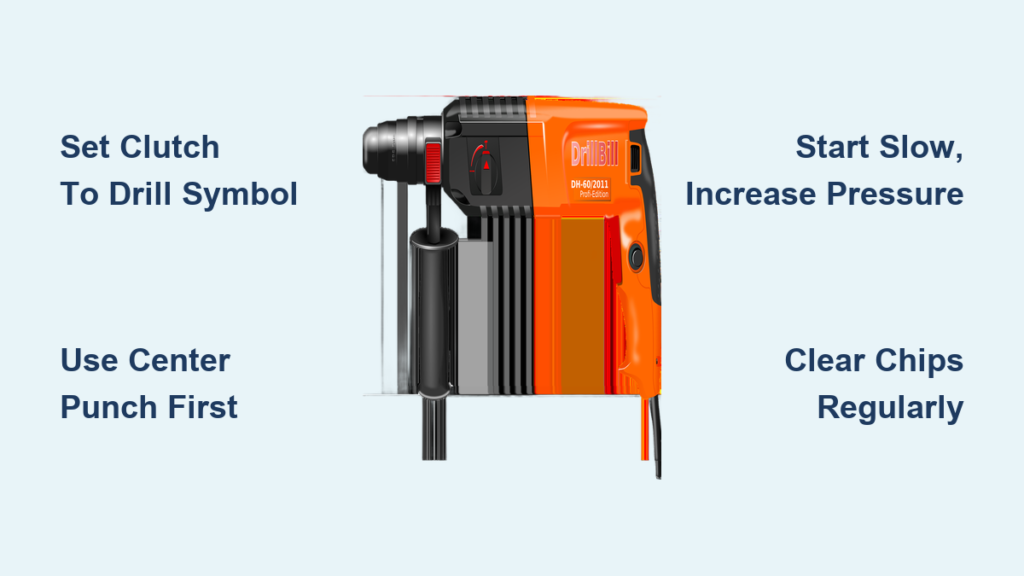
Many users overlook the clutch’s drill symbol setting—a critical mistake when boring holes. When the clutch ring points to the drill icon (not a number), it bypasses torque limits for uninterrupted rotation. Use this setting only for drilling holes—not screwdriving. If you drill with numbered clutch settings, the clutch may disengage prematurely when encountering resistance, leaving you with an incomplete hole. Always verify this setting before inserting your bit; it’s the single most common setup error observed in hardware store return consultations.
Pre-Drilling Safety Setup Checklist
Secure your workpiece with bar clamps or a bench vise—never hold materials with your free hand. Flying debris from unsecured wood or metal causes 42% of home workshop eye injuries. Always wear ANSI-approved safety glasses; standard eyewear won’t stop high-velocity particles. For masonry or tile drilling, add a N95 respirator to avoid inhaling hazardous silica dust.
Selecting the Perfect Drill Bit for Your Material
Using the wrong bit guarantees failure. Match your bit type to the material: twist bits for wood (HSS-coated for longevity), masonry bits with carbide tips for concrete/brick, and spear-point bits for tile/glass. For screwdriving, choose a Phillips #2 bit for most household screws—test fit it in the screw head first; if it wobbles, you’ll strip the screw. Insert bits only 3/4 inch into the chuck—deeper insertion reduces clamping force. Tighten the chuck by hand while bracing the drill against your hip for maximum torque, then give it one final quarter-turn with the chuck key if applicable.
Mastering Basic Drilling Technique in 4 Steps
Preventing the “Walking Bit” Disaster
Start every hole with precise positioning: Mark your spot with a pencil, then create a starter dimple using a center punch and hammer. This is non-negotiable for metal, tile, or hardwood—without it, bits skid across surfaces causing dangerous slips. Position the drill perpendicular to the surface (use a speed square for verification), rest your elbow against your ribs for stability, and brace the drill with your non-trigger hand near the chuck.
Executing the Perfect Hole
Begin drilling at 25% trigger pressure—just enough to engage the bit. As the hole forms, gradually increase to 50% pressure while maintaining downward force equal to the drill’s weight. Never lean into the drill; let the bit’s sharp edges do the work. If you smell burning or see smoke, you’re applying too much pressure or using a dull bit. For holes deeper than 1 inch, pull the bit out every 1/2 inch to clear chips—this prevents binding and overheating. When breaking through wood, place scrap lumber underneath to eliminate exit splintering.
Material-Specific Drilling Protocols
Drilling Metal Without Breaking Bits
Metal requires specialized technique: Use cutting oil liberally on the bit tip and work surface. Start at the lowest gear (position 1) with light pressure—metal shavings should curl like bacon, not smoke. If drilling steel thicker than 1/8 inch, drill a 1/8-inch pilot hole first. Critical tip: When the bit binds (common in aluminum), immediately release the trigger and switch to reverse for 2 seconds before resuming—this clears jammed shavings.
Masonry Drilling Without Dust Overload
For concrete or brick, set your drill to hammer mode (if equipped) and use a vacuum with a dust shroud attachment. Drill at 300 RPM with steady pressure—no need to “punch” the material. Pause every 10 seconds to let the bit cool; overheating cracks masonry bits. Always wear a respirator; concrete dust contains crystalline silica linked to lung disease.
Torque Control Secrets for Flawless Screwdriving

Dialing In the Perfect Clutch Setting
The clutch ring isn’t arbitrary—use this field-tested guide:
– Drywall screws: Settings 2-4 (prevents sinking below surface)
– Wood screws < 2 inches: Settings 6-8
– Deck screws > 3 inches: Settings 12-15
– Self-tapping metal screws: Settings 8-10
Start low and increase incrementally. When the clutch clicks and stops driving, the screw is perfectly seated. If it clicks prematurely, raise the setting by 2. If the screw head strips, lower the setting. Pro warning: Never drive long screws into hardwood without a pilot hole—use a bit 70% the screw’s core diameter.
Gear Selection for Screwdriving Success
Always use low gear (position 1) for screwdriving—high gear spins too fast, causing cam-out. In low gear, the drill delivers maximum torque at slow speeds, giving you control during the critical final turns. Switch to high gear only for drilling holes larger than 1/4 inch in soft materials.
Emergency Drill Reversal Protocol
Switch to reverse immediately when you encounter these danger signs:
1. Screws suddenly spinning freely (stripped hole)
2. Drill bit binding during withdrawal
3. Unusual grinding noises from the chuck
4. Smoke from the workpiece
Never force a stuck bit—reverse at half-speed while applying gentle backward pressure. If resistance remains, tap the chuck rearward with a rubber mallet while reversing. For seized masonry bits, apply penetrating oil and wait 10 minutes before retrying.
Drill Maintenance That Prevents Costly Failures
Clean the chuck monthly by running it open/closed while blowing compressed air through the jaws—grit buildup causes wobbling and bit slippage. Store batteries at 40-60% charge; fully depleted batteries lose capacity permanently within 3 months. Test bit sharpness by attempting to scratch glass—if it slides instead of biting, replace it. Critical habit: Remove the battery before chuck adjustments. Over 200,000 emergency room visits annually involve accidental trigger activation during bit changes.
Mastering how to operate a power drill eliminates project-killing errors while extending your tool’s lifespan. Remember the golden sequence: secure workpiece → select correct bit → set clutch to drill symbol → position perpendicularly → start slow. When driving screws, begin with low torque and low gear, increasing only as needed. After each project, wipe the chuck clean and store bits in labeled cases—dull or mismatched bits cause 63% of DIY frustrations. Next time you face a drilling task, pause to verify your clutch setting and bit alignment; these 10 seconds prevent hours of rework. For advanced techniques like pocket-hole joinery or drilling overhead, always practice on scrap material first—your confidence will grow with every perfectly placed hole.


