
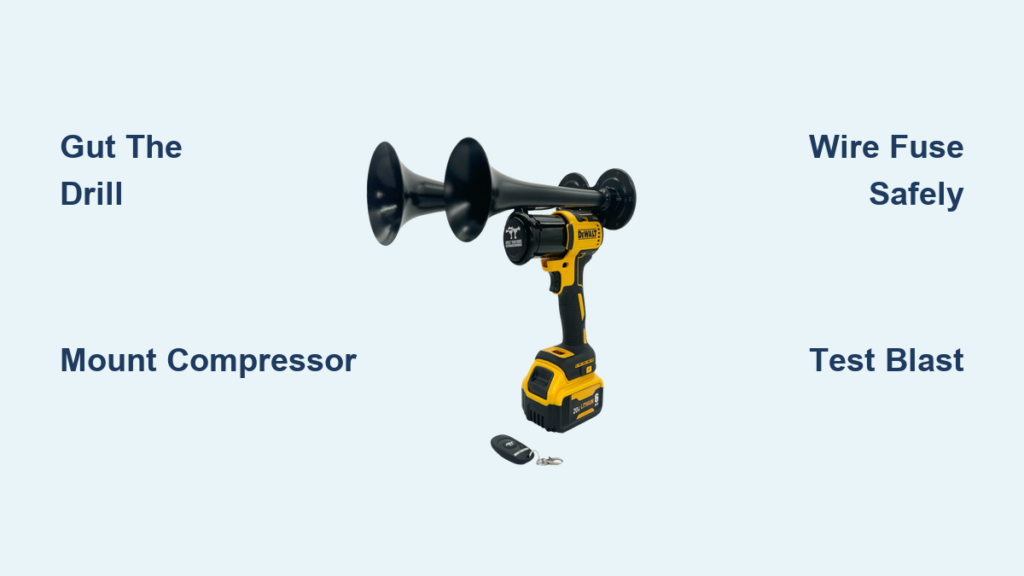
That dead drill gathering dust in your garage isn’t trash—it’s your ticket to building the loudest novelty horn on the block. Learning how to make a drill horn repurposes a non-functional power tool into a deafening 120+ dB airhorn system that blasts louder than most car horns. This DIY project breathes new life into broken drills or impact drivers by installing a compact 12V air compressor kit inside the original housing, powered by the tool’s own battery system. You’ll create a self-contained, trigger-activated horn that fits in your hand yet delivers train-horn intensity—perfect for off-road adventures, worksite warnings, or just impressing your neighbors (responsibly, of course). In this guide, you’ll discover exactly how to make a drill horn safely and effectively using basic tools and under $50 in parts.
Why Your Broken Drill Is the Perfect Horn Foundation
A drill horn isn’t actually a siren—it’s a clever repurposing of your cordless tool’s housing, battery, and trigger mechanism to power a specialized 12V airhorn kit. When you learn how to make a drill horn, you’re essentially converting the drill’s empty shell into a mobile air compressor station. The beauty lies in the existing design: the battery provides instant power, the trigger switch becomes your activation button, and the rugged housing protects delicate components. Unlike bulky commercial airhorns, this version fits in your palm and delivers a 3-second blast at 120-150 dB—the equivalent of a jet engine at takeoff. Crucially, you only need a drill with a functional battery and trigger; the motor can be completely dead. This makes it ideal for tools you’d otherwise recycle, turning e-waste into an incredibly loud utility device.
Must-Have Parts for Your Drill Horn Build

Skip generic “tool lists” and grab these specific components before starting your drill horn project. You’ll need exactly four categories of parts to successfully build how to make a drill horn a reality.
Critical Components Breakdown
- Donor Tool: A 12V-20V cordless drill or impact driver with working battery and trigger switch (motor can be dead). Ryobi, DeWalt, or Makita models work best due to common battery compatibility.
- 12V Horn Kit ($20-$30): Must include electric air compressor, dual-tone trumpet horns (high/low pitch), 0.25L air tank, and all fittings. Avoid kits missing the tank—it’s essential for sustained blasts.
- Modification Tools: Dremel with cutting/sanding bits (for housing mods), soldering iron, heat-shrink tubing, and a 10A in-line fuse (non-negotiable for safety).
- Mounting Supplies: Hot glue gun, zip ties, and a momentary push-button switch ($3 at hardware stores) for horn activation.
Build Your Drill Horn in 4 Critical Steps
Follow this precise sequence to avoid common pitfalls. Each phase includes pro tips most tutorials miss—like why skipping the air tank guarantees failure.
Step 1: Gut and Prep the Drill Housing (20 Minutes)
- Remove the battery and discharge any residual power by pressing the trigger. Unscrew all casing screws—many hide under rubber grips or labels.
- Completely evacuate internals: Discard the motor, gears, chuck, and circuit board. Keep ONLY the plastic housing, battery connector, and trigger switch wires. Wipe out metal shavings with a magnet to prevent shorts.
- Test-fit the compressor: Place the 12V unit inside the hollow shell. If it doesn’t sit flush (it won’t), mark high spots with a Sharpie. Pro tip: Rotate the compressor 90 degrees—most first-timers install it wrong, causing rattling.
Step 2: Modify Housing and Mount Components (30 Minutes)
- Dremel the cavity: Use a grinding bit to remove internal ribs where the compressor sits. Sand edges smooth—rough plastic cracks under vibration. Goal: Snug fit where the compressor doesn’t move when you shake the housing.
- Mount external horns: Drill two 1/4″ holes in the drill’s rear exhaust vents. Secure horn trumpets facing backward using zip ties through these holes. Never force horns inside—they need airflow to reach 120dB.
- Secure the air tank: Glue the small tank (0.25L minimum) to the housing’s base with epoxy. Position it near the compressor outlet for shortest hose runs.
Step 3: Wire for Safety and Reliability (25 Minutes)
Skip variable-speed wiring—this is where most builds fail. Use this foolproof method:
1. Install the fuse FIRST: Cut the battery’s positive wire. Solder the 10A in-line fuse within 2 inches of the battery connector. This prevents fire if wires short.
2. Bypass the trigger: Disconnect original motor wires. Solder the compressor’s red wire directly to the trigger’s output wire (use multimeter to confirm activation).
3. Add the horn button: Wire the momentary switch between the compressor’s solenoid valve and positive power. Critical: This button ONLY activates the horn blast—it doesn’t control the compressor.
Step 4: Air System Integration and Final Test (15 Minutes)
- Connect compressor outlet → air tank inlet → tank outlet → horn solenoid valve using included hoses. Wrap all fittings with Teflon tape to prevent 90% of leaks.
- Reassemble housing loosely. Insert battery and press the trigger: The compressor should whir for 5-8 seconds until the tank pressurizes (stops automatically).
- Test blast sequence: With compressor running, press the horn button. You’ll hear a sharp 3-second HONK. If not, check solenoid wiring and tank pressure gauge (should read 80-100 PSI).
Avoid Hearing Damage: Drill Horn Safety and Power Tips

NEVER skip hearing protection—these horns exceed 120 dB, causing instant ear damage. Test only outdoors away from people. For legal compliance: This is strictly for off-road/private property use; never install on vehicles. Regarding performance:
* Battery voltage mismatch: 18V/20V batteries overdrive 12V compressors, causing overheating. Fix with a $5 buck converter (set to 12V) between battery and compressor.
* Weak blasts? Let the tank fully pressurize (8+ seconds) before honking. Add a second tank from an auto store for longer blasts.
* Compressor won’t stop? The tank’s pressure switch is faulty—replace immediately to prevent burnout.
Top 4 Drill Horn Builder Questions Answered

Can I use any dead power tool?
Yes, but 12V-14V models work best. 20V tools require a voltage regulator. Avoid tools with damaged battery contacts—the system won’t power on.
How loud is “120 dB” really?
It’s louder than a chainsaw (110 dB) and matches a ambulance siren. At 3 feet, it can cause permanent hearing loss in under 30 seconds. Always wear ear protection.
Why does my horn sputter instead of blasting?
Air tank is too small or leaking. Check fittings with soapy water—bubbles reveal leaks. Upgrade to a 0.5L tank for consistent blasts.
How long does a battery last per charge?
With a 4.0Ah battery: 15-20 full blasts (3-second each). For extended use, carry spare batteries or connect to a car battery via adapter cables.
Maximize Your Drill Horn’s Lifespan and Impact
Mastering how to make a drill horn delivers more than just noise—it’s a trophy of resourceful engineering. Your finished unit should deliver 15+ loud, reliable blasts per charge when built correctly. For longevity, store it with the battery removed and wipe compressor vents monthly to prevent dust clogs. Remember: This isn’t a toy but a serious noise-making tool. Always check local ordinances before use, and never point it at people or animals. When built right, your drill horn becomes an invaluable worksite safety tool or off-road adventure essential. Now that you know how to make a drill horn, grab that dead drill from the junk pile—you’ll have a show-stopping horn ready in under 2 hours. Just keep the ear protection handy!


