
Your drill vanishing into a toolbox abyss isn’t just frustrating—it’s costing you hours each year. A 2019 workshop efficiency study found woodworkers waste 12 minutes daily searching for misplaced tools, with cordless drills ranking #1 for “most commonly lost.” But you don’t need expensive plastic organizers. Building a custom wooden drill holder solves this by cradling your tool securely while showcasing your craftsmanship. Unlike store-bought racks that force awkward angles or scratch finishes, a handmade holder fits your specific drill model perfectly and mounts anywhere in your workspace. In under 90 minutes with basic tools, you’ll create a storage solution that protects your investment and transforms chaotic corners into efficient stations.
This project works whether you’re a beginner with a $50 drill or a pro with Milwaukee M18s. The beauty lies in its adaptability—you control the dimensions, mounting style, and extras like bit storage. No more wrestling drills from cramped slots or watching them topple over. Just slide your tool home and get back to creating. By the end of this guide, you’ll have a sturdy, professional-looking holder that keeps your drill protected, accessible, and ready for action.
Precise Drill Measurements for Your Perfect Holder
Skip this step and you’ll force your drill into a too-tight hole or watch it wobble loose. Accurate measurements prevent damage to your tool’s finish while ensuring it stays put during workshop vibrations. Most failed DIY holders stem from guessing dimensions instead of measuring your actual drill.
Why Vertical Slot Design Beats Horizontal Trays
Vertical mounting keeps drills secure without stressing battery connections. Horizontal trays work for drill presses but cause cordless drills to slide out when batteries shift. A vertical slot with a 1.5–2″ deep cavity supports the drill’s center of gravity near the battery collar. This design also saves wall space—critical in small workshops—while keeping triggers and chucks fully exposed for quick grabs. For multi-tool racks, maintain 1.5″ minimum spacing between slots so you never snag adjacent tools.
Measure Your Drill for a Secure, Scratch-Free Fit
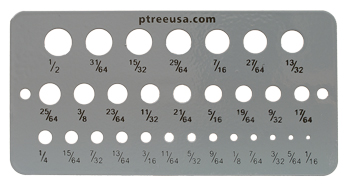
Grab calipers or a tape measure and record three critical dimensions:
– Handle diameter: Measure the widest point just above the trigger (typically 1.75–2.5″ for cordless drills). Add 1/4″ for clearance—this determines your hole size.
– Grip depth: Measure from the battery end to the front of the chuck. Your hole depth must exceed this by 1/2″ to prevent battery contact with the wood base.
– Trigger clearance: Note protrusions like side handles or LED lights. Trace your drill’s outline on paper to create a full-scale template—test it against your wood block before drilling.
Pro Tip: Clamp your template to the wood block and tap it with a mallet. The indentation shows exactly where the drill sits, revealing interference points you’d miss with measurements alone.
Exact Wood & Tools Required for a Sturdy Holder
Using the wrong materials guarantees a wobbly holder that cracks under your drill’s weight. Skip flimsy 1/2″ boards—they flex when loaded. The right supplies ensure your holder lasts decades while resisting workshop humidity and impacts.
Why 3/4″ Plywood Beats Solid Lumber
Plywood’s cross-grain layers prevent warping that plagues solid pine boards in garages. A 12″x12″ scrap piece costs under $3 at hardware stores and provides enough material for 2–3 holders. If you prefer solid wood, choose oak or maple (not pine) for drill bodies over 2 lbs—they withstand repeated insertions without splintering. Avoid MDF; it swells when exposed to moisture and can’t hold screws securely after 6 months.
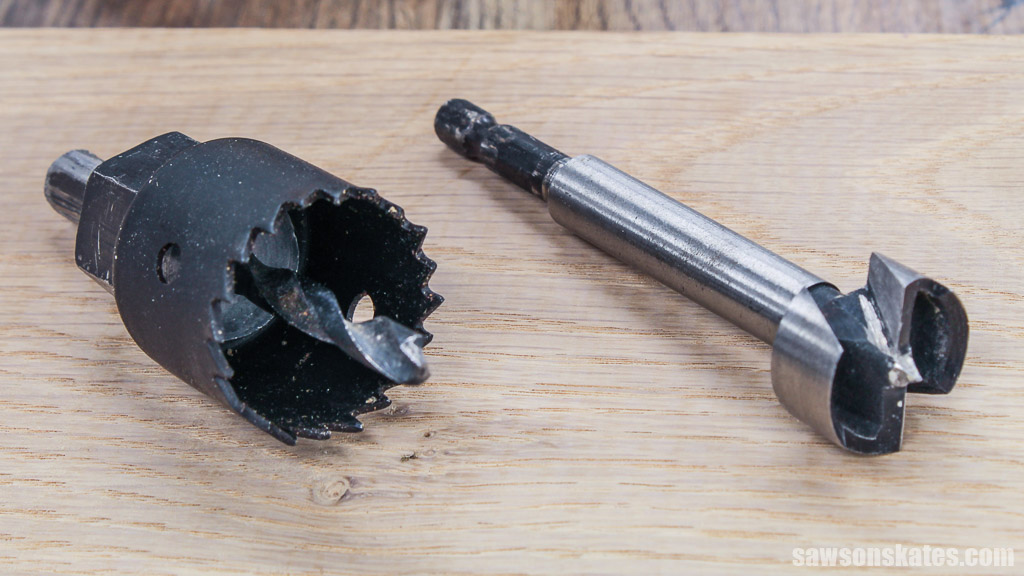
Must-Have Tools: Forstner Bits vs. Hole Saws
Spade bits create ragged holes that mar your drill’s finish. Invest in a single Forstner bit matching your measured hole size (e.g., 2″ for a DeWalt DCB203). Its flat bottom provides stable support, while the rim cuts cleanly without tear-out. If using a hand drill, clamp a scrap board beneath your workpiece to prevent blowout. For mounting, a router with 1/4″ roundover bit is non-negotiable—it chamfers edges to prevent splinters and gives pro results in 20 seconds per holder.
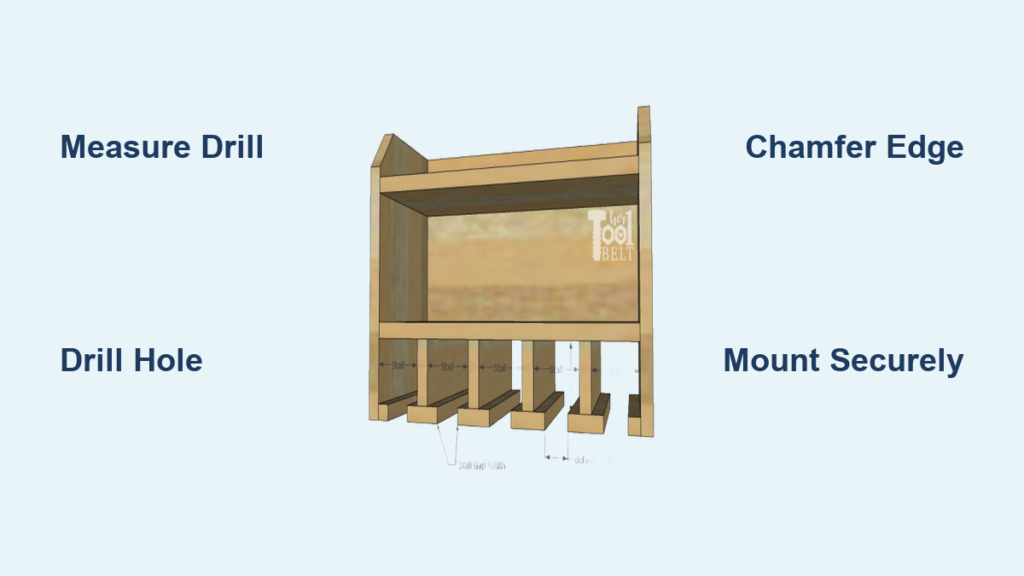
Build Your Drill Holder in 4 Steps: From Cutting to Mounting
This streamlined process eliminates complex joinery. You’ll complete each holder in under 45 minutes with minimal sanding. The key is drilling the hole before assembly—fixing errors is impossible once glued together.
Step 1: Cut Your Wood Block to Standard Dimensions
Rip a 5″x8″ block from 3/4″ plywood using a table saw (or have it cut at the store). For the base, cut a 7″x4″ rectangle—2″ wider than the block prevents tipping. Mark the block’s center point 2″ down from the top. Draw a circle using your measured hole diameter (e.g., 2.25″). Pro Tip: Score the circle lightly with a utility knife before drilling to minimize tear-out.
Step 2: Drill the Perfect Hole with Depth Control
Secure the block in a vise and set your Forstner bit’s depth stop to 1.75″. Drill slowly at 400 RPM, applying steady pressure. Stop when the bit’s shoulder touches wood—this creates a clean flat bottom. Test-fit your drill; if it binds, sand the hole’s interior with 150-grit wrapped around a dowel. If loose, glue thin wood strips into the hole and re-drill. Never force the drill—it should slide in with light pressure.
Step 3: Secure the Base to Prevent Tipping
Lay the base flat and apply wood glue to the block’s bottom edge. Position the block centered on the base, leaving 1″ clearance at the top. Clamp firmly and drill two 3/32″ pilot holes through the base into the block. Drive 1.25″ pocket screws upward (counterbored for invisible finish). Wipe excess glue immediately with a damp cloth—dried squeeze-out ruins your stain later.
Step 4: Mount with French Cleats for Modular Flexibility
Cut a 45° bevel along the holder’s top back edge using a table saw. Attach a matching cleat to your wall stud with 2.5″ screws. Slide the holder onto the cleat—it locks securely but releases with upward pressure. For pegboard mounting, screw a keyhole slot into the back. Never use drywall anchors—they fail under repeated tool weight. Always mount into studs for safety.
3 Professional Finishing Techniques for a Splinter-Free Holder
Skip these steps and your holder will shed splinters that scratch your drill’s finish. Proper finishing takes 10 minutes but makes the difference between a shop-made eyesore and a professional organizer.
Chamfer the Hole Edge to Protect Your Drill
Run a router with 1/4″ roundover bit around the hole’s top edge at 12,000 RPM. This slight bevel guides your drill home smoothly while eliminating sharp corners that chip during insertion. If routing isn’t possible, sand the edge at 45° using a sanding block—check with your fingernail; it should feel silky, not sharp.
Test Fit Before Final Sanding and Staining
Assemble the holder dry (no glue) and insert your drill 5–6 times. Look for:
– Wood dust on the drill: Indicates sanding is needed in that spot
– Drill rocking: Deepen the hole by 1/8″ incrementally
– Battery contact: Shave the base’s interior with a chisel
Only after perfect test-fits apply 220-grit sanding and your finish. Wipe-on polyurethane provides durable protection in one coat—oil finishes require weekly maintenance in dusty shops.
Add Battery Storage & Bit Holders to Your Drill Rack
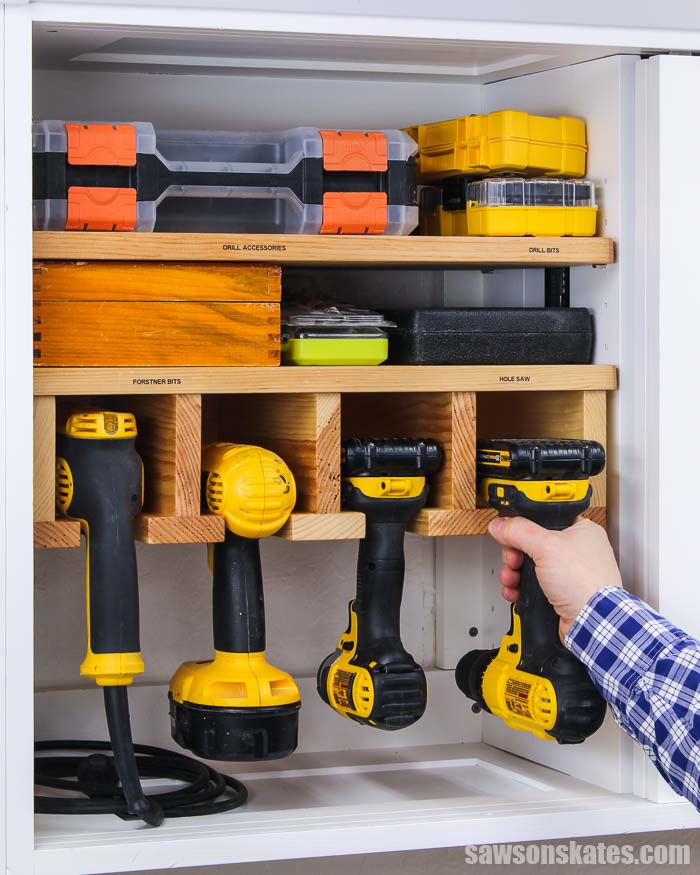
Transform a basic holder into a complete workstation with these workshop-tested upgrades. They solve the #1 complaint from woodworkers: “I still lose my bits and batteries.”
Integrate Charging Stations with Power Strip Mounting
Cut a 3″x5″ shelf from 3/4″ plywood and attach it 4″ above your drill holder using L-brackets. Mount a slim power strip underneath with double-sided tape. Drill two 1.25″ holes in the shelf for battery chargers—position them so cords hang straight down without tension. Label each charger slot with a wood-burning tool (e.g., “RED 18V”) to prevent mix-ups.
Create Accessory Compartments for Bits and Drivers
Drill three 3/8″ holes along the holder’s side for 1″ hex bits. For driver bits, glue a 1/8″ felt strip inside the main hole—it grips bits vertically without rattling. Add a magnetic strip (glued to the base’s front edge) to hold metal-tipped bits securely. Pro Tip: Paint the bit holes different colors using acrylic craft paint—match colors to your drill’s bit case for instant identification.
Your custom wooden drill holder isn’t just storage—it’s a workflow revolution. In less time than a single trip to the hardware store, you’ve created a solution that protects your tools, saves daily search time, and reflects your craftsmanship. Start with one holder for your most-used drill, then expand to a full modular wall system using French cleats. Within weeks, you’ll wonder how you ever worked without it. The real test? Next time you need your drill, you’ll find it in under 5 seconds—not after emptying three drawers. That’s the power of a holder built exactly for you, not mass-produced for everyone. Now grab your Forstner bit and reclaim your workspace—your drill (and your patience) will thank you.


