
Do you constantly waste time searching for your cordless drill in a cluttered toolbox or messy workbench? A well-designed drill holder solves this frustrating problem while protecting your valuable tool from damage. Learning how to make a drill holder takes just a few hours but delivers years of organized efficiency in your workshop. This guide walks you through creating a professional-quality storage solution that keeps your drill accessible, secure, and ready for action. Whether you’re a weekend DIYer or a professional tradesperson, this simple woodworking project transforms your workspace organization with minimal investment.
Essential Materials and Tools Checklist

Gathering everything before starting prevents mid-project frustration and ensures your drill holder construction proceeds smoothly. The right components determine both functionality and longevity of your finished piece.
Choosing Your Drill Holder Materials Wisely
Selecting appropriate materials makes the difference between a flimsy holder that fails and a robust solution that lasts years. For most DIYers, 3/4-inch plywood delivers the best balance of strength, stability, and affordability. This thickness supports standard cordless drills weighing 2-5 pounds without flexing or warping. If you prefer visible wood grain, birch or pine plywood offers better aesthetics while maintaining structural integrity. Avoid particleboard or MDF—these materials swell with moisture and won’t hold screws securely over time.
Complete Drill Holder Materials List:
* Primary Wood: 3/4″ plywood (a 2′ x 2′ piece suffices for multiple holders)
* Hardware: 1 1/4″ pocket hole screws or wood screws with matching pilot drill bit
* Adhesive: Waterproof wood glue for permanent joints
* Finishing Supplies: 120-grit and 220-grit sandpaper, plus your choice of finish (polyurethane recommended for workshop durability)
Critical Tools You’ll Need:
* Measuring tape, pencil, and carpenter’s square for precise layout
* Safety glasses and hearing protection (non-negotiable for power tool work)
* Cutting Tool: Table saw (most precise) or circular saw with guide
* Drilling Equipment: Drill/driver with Forstner or hole saw bit matching your drill’s diameter
* Clamps (at least two 6″ bar clamps) for secure assembly
Perfect Dimensions for Your Drill Holder Design

Your holder’s effectiveness hinges on accurate measurements tailored to your specific drill model. A one-size-fits-all approach often results in a wobbly or inaccessible storage solution.
Measuring for a Custom Drill Fit
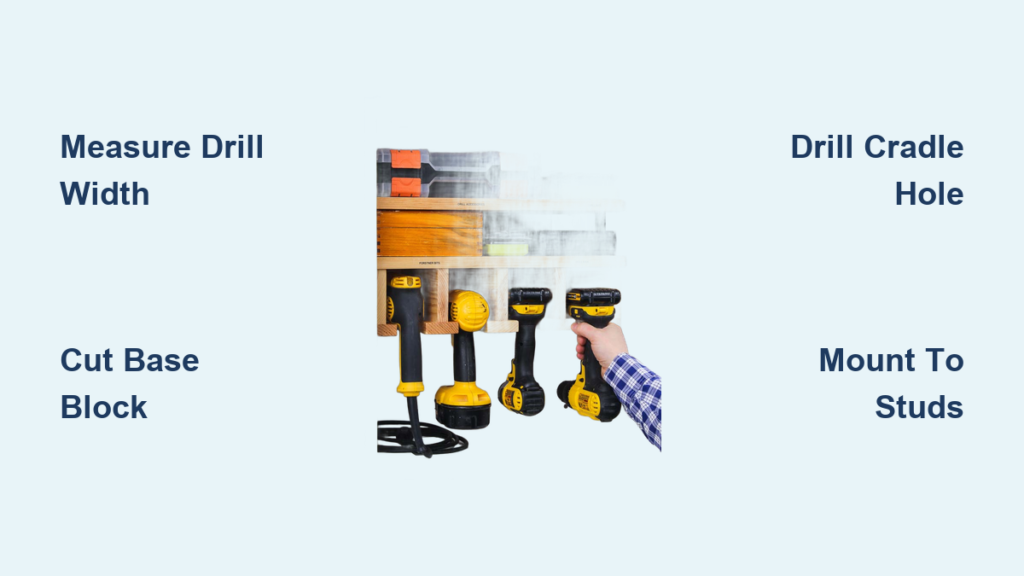
Grab your cordless drill and take these critical measurements before cutting wood:
* Handle/Battery Width: Measure the widest point of your drill’s handle or battery pack (typically 1.75″-2.5″ for standard 18V models)
* Required Hole Diameter: Add 1/4″ to your width measurement for clearance (e.g., 2″ wide drill needs 2.25″ hole)
* Base Block Dimensions: Cut a 4″ high x 4″ deep x 6″ wide block—this provides stability against tipping even with heavier drills
* Backer Board Size: 12″ high x 8″ wide creates adequate wall mounting surface while keeping the profile compact
Pro Tip: Test your hole size by drilling a practice hole in scrap wood first. Insert your drill to verify it slides in smoothly but doesn’t wobble excessively. A 1/8″ gap around the drill provides ideal security.
Step-by-Step Drill Holder Construction Guide
Follow these precise steps to build a professional-looking holder in under two hours. This method prioritizes strength and simplicity for reliable everyday use.
Cutting and Shaping Your Drill Holder Components
- Prepare Your Workspace: Clear a flat surface and lay out your plywood. Mark all cutting lines with pencil and square—measure twice, cut once.
- Cut the Backer Board: From your plywood, cut a 12″ × 8″ rectangle for the wall-mounted portion. Sand all edges smooth with 120-grit paper.
- Create the Base Block: Cut a 4″ × 4″ × 6″ block from solid wood or laminated plywood. Critical step: Round the top front corners slightly with sandpaper to prevent wood splintering during drill insertion.
- Drill the Cradle Hole: Secure your base block in a vise. Using a Forstner bit (for clean, flat-bottomed holes), drill a hole 1″ from the top edge, centered side-to-side. Drill depth should be 3″-3.5″ to securely hold the drill.
Assembling Your Drill Holder for Maximum Strength
- Dry Fit First: Position the base block against the backer board 2″ from the bottom. Ensure a perfect 90-degree angle using your carpenter’s square.
- Apply Adhesive: Spread waterproof wood glue along the entire contact surface between components. This creates a bond stronger than screws alone.
- Clamp and Screw: Position clamps to hold the assembly square. Pre-drill two 3/16″ pilot holes through the backer board into the base block. Drive 1 1/4″ screws through these holes.
- Pocket Hole Alternative: For a cleaner front appearance, drill two pocket holes in the bottom of the base block. Clamp the assembly, then drive pocket screws upward into the backer board.
Mounting Your Drill Holder Securely to the Wall
- Locate Wall Studs: Use a stud finder to identify at least one wall stud in your desired mounting location—this is non-negotiable for safety.
- Mark Mounting Points: Hold your holder against the wall at eye level (typically 48″-52″ from floor). Mark screw locations through existing holes or create two keyhole slots.
- Install Mounting Hardware: Drive two 2 1/2″ screws partially into wall studs at your marked points, leaving 1/4″ exposed for the holder to rest on.
- Test Before Trusting: Hang your holder and insert the drill. Gently pull downward to verify security before relying on it daily.
Advanced Drill Holder Customizations

Elevate your basic holder with these practical modifications that address specific workshop needs and preferences.
Multi-Drill Storage Solutions
Expand your design to accommodate multiple tools without clutter:
* Stackable Design: Build identical holders spaced 8″ apart vertically on a single backer board (max 3-4 drills to prevent top-heaviness)
* Modular System: Create individual holders with standardized mounting points for flexible arrangement
* Integrated Charging: Cut a small recess in the base block for your battery charger—position holder near an outlet
Workshop-Specific Adaptations
Tailor your holder to your unique workspace:
* Mobile Cart Integration: Mount directly to the side of a rolling tool cart using longer screws
* Pegboard Compatibility: Attach a standard pegboard hook to the backer board for flexible positioning
* Magnetic Bit Storage: Glue a small magnetic strip below the drill cradle for quick bit access
Critical Safety Checks Before Final Use
Never skip these verification steps—your safety depends on proper installation:
- Weight Test: Apply 3x your drill’s weight to the holder (e.g., hang a 5lb weight on a 1.5lb drill holder) for 24 hours before trusting it
- Stress Point Inspection: Examine all joints for cracks or separation after initial use
- Child Safety Check: If kids access your workshop, ensure the holder sits high enough (minimum 54″ from floor) and has no sharp protrusions
- Drill Clearance: Verify your drill slides in/out without catching on wood fibers—sand any rough spots immediately
Maintenance Tips for Long-Lasting Drill Holders
Keep your new organizer functioning perfectly with minimal upkeep:
* Monthly Inspection: Tighten all screws and check for wood cracks
* Seasonal Adjustment: In humid climates, sand any raised wood fibers that develop
* Finish Renewal: Reapply polyurethane every 18-24 months to prevent moisture damage
* Drill Weight Changes: If upgrading to a heavier drill, reinforce the holder with corner braces
This simple how to make a drill holder project delivers immediate organization benefits while protecting your investment. The sturdy construction supports any standard cordless drill, and the customizable design adapts to your specific workshop layout. Unlike store-bought solutions that often fail under daily use, your handmade holder provides reliable storage that actually improves your workflow. Start building yours today and experience the satisfaction of having your drill exactly where you need it, every time you reach for it. Remember to always mount your drill holder securely to wall studs—never rely on drywall anchors alone for this critical safety element.


