
Searching through a jumbled toolbox for the right drill bit wastes precious project time and risks damaging expensive tools. Proper organization isn’t just convenient—it actively extends your bits’ lifespan by preventing rust, chipping, and misplacement. Learning how to make a drill bit holder transforms chaotic storage into a precision system where every size sits instantly accessible. This guide delivers actionable, workshop-tested methods to create custom organizers from basic materials, eliminating frustration while protecting your investment. You’ll discover solutions matching any skill level—from magnetic strips for quick wall mounting to modular grid systems for serious collections—all designed to keep your workspace efficient and bits ready for action.
Why Your Workshop Demands a Custom Drill Bit Holder
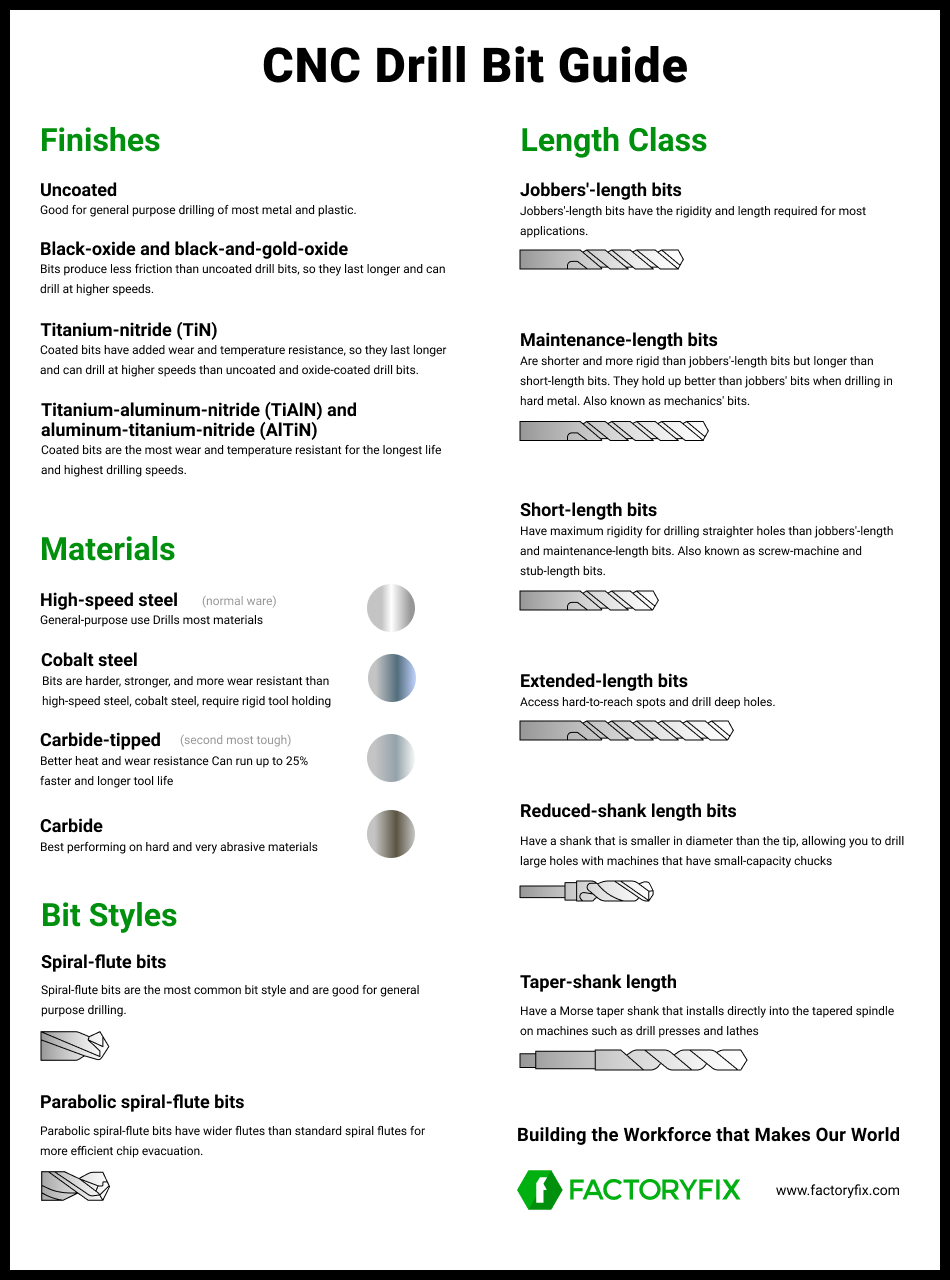
Loose drill bits rattling in drawers cause more than momentary annoyance—they create measurable workflow disruption. Every minute spent hunting for a 3/16″ bit during critical project phases adds up to hours of lost productivity annually. More critically, unprotected bits develop nicks on cutting edges from contact with other metal tools, reducing drilling precision and requiring premature replacement. A dedicated holder prevents costly damage by isolating bits, while organized sizing (grouped by fractional, letter, or metric standards) eliminates guesswork mid-task. For woodworkers using coated bits like titanium or cobalt, proper storage is non-negotiable—these premium bits lose effectiveness when their specialized coatings scrape against surfaces. Building how to make a drill bit holder solutions addresses these pain points directly, turning storage from a chore into a strategic advantage.
Critical Safety Steps Before Building Your Holder
Never skip safety protocols when crafting drill bit storage—wood splinters, PVC dust, and magnet hazards cause preventable injuries. Always wear ANSI-approved safety glasses and N95 dust masks during cutting or sanding phases, especially when working with hardwoods like oak or walnut that produce fine particulates. Secure workpieces firmly with bench clamps before drilling; a 2×4 block shifting under a drill press can cause severe hand injuries. When embedding magnets, handle neodymium types with care—they can snap together with enough force to crush fingers. For electrical safety, unplug all power tools during bit changes or adjustments, and verify your drill press is anchored to a stable surface. These precautions aren’t optional extras; they’re foundational to successfully executing how to make a drill bit holder without incident.
Gathering Materials: Match Supplies to Your Workshop Needs
Your drill bit collection size and workshop space dictate the ideal holder design. Avoid overcomplicating your first build—start with solutions matching your current bit count and available wall/bench space.
Essential Tools Checklist
- Cutting & Drilling: Drill/driver with Forstner bits (for clean wood holes), miter saw, and clamps
- Measuring & Marking: Tape measure, combination square, and pencil for precise hole spacing
- Finishing: Sandpaper (80/120/220 grit), wood glue, and wipe-on polyurethane
- Safety Gear: Safety glasses, dust mask, and ear protection
Choosing Your Holder Design
- Magnetic Wall Strip: Best for 10-15 frequently used steel bits. Requires a 12″ steel flat bar (1.5″ wide) mounted on wood backing. Avoid for titanium/cobalt bits—they won’t stick.
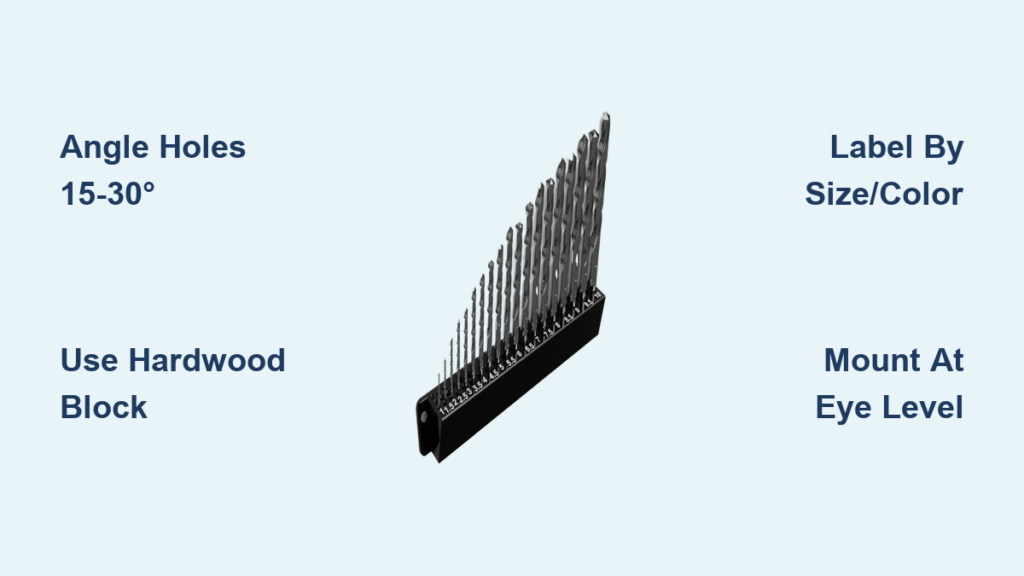
- Angled Wood Block: Ideal for 20-30 bits. Use 2″ thick hardwood (maple/oak) with holes drilled at 15-30 degrees to prevent rolling.
- PVC Pipe Organizer: Perfect for masonry/spade bits needing upright storage. Cut 1″ PVC into 3″ sections mounted on a 2×4 base in a 6×6 grid.
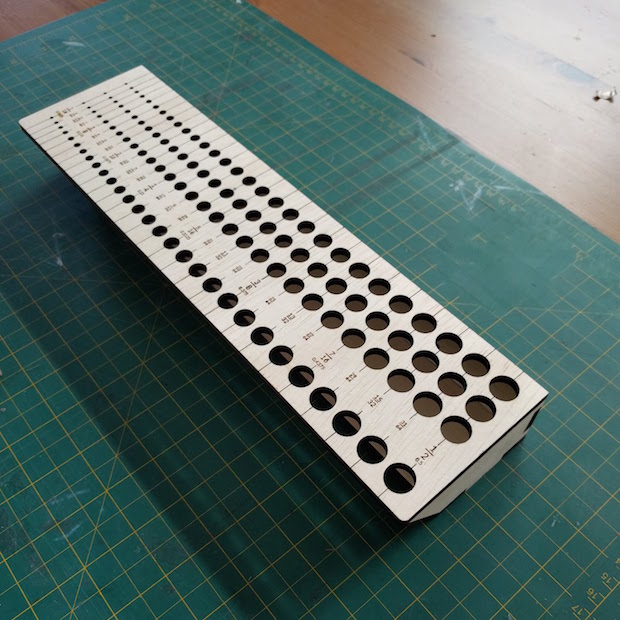
- Modular Grid System: For 50+ bits. Create 1″ grid holes on a backer board with 0.75″-1.5″ spacing based on bit type (fractional vs. letter sizes).
Build the Angled Wood Block Holder: Step-by-Step

This time-tested design balances simplicity with functionality, keeping bits visible and secure.
Step 1: Material Prep and Layout
Cut a 2×4 scrap to 8″ long. Mark a center line lengthwise, then measure hole positions spaced 1″ apart—this prevents bits from touching during access. For optimal usability, angle your drill bit 15-30 degrees (not straight down) using a protractor guide. This critical angle ensures bits stay put while making labels visible. Drill shallow test holes in scrap wood first; the bit should slide in with light finger pressure but not rattle loose.
Step 2: Precision Drilling and Assembly
Secure the block in a drill press vise. Using a Forstner bit matching your shank size (e.g., 1/4″ bit for 1/4″ shanks), drill holes to 3/4″ depth—deep enough to hold the shank but shallow enough to display the cutting tip. Wrap tape around the bit as a depth gauge for consistency. After drilling, sand thoroughly from 80 to 220 grit, paying special attention to hole entrances to prevent snagging bits.
Step 3: Mounting and Customization
Apply wipe-on polyurethane to protect against shop grime. For wall mounting, attach a French cleat to the back—this allows tool-free removal for reorganization. Label holes using a wood-burning tool: group sizes by color (silver for black oxide, gold for titanium, red for cobalt) following industry standards. Mount at eye level (48-60″ from floor) for instant visibility during projects.
Two Proven Alternative Builds
Magnetic Tool Wall Strip for Quick Access
Ideal for metal surfaces or frequent-bit access:
1. Cut a 1×4 pine backer board to 12″ length
2. Glue a 12″ steel flat bar (1.5″ wide) centered along its length
3. Embed 8 neodymium magnets (10mm x 3mm) spaced 1.5″ apart beneath the steel strip
4. Mount to wall at shoulder height using heavy-duty anchors
Pro Tip: Paint the backer board gray to contrast with bits. Remember—this only works for ferrous (iron/steel) bits; carbide tips won’t adhere.
PVC Pipe Organizer for Masonry Bits
Solve the problem of long bits rolling off benches:
1. Cut 1″ PVC pipe into twelve 3″ segments
2. Arrange in a 3×4 grid on a 2×4 base, spacing centers 1.5″ apart
3. Secure pipes with construction adhesive (Liquid Nails)
4. Label rows by bit type: yellow bands for masonry, blue for metal
This upright design prevents tip damage while accommodating bits up to 6″ long—critical for masonry work where bent shanks ruin accuracy.
Pro Tips for Flawless Holder Construction
- Test Hole Geometry First: Drill practice holes in scrap wood to perfect depth and angle—bits should stay put when tilted but pull out smoothly.
- Optimize Spacing: Use 1.5″ centers for fractional bits, 1″ for letter sizes, and 0.75″ for number bits per industry standards.
- Prevent Rust: Wipe polyurethane inside holes to seal wood against moisture, especially in humid climates.
- Speed Hack: Create a drilling template from cardboard with pre-marked holes—align it with your wood block for perfect spacing.
Maintenance Routines That Extend Holder Life
A well-built holder fails without upkeep. Weekly, blow compressed air through wood holes to remove dust buildup that can corrode bits. Monthly, inspect magnetic strips for weakened adhesion—re-glue loose magnets immediately. For PVC organizers, wipe interior pipes with a silicone cloth to prevent static cling. Reorganize seasonally as your collection grows: add new PVC sections or drill supplementary holes in wood blocks. Crucially, store all holders in dry areas with 30-50% humidity; include silica gel packets in enclosed systems to inhibit rust.
Critical Mistakes That Sabotage Your Holder
- Ignoring Angle Physics: Straight-down holes (90 degrees) let bits roll out. Always use 15-30 degree angles—this simple tilt leverages gravity for retention.
- Overcrowding: Packing bits tighter than 0.75″ spacing causes scratching. Measure your largest bit’s diameter before finalizing hole placement.
- Wrong Material Choices: Soft pine blocks splinter quickly. Opt for maple, oak, or walnut for shank holes that stay smooth after years of use.
- Skipping Labels: Unmarked holders defeat the purpose. Use permanent markers or wood-burned size indicators—group by color coding per industry standards.
Transform Your Workshop Efficiency Today
Mastering how to make a drill bit holder delivers immediate returns: no more project-stopping searches, no more ruined cutting edges, and a workspace that empowers rather than frustrates. Start simple with a magnetic strip for your top 10 bits, then expand to modular systems as your collection grows. Remember, the best holder fits your workflow—not a generic solution. By investing a few hours in custom storage, you protect hundreds in tool investments while reclaiming valuable project time. Your next build deserves seamless tool access; build your holder this weekend and feel the difference from the first drill hole.


