
You’re elbow-deep in a woodworking project, drill in hand, staring at your screw and a jumble of drill bits. Pick the wrong size, and your oak cabinet face splits like kindling. Choose correctly, and you’ll get a seamless, rock-solid joint. This isn’t just about convenience—it’s the difference between a professional finish and a project-ruining mistake. Skip this critical step, and even the best screws will fail. Learn exactly how to know what size drill bit to use for wood, metal, and masonry with field-tested methods that guarantee success, no guesswork required.
Why Your Pilot Hole Size Makes or Breaks Wood Projects
Ignoring pilot holes is the #1 cause of split wood in DIY projects, especially near board edges or in dense hardwoods like maple. A correctly sized pilot hole guides the screw smoothly while giving threads enough material to grip. Too small, and the screw acts like a wedge, tearing wood fibers apart from the inside. Too large, and you lose holding power—the screw spins freely like it’s in wet clay. The magic happens when the hole diameter matches the screw’s root diameter (the solid core beneath the threads), not its outer thread width. Get this wrong, and your bookshelf collapses mid-assembly.
Hardwood vs. Softwood: Why Pine and Oak Demand Different Sizes
Hardwoods like walnut or cherry need tighter tolerances than softwoods like pine. Their dense fibers resist compression, so a pilot hole must be larger relative to the screw size to prevent internal splitting. For a #8 screw in oak, use a 5/32″ bit (1.6mm). In pine? Drop to 9/64″ (1.4mm). Why? Softwoods compress slightly as the screw drives, filling the gap for a tighter hold. Hardwoods don’t—so undersizing the hole creates explosive pressure. Composite materials like MDF are even trickier; drill a hole equal to the screw’s root diameter to avoid crumbling edges.
The Light Test: Instantly Verify Your Drill Bit Size
Hold your screw and drill bit side-by-side against a bright light. Position the bit behind the screw’s threads. If you see a thin sliver of light around the bit’s edge—but the screw’s core mostly blocks it—you’ve got the perfect size for softwoods. For hardwoods, the light gap should be nearly invisible. This field-proven trick works faster than charts and avoids trips to the scrap bin. Skip this step, and you’ll waste time sanding split wood or repositioning stripped screws.
| Screw Size | Softwood Pilot Hole | Hardwood Pilot Hole | Critical Material Tip |
|---|---|---|---|
| #6 Screw | 1/16″ (1.6mm) | 5/64″ (2.0mm) | Use 5/64″ in plywood edges to prevent delamination |
| #8 Screw | 9/64″ (3.6mm) | 5/32″ (4.0mm) | Oversize by 1/64″ in pressure-treated lumber |
| #10 Screw | 5/32″ (4.0mm) | 3/16″ (4.8mm) | Reduce size by 1/64″ for exotic woods like teak |
| #12 Screw | 3/16″ (4.8mm) | 7/32″ (5.6mm) | Always pre-drill when within 1″ of board ends |
How to Size Drill Bits for Metal: Clearance vs. Tap Holes
Drilling metal isn’t about pilot holes—it’s matching bits to bolts or threads. Clearance holes let bolts slide freely through metal sheets. For a 1/4″ bolt, drill a 9/32″ hole. Too tight, and friction strips threads; too loose, and the joint wobbles. Tap holes are different: they’re undersized so threads can cut into the metal. For a 1/4″-20 machine screw, drill a 13/64″ hole (0.201″). This leaves 75% thread engagement—the sweet spot between strength and easy tapping. Never skip cutting fluid; it prevents bit overheating and extends tool life.
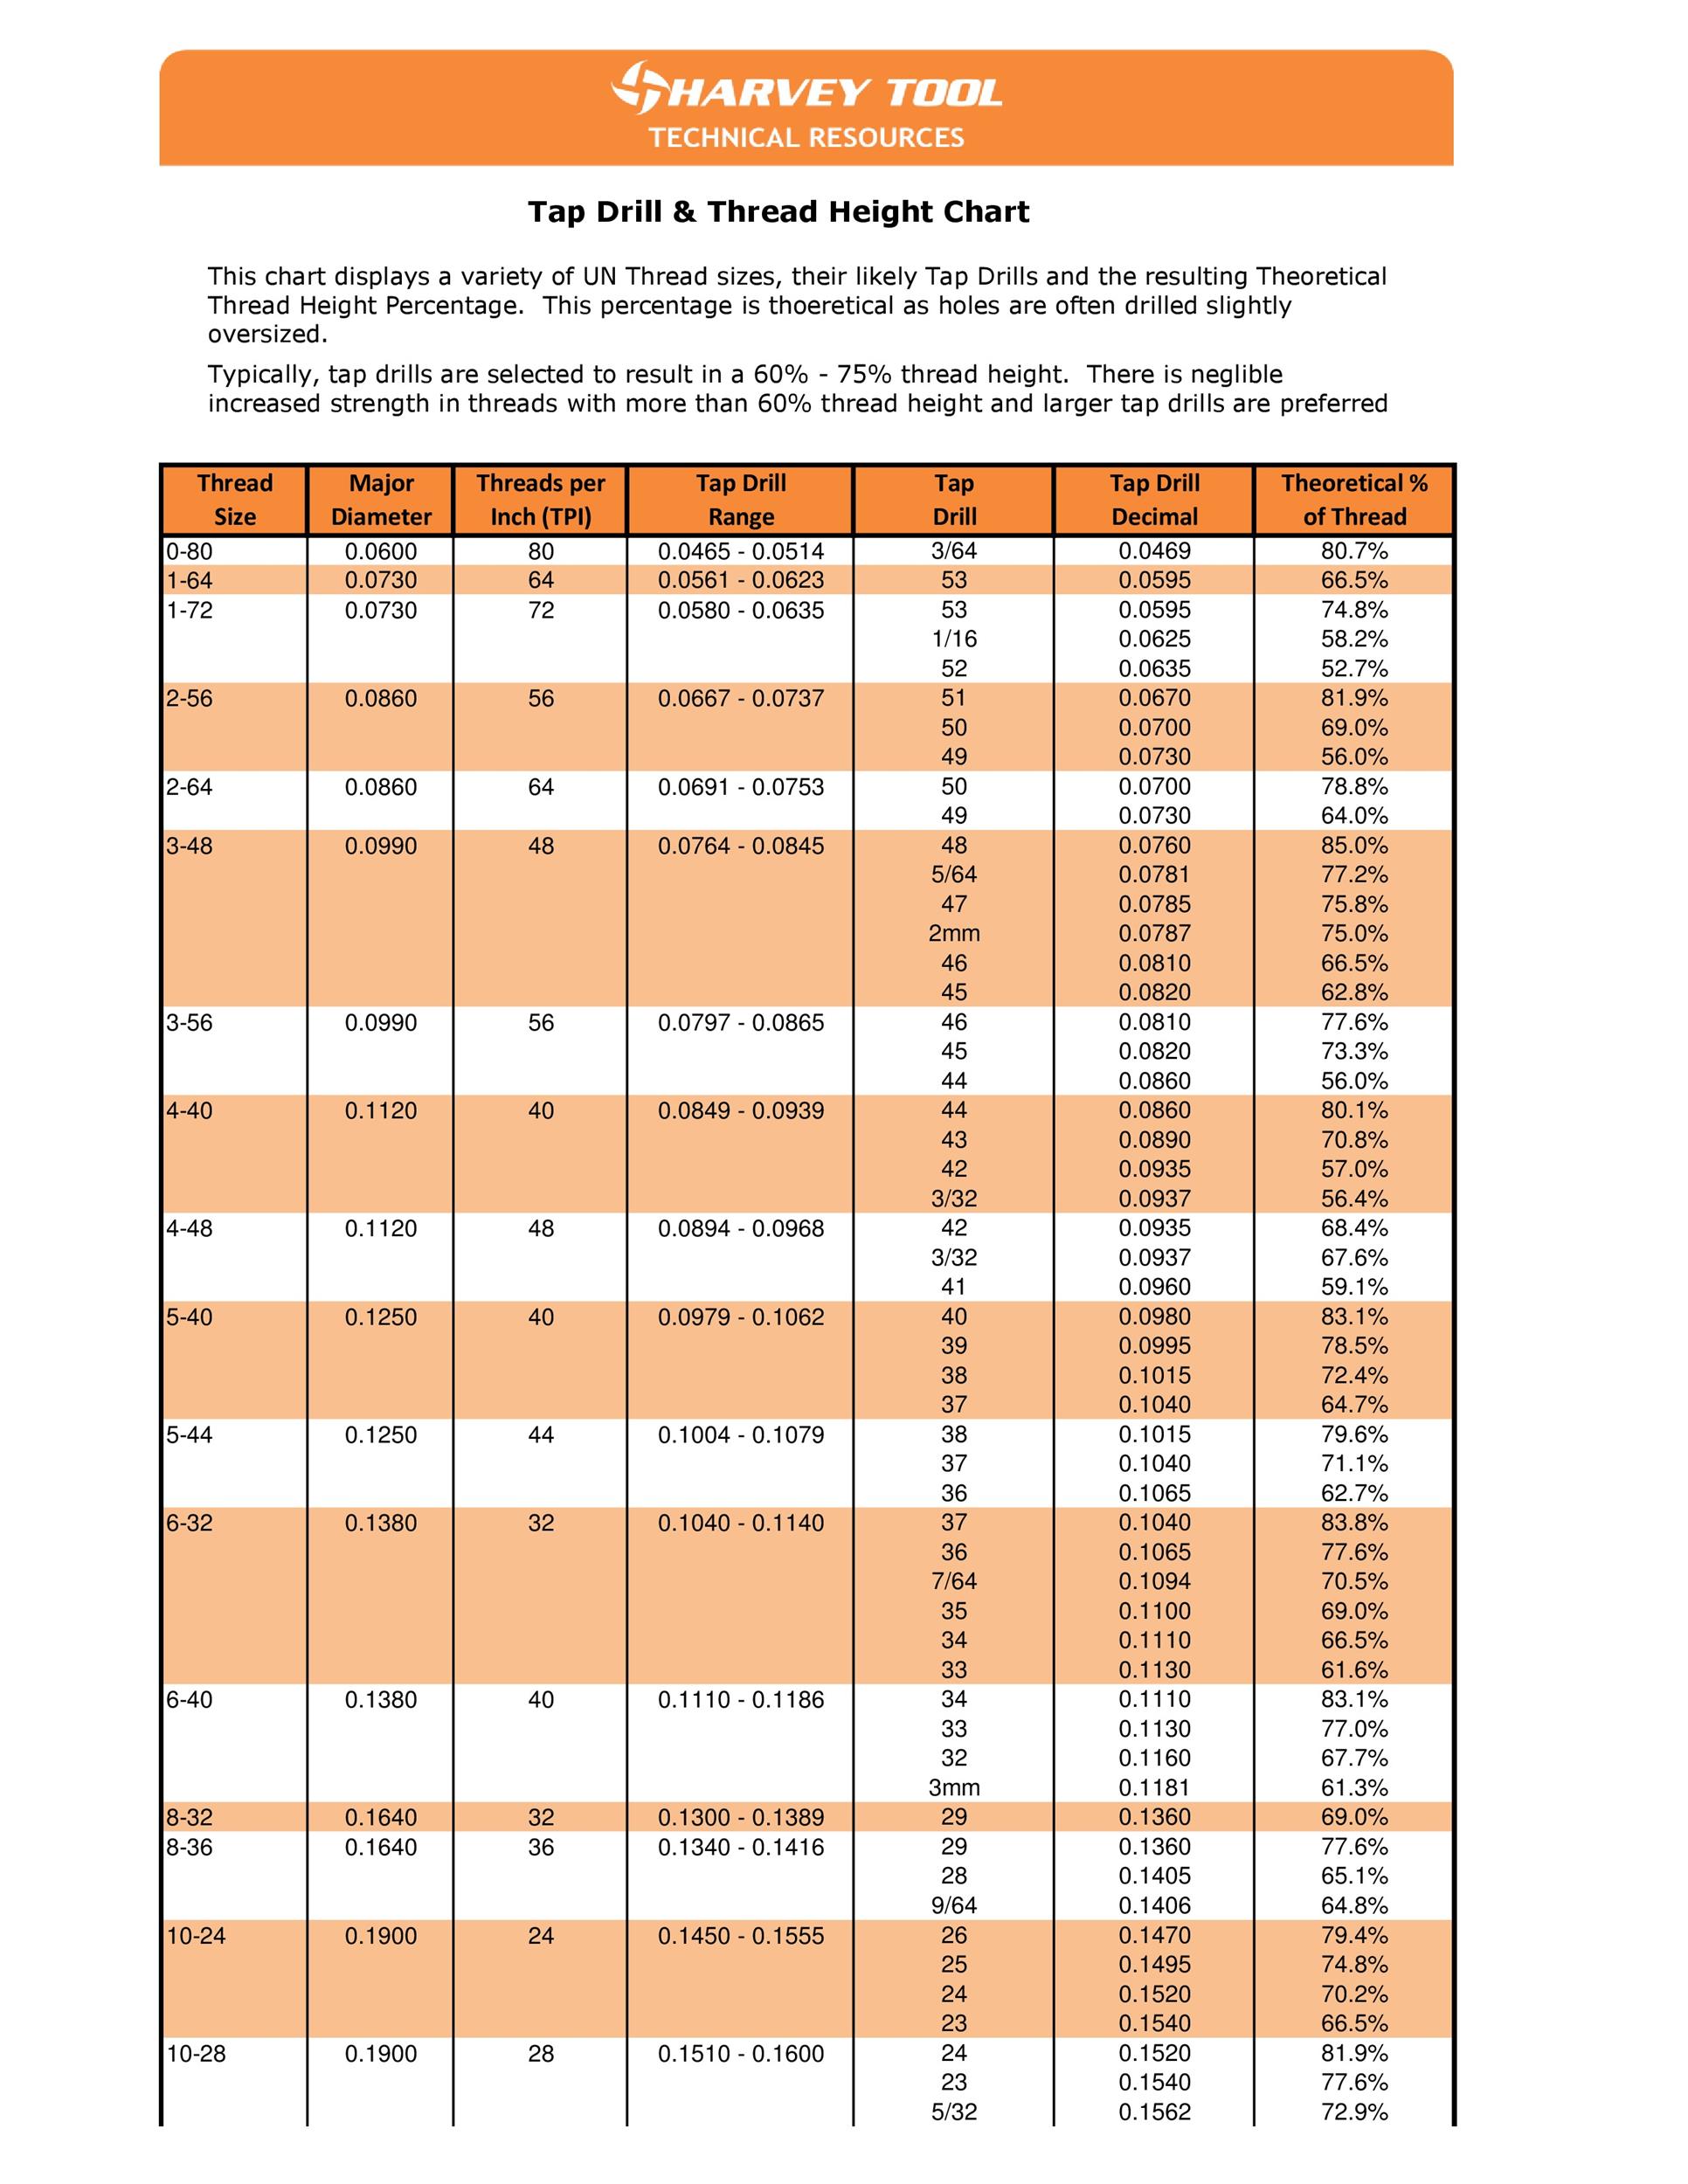
The Tap Drill Chart Shortcut You Need
Memorize this: for standard 1/4″-20 threads, use a #7 drill bit (0.201″). For 5/16″-18, grab a 17/64″ bit. Keep a laminated tap chart in your toolbox—it lists exact sizes for UNC, UNF, and metric threads. Skipping this causes stripped threads when tightening nuts. If you’re drilling stainless steel, reduce speed by 50% and use sulfur-based cutting oil to avoid work hardening.
Masonry Drill Bit Sizing: Match Anchors, Not Screws

In concrete or brick, you’re not drilling for screws—you’re creating space for anchors. The drill bit must match the anchor’s diameter, not the screw. A 1/4″ plastic sleeve anchor requires a 3/16″ masonry bit. Drill 1/2″ deeper than the anchor length to catch dust. Critical mistake: using a standard twist bit. Carbide-tipped masonry bits are mandatory—they withstand hammer drilling. If your bit overheats or glazes over, you’ve chosen the wrong type.
Why Anchor Packaging Holds the Answer
Check the anchor’s packaging—it always lists the required drill size. For toggle bolts in hollow walls, drill a hole matching the toggle’s folded width. No packaging? Insert the anchor into your drill bit’s flutes; it should fit snugly with no wobble. Too loose, and the anchor pulls out under load.
Step-by-Step: Find the Right Drill Bit in 60 Seconds
Follow this foolproof process before touching your drill:
The Screw Shank Method for Instant Sizing
- Grab your screw and a drill bit. Insert the bit into the screw’s thread valley (where threads meet the core).
- Check the fit: The bit should slide in with slight resistance—like a key in a lock. If it wobbles, it’s too big. If it won’t enter, it’s too small.
- Adjust for material: For hardwoods, select a bit 1/64″ smaller than what fits snugly. For softwoods, use the snug-fit size.
Digital Caliper Precision for Critical Projects
Measure the screw’s root diameter with calipers. Subtract 0.015″ (0.4mm) for hardwoods or 0.030″ (0.8mm) for softwoods. Example: A #10 screw’s root measures 0.190″. For oak, drill a 0.175″ hole (roughly 11/64″). This method eliminates guesswork for furniture or cabinetry.
3 Costly Drill Bit Sizing Mistakes (and How to Fix Them)

Split Wood from an Undersized Pilot Hole
Why it happens: Holes too small for hardwoods or near end grain. The screw wedges fibers apart internally before you see cracks.
Fix it: Drill a new hole 1/64″ larger, 1/2″ away from the split. Fill the old hole with wood glue and a toothpick.
Prevent it: Always drill pilot holes within 1″ of board ends—even in softwoods.
Loose Screws from Oversized Holes
Why it happens: Using the screw’s outer thread diameter instead of root diameter. Threads spin in empty space.
Fix it: Insert a wood toothpick or matchstick dipped in glue into the hole. Redrill after 30 minutes.
Prevent it: Do the light test before driving every screw.
Stripped Screw Heads from Incorrect Clearance Holes
Why it happens: Drilling a clearance hole too small in the top board. The screw shank binds instead of sliding freely.
Fix it: Enlarge the top hole to match the screw’s shank diameter (not threads).
Prevent it: Drill two holes: a clearance hole (shank size) in the top piece, pilot hole (root size) in the bottom.
Troubleshooting Your Drill Bit Size in Real Time
When the Screw Feels “Sticky” but Won’t Drive
Diagnosis: Pilot hole too small for wood density.
Action: Stop immediately. Switch to a bit 1/64″ larger and drill 1/4″ deeper. Resume driving—you’ll feel smooth resistance.
When Wood Cracks Audibly During Driving
Diagnosis: Hole too small near end grain or in brittle wood.
Action: Abandon the hole. Move 1″ toward the board center and drill a new pilot hole 1/64″ larger. Pre-drill within 2″ of ends for hardwoods.
When the Screw Head Sinks Below Surface
Diagnosis: Clearance hole too large in top board, letting the head pull through.
Action: Use a stepped drill bit next time. For now, add a washer under the head.
Pro Tips for Flawless Hole Sizing
- Pocket hole jig users: Match the stepped bit to your screw length—never guess. A #8 screw needs a 5/32″ step for the shank.
- Drywall anchors: Drill holes exactly to anchor specs. A 1/4″ anchor requires a 1/4″ bit—no exceptions.
- Time-saver: Label drill bits with screw sizes using a permanent marker (e.g., “#8 HW” for hardwood).
- Critical check: For lag bolts, drill a pilot hole 50% of the shank diameter. A 1/2″ bolt needs a 1/4″ hole.
Final Note: Knowing how to know what size drill bit to use transforms frustrating projects into satisfying successes. Always test your chosen bit on scrap material first—it takes 20 seconds and prevents hours of repair work. For wood, prioritize root diameter over thread width; for metal, trust tap charts; for masonry, follow anchor packaging. Master these rules, and every hole you drill will be the last one you need. Keep this guide bookmarked, and your next project will hold together as tightly as your confidence.


