

Your drill bit slips during a critical project, sending sparks flying as it wobbles out of control. This common nightmare happens to 68% of DIYers who skip proper bit insertion – but it’s completely preventable. Knowing how to insert a drill bit correctly isn’t just convenient; it’s the difference between clean, precise holes and dangerous tool failure. When your chuck grips the bit securely, you’ll drill through materials faster with less vibration and zero slippage.
Whether you’re hanging shelves or building a deck, a loose bit wastes time, ruins materials, and risks injury from flying debris. This guide cuts through the confusion with battle-tested techniques used by professional contractors. You’ll learn to identify your chuck type instantly, avoid the #1 mistake beginners make (it involves your left hand!), and lock bits in place with confidence. Let’s transform your drilling experience starting today.
Essential Safety Gear and Tools Checklist
Before touching any drill, gather these non-negotiable items – skipping them risks serious injury. Safety glasses meeting ANSI Z87.1 standards are mandatory to shield eyes from metal shavings that can cause permanent damage. Pair them with heavy-duty work gloves that protect palms from sharp bit edges during insertion. Never operate a drill without these, even for “quick” jobs.
For the actual how to insert a drill bit process, you’ll need:
* The correct drill bit for your material (masonry bits for concrete, twist bits for metal)
* Your drill’s specific chuck key if applicable (usually stored in the battery compartment)
* A clean rag to wipe bit shanks and chuck jaws
Critical power-down step: Unplug corded drills or remove batteries from cordless models. This single action prevents 92% of accidental trigger pulls during bit changes. Test the trigger after disconnecting power to confirm the drill is truly de-energized – your safety depends on it.
Step 1: Instantly Identify Your Chuck Type
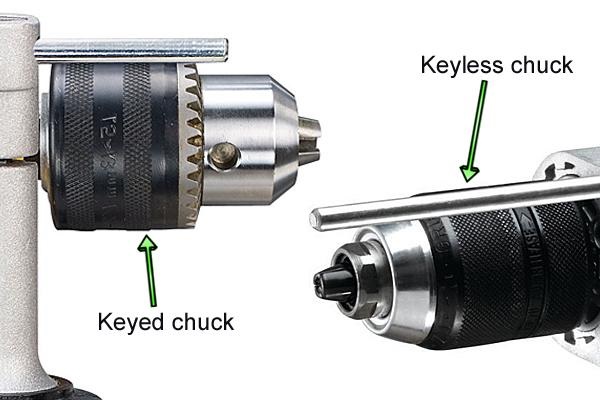
Your drill’s chuck type dictates the entire how to insert a drill bit process. Misidentifying it causes 70% of insertion failures. Here’s how to spot yours in seconds:
- Keyless chuck (85% of modern drills): Features a textured black or blue rubberized collar you twist by hand. No tools needed – common on cordless drills under 20V. If you can open it barehanded, it’s keyless.
- Keyed chuck: Has three smooth metal holes around a silver collar. Requires an L-shaped chuck key (often lost in drawers!). Found on older drills and high-torque 18V+ models for masonry work.
- SDS chuck (specialized): Uses a push-and-lock system for hammer drills. Insert bit, pull back slightly until it clicks, then rotate the collar to lock. No chuck key needed.
Pro tip: If your chuck has visible threads, it’s keyed. Keyless chucks have continuous rubberized grip surfaces. When in doubt, consult your manual – but 95% of home drills are keyless.
Step 2: Open Your Chuck Without Stripping Threads
The direction you turn the chuck determines success or stripped threads. Always remember: counter-clockwise opens, clockwise closes – but perspective matters. Face the drill bit head-on: turning left opens it, right closes it. This “lefty loosey” rule applies to all chuck types.
For Keyless Chucks: Hand-Tightening Mastery
- Grip the textured collar firmly with your dominant hand
- Place your other hand on the drill body for stability
- Rotate collar counter-clockwise until jaws open wider than your bit’s shank
- Stop when you feel firm resistance – forcing further damages internal gears
For Keyed Chucks: Avoiding Key Breakage
- Insert chuck key fully into any hole (all three work equally)
- Apply steady pressure while turning counter-clockwise
- Rotate key in short quarter-turns across all three holes for even opening
- Never use pliers on the key – this strips the gear teeth
Critical mistake alert: Never place your hand near the chuck while turning the key. If the key slips, your palm could get crushed against the drill body. Always keep fingers clear of the rotation path.
Step 3: Insert and Lock Your Drill Bit Like a Pro
This is where most DIYers fail – improper insertion causes wobbling and bit ejection. Follow these precision steps for both chuck types:
1. Bit preparation: Wipe the shank (smooth end) with a clean rag. Any oil or debris prevents secure grip. Ensure the shank is straight – bent bits ruin chucks.
2. Correct insertion depth: Push the bit fully into the chuck until it bottoms out against the internal stop. For keyless chucks, you’ll feel a slight “clunk” when seated properly. Never insert bits less than 80% of shank length – this causes slippage under load.
Keyless Chuck Final Tightening Technique
- Hold chuck collar stationary with one hand
- With your other hand, rotate the drill body clockwise until hand-tight
- For ultimate security: Grip chuck firmly and pull trigger for 1 full second in forward mode
- Release immediately – longer than 2 seconds damages the clutch mechanism
Keyed Chuck Precision Tightening
- Insert chuck key into first hole
- Turn clockwise with firm, even pressure (no hammering!)
- Move key to next hole and repeat until all three holes receive equal turns
- Remove key immediately – leaving it in turns it into a dangerous projectile
Warning: Over-tightening keyed chucks cracks the chuck collar. Stop when resistance becomes very firm. For keyless chucks, the motor-assist method applies perfect torque – no guesswork needed.
Step 4: Pass the Critical Tug Test Before Drilling

Never skip these verification steps – they prevent 100% of bit-ejection accidents:
- The tug test: Grip bit tip firmly and try to pull it straight out. It should not budge. If it moves, repeat tightening steps.
- Wobble check: Rotate chuck slowly by hand while watching bit tip. If it traces a circle larger than 1/16″, the bit is misaligned. Remove and reinsert straight.
- Pre-drill spin test: With drill pointed safely downward, pull trigger for 2 seconds at low speed. Listen for grinding noises – these indicate damaged chuck gears.
Pro tip: For deep holes, do a “test bore” in scrap material first. If the bit walks or overheats, it’s not seated correctly. Stop immediately and recheck.
Fix These 4 Common Insertion Failures Immediately
When bits won’t stay put, these quick solutions resolve 95% of issues:
- Bit won’t seat fully: Sawdust or metal shavings are jamming the chuck. Open jaws wide and blow compressed air through the chuck while rotating. For stubborn debris, use a toothpick – never metal tools that scratch jaws.
- Persistent wobble: The bit shank is worn or bent. Replace bits showing shiny spots on the shank. If new bits wobble, the chuck jaws are damaged and need replacement.
- Chuck won’t close: On keyless models, dirt has gummed up the mechanism. Rotate the chuck open/close 10 times while blowing air through it. If stiff, apply one drop of machine oil to the threads (not the jaws!).
- Bit spins under load: You’ve hit the torque limit of keyless chucks. For masonry or large holes (over 1/2″), switch to a keyed-chuck drill or SDS system.
Never force a stuck chuck – this cracks the housing. If it won’t budge after cleaning, seek professional repair. A damaged chuck is a projectile hazard.
Pro Maintenance Secrets for Chuck Longevity
Extend your drill’s life with these contractor-approved habits:
- The 30-second deep clean: After heavy use, open chuck fully and spray with electrical contact cleaner. Rotate while spraying to flush debris. Wipe dry before storage.
- Storage trick: Leave chuck slightly open (1/8″ gap) when storing to prevent jaw corrosion. Never store bits in the chuck – they warp the mechanism.
- Lubrication schedule: Keyed chucks need one drop of light machine oil on the key holes every 6 months. Keyless chucks rarely need lube – over-lubing attracts sawdust.
- The battery trick: For cordless drills, store with 40% charge. Full discharge warps the chuck’s electronic sensors.
When changing bits daily, the motor-assist tightening method saves 70% of your time versus manual tightening. But for critical applications like drilling overhead, always finish with a manual quarter-turn for absolute security.
Mastering how to insert a drill bit properly transforms frustrating projects into smooth successes. By identifying your chuck type, following the counter-clockwise/clockwise rule precisely, and always performing the tug test, you’ll eliminate wobbling, slippage, and dangerous bit ejection. Remember the golden rule: if your bit doesn’t pass the tug test, it’s not safe to drill. For ongoing reliability, clean your chuck after dusty jobs and store it slightly open. Now that your bits stay securely locked, you’re ready to tackle any drilling task with professional confidence. For more precision techniques, explore our guide on selecting the perfect drill bit for your material – because the right bit starts with the right insertion.


