
Your drill suddenly feels like it’s about to burn your hand, and a faint burning smell fills the air. This isn’t just annoying—it’s a critical warning that your power tool is overheating and could suffer permanent damage. Knowing how to fix overheated drill problems immediately can save you from costly replacements and keep your projects moving. In this guide, you’ll learn the exact steps to cool down an overheating drill, diagnose why it happened, and implement foolproof prevention strategies for every drilling scenario.
Most DIYers and professionals face drill overheating when pushing through tough materials or working continuously. But here’s the good news: 80% of overheating cases stem from preventable issues like blocked vents or dull bits—not internal failures. By the end of this guide, you’ll be equipped to troubleshoot like a pro and extend your drill’s lifespan by years. Let’s dive into the immediate actions you must take the second your drill starts running dangerously hot.
Stop and Cool Your Overheating Drill Immediately
The moment your drill becomes too hot to hold or emits a burning odor, stop drilling immediately. Continuing operation risks melting internal wiring, warping plastic housings, or destroying motor windings. For corded drills, unplug from the outlet—don’t just switch off the trigger. For cordless models, pop out the battery pack. Never attempt to speed up cooling by dunking the drill in water or placing it in a freezer; this causes thermal shock that cracks components and invites moisture damage.
Let your drill cool naturally in a shaded, well-ventilated area for at least 30 minutes before handling. During this cooldown period, inspect for visible blockages around the ventilation slots. Never force cooling with compressed air while the motor is hot—this can blow debris deeper into critical components. A severely overheated drill may take 45+ minutes to return to safe operating temperature, so resist the urge to rush back into work.
Why Blocked Ventilation Slots Cause Drill Overheating

Your drill’s cooling slots aren’t decorative—they’re essential breathing points for the motor. When sawdust, drywall particles, or wood shavings clog these vents (especially near the trigger housing), hot air traps inside the motor chamber. This is the #1 preventable cause of drill overheating, particularly in drywall or woodworking projects. You’ll know vents are blocked when the drill housing feels scorching hot while the chuck remains cool.
To fix this, use low-pressure compressed air (under 30 PSI) to blow debris from all intake and exhaust ports. Hold the nozzle 6 inches away to avoid forcing particles deeper. For stubborn clogs, gently brush vents with a soft toothbrush—never use metal tools that could damage plastic housings. Make this cleaning part of your post-project routine; skipping it after just two drywall jobs can reduce cooling efficiency by 40%.
Replace Dull Drill Bits Before They Ruin Your Motor
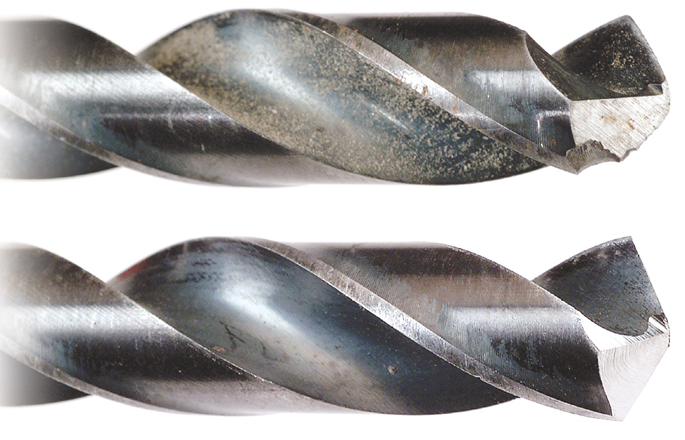
A dull drill bit is like driving with your parking brake engaged—it forces your motor to work exponentially harder. When cutting edges lose their sharpness (visible as rounded or chipped tips), the bit grinds instead of cuts, generating intense friction heat. This is especially critical when drilling metal or hardwood, where dull bits can increase motor temperature by 50°F in under 60 seconds.
Always inspect bits before starting a job. A sharp bit should cleanly bite into material with minimal pressure. Replace any bit showing:
– Visible rounding at the tip
– Chipped cutting edges
– Glazed or blue-tinged metal (sign of overheating)
– Poor chip ejection during drilling
For metal drilling, apply cutting oil to the bit tip—this reduces heat by 30% and doubles bit life. When switching materials (e.g., from wood to tile), always change to the correct bit type; using a wood bit on ceramic creates dangerous heat spikes.
Diagnose Motor Brush and Armature Damage in 3 Steps
Worn motor brushes or a failing armature create internal friction that overheats your drill even during light use. This requires disassembly but is diagnosable with basic tools. First, unplug the drill or remove the battery. Then:
- Listen for telltale sounds: With the drill powered off, spin the chuck by hand. A healthy motor spins smoothly for 3+ revolutions. If it catches, clicks, or stops abruptly after half a turn, worn brushes or a damaged commutator are likely.
- Check for excessive sparking: Run the drill at low speed in a dark room. Bright white or continuous sparks from the vents indicate failing brushes (normal operation shows small blue sparks).
- Smell for burnt insulation: A persistent acrid, fishy odor after cooling suggests melted wiring that requires professional rewinding.
If you confirm internal damage, do not continue using the drill. Attempting repairs without proper tools often worsens the problem. Most manufacturers offer brush replacement kits for under $15—far cheaper than a new drill.
Fix Cordless Drill Battery Overheating Issues Now

When your cordless drill overheats but the motor sounds fine, the battery or charger is often the culprit. Faulty batteries can overheat during use or charging, causing the drill to throttle power and generate excess heat. Start by checking these critical points:
- Battery contacts: Clean corrosion from metal terminals using a pencil eraser. Dirty contacts force the motor to draw more current.
- Battery age: Batteries over 3 years typically lose 40% capacity, making the motor work harder. Test with a spare battery if available.
- Charger compatibility: Never use third-party chargers—they often deliver incorrect voltage that stresses battery cells.
If the battery pack feels hot during charging (beyond slight warmth), stop immediately. Let it cool for 2 hours before inspecting. Swollen or leaking batteries must be recycled—never reuse them. Always store batteries in cool, dry places; leaving them in a hot car can permanently damage cells.
Implement Smart Work-Rest Cycles for Continuous Drilling
Treating your drill like an endurance athlete prevents heat buildup during prolonged projects. Continuous operation beyond 15 minutes—especially in masonry or thick steel—overwhelms air-cooled motors. Instead, adopt this proven work-rest pattern:
- Drill for 10-15 minutes at moderate pressure
- Take a 5-minute cooldown break (longer in hot environments)
- During breaks, clear chips from the hole and inspect the bit
- For heavy tasks (like mixing mortar), switch to a low-speed, high-torque drill
This simple rhythm reduces peak temperatures by up to 70°F. For marathon projects, keep a second drill or battery on hand to alternate while the first cools. Never ignore the first signs of heat—waiting until the drill smells burning means damage has already occurred.
Prevent Overheating When Drilling Metal, Wood, and Masonry
Material-specific techniques prevent 90% of heat-related failures. For metal drilling, always use cutting fluid and start with a center punch to prevent bit wandering. Drill at low speeds (under 1,000 RPM for steel) and back out frequently to clear chips—this reduces heat by 50% compared to continuous drilling. Never use wood bits on metal; the flutes can’t evacuate metal shavings, causing instant overheating.
When drilling hardwoods or laminates, use sharp brad-point bits and drill pilot holes for large diameters. Apply light, consistent pressure—forcing the bit creates friction heat that can char wood and melt drill components. For masonry, switch to a hammer drill mode; the percussive action reduces heat by breaking material instead of grinding. If your standard drill overheats in concrete, you need the right tool for the job.
When to Stop DIY Fixes and Call a Professional
Some overheating symptoms signal damage beyond user repair. Discontinue use immediately and seek professional service if you notice:
– Persistent burning smell after cleaning vents and replacing bits
– Visible smoke or sparks from motor vents
– Intermittent power loss where the drill cuts out when hot
– Grinding noises that continue after bit replacement
These indicate serious issues like shorted windings or seized bearings that require specialized tools. Attempting DIY fixes on damaged armatures often creates safety hazards. Most manufacturers offer repair services costing 30-50% of a new drill’s price. For older models, compare repair quotes against replacement costs—sometimes investing in a new drill with better cooling technology is wiser.
Final Note: By implementing these targeted fixes and prevention strategies, you’ll transform how to fix overheated drill problems from emergency repairs into routine maintenance. Remember that 95% of overheating cases stem from user-controllable factors like bit selection and workflow habits. Keep your vents clear, your bits sharp, and your work cycles disciplined—your drill will reward you with years of cool, reliable performance. For persistent issues, consult your tool’s warranty documentation or contact an authorized service center; never risk further damage by ignoring critical warning signs.


