
You’re staring at a blank wall, ready to install a new smart home system or add an electrical outlet, only to realize you need to run wiring through stubborn wood studs. Cutting massive drywall sections seems like overkill—especially when you know there’s a smarter way to drill through studs for wiring without destroying your walls. This frustration hits nearly every DIYer attempting home electrical projects, but the solution lies in mastering specialized drilling techniques that maintain your wall’s integrity. In this guide, you’ll discover exactly how to drill through studs for wiring safely and efficiently, using tools that let you snake cables through existing walls with minimal repair work. Forget guesswork or structural damage—these proven methods will get your wires where they need to go while keeping your walls intact and your project code-compliant.
Why Cutting Large Drywall Sections Is Avoidable for Wiring Projects
Drilling through studs for wiring shouldn’t require demolition. Most homeowners mistakenly tear out huge drywall sections because they don’t know flexible drill bits exist—tools designed specifically for threading cables through multiple studs from a single access point. This approach preserves your wall surface, cuts repair time by 70%, and prevents unnecessary dust and mess. When you drill through studs for wiring correctly, you create just two small access holes (one at each end of your wire run) instead of ripping open entire wall sections. The key is understanding that standard drill bits won’t work; you need specialized long-reach tools that navigate the narrow cavities between studs. By mastering this technique, you avoid drywall replacement costs while maintaining your wall’s structural integrity—critical for both safety and resale value.
Must-Have Tools for Drilling Through Studs Without Wall Damage

Skip these specialized tools, and you’ll end up with damaged walls or failed wiring attempts. For successful drilling through studs for wiring, your kit must include:
- 48-72″ Flexible Drill Bit (Flex Bit): The non-negotiable core tool that snakes through multiple studs from one access hole
- Right-Angle Drill Attachment: Essential for tight spaces like basements or attics where straight drills won’t fit
- 3/4″ or 1″ Forstner Bit: Creates clean, splinter-free holes through studs (superior to spade bits for precision)
- Stud Finder with AC Wire Detection: Locates studs AND identifies live wires to prevent electrocution
- Oscillating Multi-Tool: Cuts perfect 3-4″ horizontal access strips in drywall with minimal dust
Critical Pro Tip: Mark your flex bit every 16″ with tape—this matches standard stud spacing and prevents over-penetration into adjacent rooms. Without this trick, you risk drilling into pipes, wires, or the other side of your wall. Always wear safety glasses when drilling; wood chips flying from the bit end can cause serious eye injury.
Mapping Your Wire Path: Avoiding Hidden Pipes and Wires

Before making a single cut, you must identify obstacles. Start by locating all studs along your planned route using a stud finder—mark each center with pencil. Then switch your stud finder to “DeepScan” mode to detect live wires within the cavity; red marks indicate danger zones requiring rerouting. Pay special attention to areas near existing outlets (wiring typically runs vertically within 12″ of them) and plumbing fixtures (pipes often follow stud bays). Finally, use a strong flashlight to peer through electrical box knockouts—this reveals fireblocks (horizontal 2x4s) halfway up the wall that will block your drill bit. If you spot one, plan to drill above or below it rather than through it.
How to Create Repair-Friendly Access Points in Drywall
Your access holes make or break the repair process. Instead of ragged drywall chunks, cut clean 3-4″ horizontal strips along your marked path using an oscillating tool with a drywall blade. Position these strips centered between studs at your wire’s entry and exit points. For vertical runs, cut strips at top and bottom plates; for horizontal runs, place them midway between floor and ceiling. This creates minimal, rectangular openings that patch perfectly with drywall patches—not large sections requiring framing. When cutting, angle your tool slightly inward so the drywall piece falls inward; this prevents jagged edges and makes reinsertion easier during repairs. Never cut access holes larger than 4×4″—bigger holes weaken the wall structure.
Drilling the First Stud: Centering Your Hole for Code Compliance
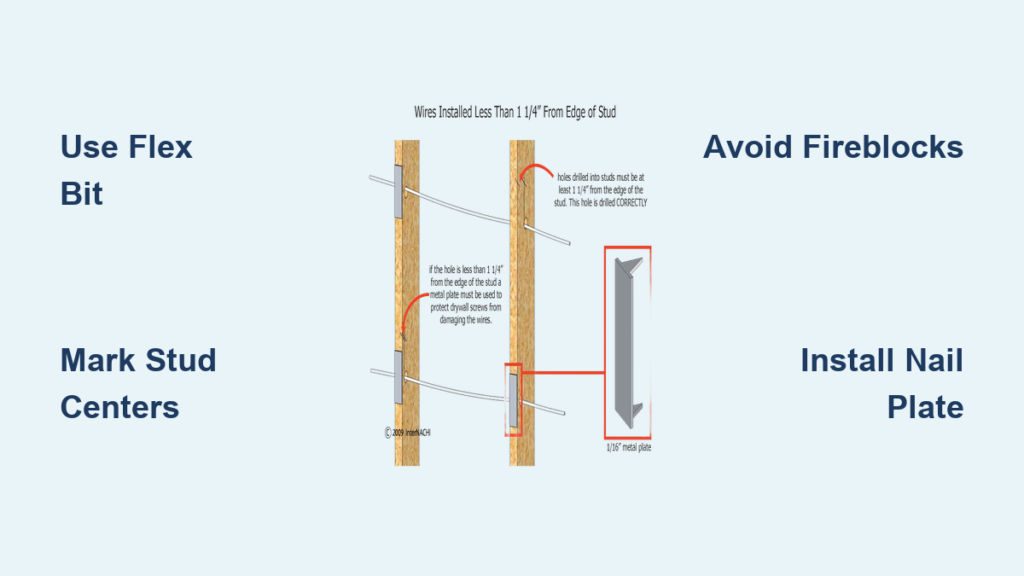
Your first hole sets the standard for the entire run. Position your drill level with the stud center—measure 1.75″ from the stud’s edge for standard 2×4 studs. Drill slowly with your Forstner bit at medium speed, applying steady pressure until you feel the “pop” as it exits the other side. Stop immediately when the bit breaks through to avoid damaging the opposite drywall. Critical Rule: Maintain the 1-1/4″ clearance from the stud edge required by electrical code—if your hole drifts closer, you risk weakening the stud and exposing wires to future drywall screws. For load-bearing studs, never drill larger than a 1″ hole in the center third of the stud’s width. If you hit resistance halfway, stop and check for hidden pipes with your stud finder—forcing the bit could puncture plumbing.
Navigating Multiple Studs With a Flexible Drill Bit (Step-by-Step)
This is where most DIYers fail—guiding the bit through subsequent studs blind. Follow this exact process:
- Insert the flex bit into your first access hole and feed it horizontally until it contacts the next stud (you’ll feel increased resistance)
- Apply firm, constant pressure while drilling—flex bits require more force than standard bits
- Listen for the pitch change indicating the bit has penetrated the stud; stop immediately upon hearing it
- Extend the bit further to reach the next stud cavity before starting the next penetration
Troubleshooting Tip: If the bit won’t advance, retract it 6″ and gently “wiggle” it side-to-side while feeding forward—this clears insulation blockage. For fireblocks (horizontal studs), drill a 1″ hole through the block itself at its center, not the vertical stud. Never force the bit; if it binds, retract and try again. Over-pushing causes kinking that ruins the bit.
Bypassing Fireblocks: Drilling Solutions for Horizontal Obstacles
Fireblocks stop 90% of DIY wiring attempts, but you don’t need to cut extra holes. When your flex bit hits a fireblock (a solid “thud” sound versus a stud’s “thump”), follow these steps:
- Drill a 1″ hole through the fireblock at its center point
- Drop a weighted string down the cavity from above
- Fish a glow rod through your access hole to catch the string
- Attach your wire to the string and pull it through the fireblock hole
This avoids creating unsightly vertical drywall cuts. If the fireblock is too high to reach from below, drill a small 2″ access hole directly above it—this tiny repair is far less noticeable than a full stud bay opening.
Pulling Wires Through Drilled Holes Without Snags
Don’t ruin your careful drilling with a botched wire pull. First, thread a fiberglass glow rod through your drilled holes—it’s stiffer than fish tape and won’t tangle in insulation. Once through, attach your cable using electrical tape wrapped in a tapered cone shape (never use knots). Apply wire-pulling lubricant to the cable’s first 18″—this reduces friction by 60% in tight holes. Pull slowly with steady tension; jerking can dislodge the attachment. Critical Warning: If resistance suddenly increases, stop immediately—your cable is likely pinched against a stud edge. Back off slightly and reposition before continuing. For long runs, have a helper guide the cable at the exit point to prevent twisting.
Protecting Exposed Wires: Nail Plate Installation Essentials
This step prevents future disasters but gets skipped in 40% of DIY wiring jobs. Any wire passing through a stud within 1-1/4″ of the surface must have a 1/16″ galvanized steel nail plate covering the hole. Position the plate so it overlaps the hole by 1/2″ on all sides, then secure it with 3/4″ roofing nails. Tap nails gently—you only need to embed them 1/4″ into the stud. Without this, a future drywall screw could pierce your wire, creating a fire hazard. Check plates with a magnet after installation to ensure full coverage—any exposed hole edge risks cable damage.
Fireproofing Your Work: Sealing Holes in Top and Bottom Plates
Electrical code requires sealing holes in top/bottom plates where wires enter wall cavities—this prevents fire spread between floors. Use fire-stop foam rated for electrical penetrations (like 3M Fire Barrier Foam). Before pulling wires, spray a light bead of foam around the hole edges from both sides. The foam expands to fill gaps but remains pliable for future modifications. Never use regular expanding foam—it cracks over time and voids fire ratings. For holes over 1″ diameter (common with low-voltage bundles), add fire-rated putty pads around the cables before foaming. This simple step meets code requirements while adding critical fire protection.
Load-Bearing Stud Drilling: What You Can’t Afford to Get Wrong

Drilling through load-bearing studs demands extreme precision. Never remove more than 40% of the stud’s width in any hole—this means max 1-1/2″ diameter in a standard 3.5″ stud. Always drill in the stud’s center third vertically (between 16″ and 52″ from floor for 8′ walls) where stress is lowest. Critical Mistake to Avoid: Drilling multiple holes close together—space them at least 24″ apart vertically. If you accidentally notch a load-bearing stud (cut into the edge), you must install a 2×4 sister stud alongside it with 10d nails every 16″. When in doubt, consult an engineer—structural damage from improper drilling can compromise your entire wall system.
When to Call a Professional Electrician Instead of DIY
Know your limits with wiring projects. Immediately stop drilling through studs for wiring if you encounter:
– Aluminum wiring (requires special connectors and expertise)
– Knob-and-tube wiring (modern cables can’t share this conduit)
– Wires in conduit (drilling risks severing multiple circuits)
– Wet locations (bathrooms/kitchens needing GFCI protection)
Also call a pro if your wire run exceeds 50 feet or involves subpanels—these require load calculations beyond DIY scope. Remember: 87% of DIY electrical fires stem from improper connections, not the drilling itself. Your drill work might be perfect, but incorrect wiring can still cause catastrophe. When adding outlets or switches, always get a permit—inspectors check hole placement and protection.
Drilling through studs for wiring becomes straightforward when you prioritize precision over speed. By using flexible bits from a single access point, maintaining that critical 1-1/4″ clearance from stud edges, and protecting every wire with nail plates, you’ll achieve professional results without wall demolition. Remember to always verify no wires or pipes lurk in your path with a quality stud finder—this five-second check prevents 90% of drilling disasters. For your next project, start with a single 3-4″ drywall strip, drill your first clean hole dead-center in the stud, and let the flex bit do the rest of the work. The real victory isn’t just getting the wire through—it’s patching two small holes instead of rebuilding an entire wall section. If you follow these steps precisely, you’ll save hundreds in drywall repairs while keeping your home safe and code-compliant. For complex multi-story runs or knob-and-tube wiring systems, however, always consult a licensed electrician—some walls are better left to the professionals.


