
Ever started drilling what should be a simple 2-inch hole in wood only to end up with a ragged, off-center mess? You’re not alone. Drilling wide holes (2+ inches) in wood triggers unique challenges like bit wandering, catastrophic tear-out, and dangerous torque reactions that standard drill bits can’t handle. When you’re working on projects like hollowing birch logs for pet toys or creating cable channels in thick beams, using the wrong technique guarantees frustration. This guide reveals exactly how to drill clean, precise wide holes in wood every time—using the right tools, avoiding critical mistakes, and applying pro techniques field-tested on railroad ties and hardwood logs. You’ll learn why your regular drill bit fails and what actually works for holes up to 4 inches in diameter.
Why Standard Drill Bits Fail for Wide Holes in Wood
Your typical twist drill bit becomes useless beyond 1 inch in diameter. The tapered point lacks stability, causing aggressive “walking” across the wood surface before you even penetrate. More critically, shallow flutes can’t eject wood chips from deep holes, leading to explosive binding that strips drill chucks or snaps bits mid-cut. This isn’t theoretical—when drilling a 3-inch hole in a railroad tie, forcing a standard bit creates dangerous kickback as chips jam the flutes. The solution? Specialized bits designed for wide-bore woodworking that solve these exact problems through engineered geometry.
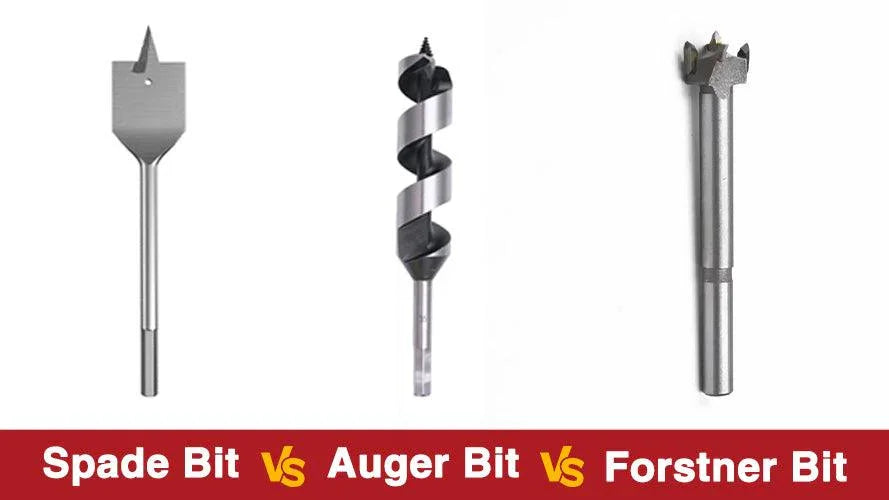
Forstner vs. Auger vs. Multi-Spur: Best Bit for 2+ Inch Holes
Choosing the wrong bit ruins your project before you start drilling. Here’s how to select the perfect tool for your specific wide-hole application:
Why Forstner Bits Fail Beyond 2 Inches
Forstner bits create clean, flat-bottomed holes up to 2 inches—but that’s their limit. Beyond this diameter, the rim’s cutting spurs lose rigidity, causing tear-out on hardwoods like oak. Worse, the center spur struggles to anchor in end grain (like log ends), making the bit “cam out” violently. In a 3-inch birch log project, Forstner bits bind within 2 inches of depth as chips clog the shallow flutes. Reserve them for shallow cabinetry work under 1.5 inches deep.
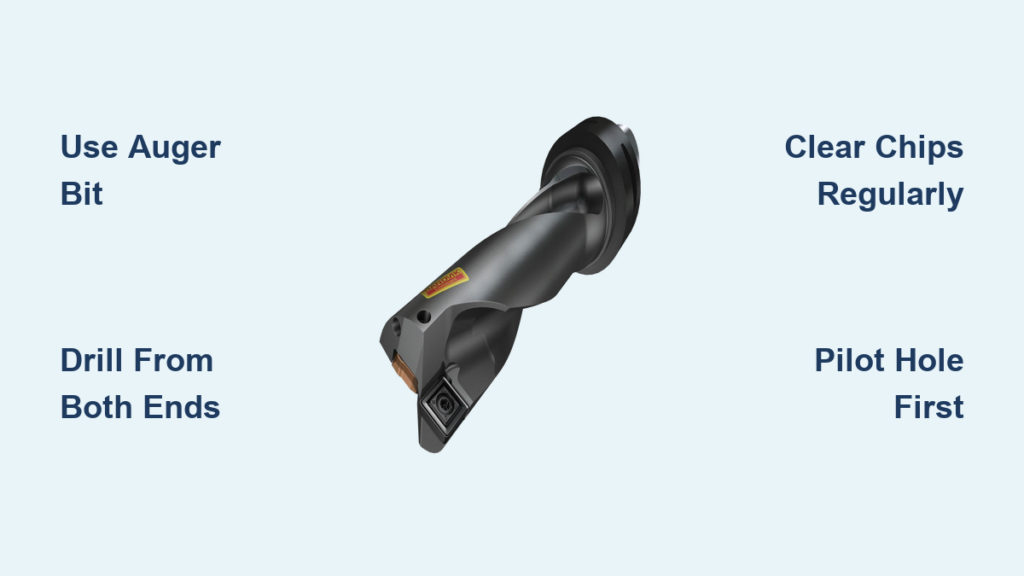
Auger Bits: The Deep-Hole Specialist for Logs
When hollowing a 70mm birch log 200mm deep, nothing beats a wood auger bit. Its aggressive screw point (not just a spur) self-feeds through end grain while deep, wide flutes eject chips continuously—even in damp wood. Unlike Forstner bits, augers stay stable at depth because the screw point pulls the bit straight rather than relying on downward pressure. For logs over 6 inches thick, use a ship auger with extra-long flutes. Critical tip: Always drill from both ends to meet in the middle—this prevents exit tear-out and keeps the hole straight.
Multi-Spur Bits: Drill 3-Inch Holes in Railroad Ties Safely
For structural projects like drilling 3-inch holes in railroad ties, Milwaukee Speedbor or Greenlee E-Z Bore bits are non-negotiable. Their four cutting spurs slice clean edges while the aggressive screw point pulls the bit through dense, knotty wood with minimal user force. The secret? Flutes engineered to clear massive chips from depths over 6 inches. Never attempt this with a hole saw—the core jams instantly. Pro move: Pair with a right-angle drill for better torque control in tight spaces.
3 Non-Negotiable Pre-Drilling Steps to Prevent Disaster
Skipping these steps causes 90% of wide-hole drilling failures. Do them every time:
Secure the Workpiece Like Your Fingers Depend on It
A spinning railroad tie or birch log becomes a lethal projectile. Clamp logs in V-blocks; sandwich flat stock between sacrificial boards. For round logs, wrap with a pipe clamp against a bench stop. If your workpiece moves during drilling, stop immediately—repositioning mid-cut guarantees tear-out.
Drill a 1/8″ Pilot Hole Through the Entire Piece
This tiny guide hole prevents wandering better than any center punch. Drill completely through the wood using a 3mm bit—the pilot hole must exit the backside. When you insert your wide bit, the center point locks into this channel. Without it, even auger bits will drift off-center in the first critical inch.
Mark Depth with Blue Painter’s Tape
Wrap tape around your bit at the desired depth (e.g., 200mm for birch logs). Unlike tape residue, blue painter’s tape won’t gunk flutes. This visual stop prevents drilling too deep and reduces chip-clearing time—you’ll know exactly when to pull out.
Step-by-Step: Drilling a Clean 2-Inch Hole Through a Birch Log

Follow this exact sequence for professional results on log projects:
Drill from Both Ends to Avoid Exit Tear-Out
Start drilling from one end until chips slow ejection (about half the log’s thickness). Never force it—if the drill groans, stop immediately. Extract the bit, clear all chips from flutes and hole, then flip the log. Use the pilot hole to align the bit from the opposite side. Drilling to meet the first bore in the middle creates a seamless hole with zero blowout.
Clear Chips Every 2 Inches of Depth
For holes deeper than the bit’s flutes (typically 3-4 inches), back out completely after every 2 inches drilled. Tap the bit against wood to dislodge chips, then blow out the hole with compressed air. Skipping this causes binding—wood dust becomes glue under heat, seizing the bit. In green birch logs, clear chips twice as often.
Use Low Speed and Let the Bit Self-Feed
Set your drill to its lowest speed (400-600 RPM for 2+ inch bits). High speed burns wood and dulls bits instantly. For auger/multi-spur bits, apply only light pressure—the screw point pulls itself in. If the drill stalls, you’re feeding too fast or chips are jammed. Back off and restart.
How to Drill 3-Inch Holes in Railroad Ties Without Kickback
Railroad ties demand extreme caution due to embedded metal and density. Here’s the pro method:
Use a Side-Handle Drill with Hex Shank Bits
A standard drill can’t handle the torque of a 3-inch multi-spur bit. Use a 1/2-inch chuck drill with side handle and hex-shank bit (not round shank). Clamp the tie to concrete with heavy-duty anchors—any movement risks catastrophic kickback. Position yourself sideways to the drill rotation; if it binds, the handle will kick down, not toward you.
Drill in 30-Second Bursts with Chip Clearing
Start at lowest speed, letting the screw point engage for 10 seconds. Drill for 30 seconds max, then withdraw completely to clear chips. Reinsert and repeat. The smell of burning wood means you’re drilling too long between clears. For ties over 6 inches thick, drill from both sides using your pilot hole as a guide.
Split-and-Glue Method: Perfect Holes Without Special Bits
When you lack a 3-inch auger bit, this technique creates flawless channels:
- Split the log cleanly lengthwise using a froe or bandsaw.
- Hollow each half with a router and core box bit (or chisels for rustic looks).
- Reassemble with waterproof glue and clamp overnight.
This avoids all drilling pitfalls—ideal for irregular shapes or when tear-out is unacceptable. The glue line becomes invisible on sanded surfaces.
5 Safety Must-Dos for Drilling Wide Holes
Ignoring these risks serious injury:
- Wear a drill side handle—it prevents wrist fractures when torque spikes
- Never drill above shoulder height—gravity amplifies kickback force
- Use hearing protection—multi-spur bits generate 100+ dB noise
- Cool overheating bits with a quick water dip (not soaking the wood)
- Brace your body against a wall when drilling—your core absorbs torque
Fix a Wandering Bit Mid-Drill: Emergency Techniques
If your bit starts walking off-center:
- Stop drilling immediately—forcing it worsens the error
- Chisel a shallow guide channel along the desired path
- Reinsert the bit with firm downward pressure on the high side
- Start at ultra-low speed until the bit re-establishes its path
For severe wander, abandon the hole and start over—patching a misdrilled wide hole rarely works.
Drilling clean wide holes in wood demands respect for the physics involved—but it’s entirely achievable with the right tools and techniques. Remember: auger bits for deep log work, multi-spur bits for structural holes, and always drill from both ends on thick stock. Never skip the pilot hole or chip clearing, and treat every wide-bore project as a high-torque operation requiring serious safety prep. The difference between a professional result and a ruined workpiece comes down to these details. Now grab your auger bit, clamp that birch log securely, and drill with confidence—your next wide hole will be perfectly round, smooth, and exactly where you intended. For more precision woodworking techniques, explore our guide to preventing tear-out when cross-cutting hardwoods.


