
Nothing beats the satisfaction of drawing clean, fresh water from your own property. Drilling a shallow well gives homeowners reliable water access while cutting utility costs significantly. Whether you’re preparing for emergencies or seeking self-sufficiency, this guide shows exactly how to drill a shallow well safely and effectively. By following these proven methods, you can access groundwater typically found at depths of 25 feet or less—without breaking the bank.
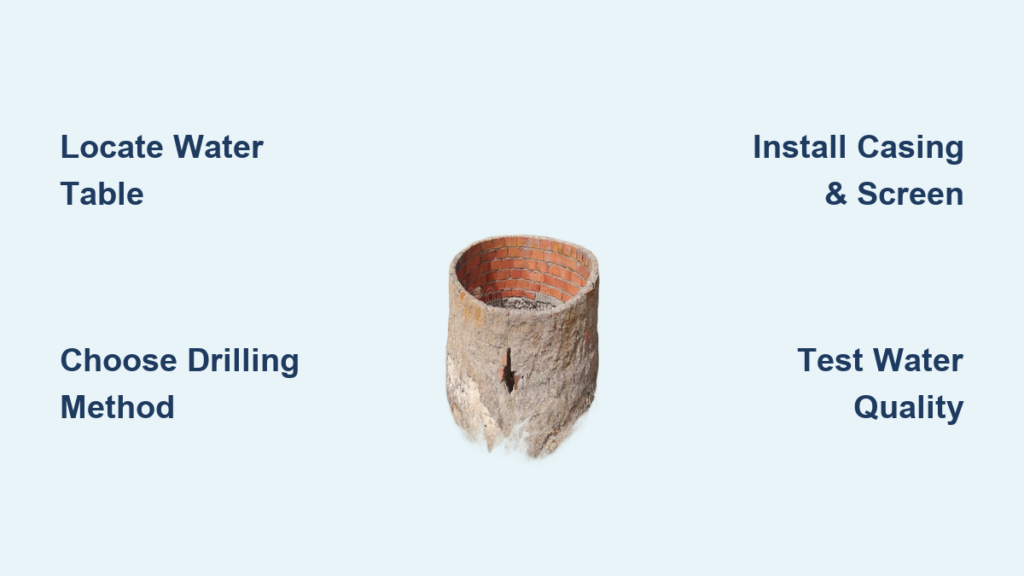
Identify Your Water Source Before Digging
Before you pick up a single tool, determining where water actually exists on your property prevents wasted effort and money. This critical first phase makes the difference between a flowing well and a dry, expensive hole.
Locate Your Water Table and Soil Composition
Your local water table depth dictates everything about your drilling approach. In many regions, water tables fluctuate seasonally—higher after rains, lower in drought. Contact your state geological survey for water table maps, or check with neighbors who already have wells. For the Central Texas example in our resource, water tables often sit between 3-15 feet but can disappear completely during dry spells.
Soil type dramatically affects your drilling method:
– Clay-heavy soils (common in many regions) stick to tools and require frequent cleaning but hold borehole shape better
– Sandy or silty soils collapse easily without immediate casing
– Rocky terrain may require professional equipment beyond DIY capabilities
Critical Safety Step: Always call 811 three business days before digging. This free service marks underground utility lines—hitting a gas or electrical line can be fatal.
Choose the Right Drilling Method for Your Soil
Selecting the appropriate technique based on your specific conditions saves hours of frustration. These proven methods work for most DIYers with basic tools and moderate physical ability.
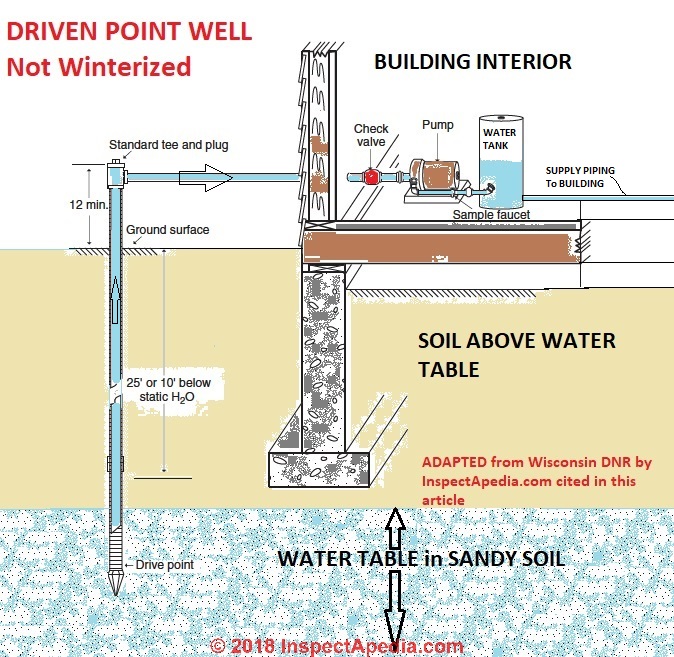
Drive a Well Point in Sandy or Gravelly Soil
When your soil consists of loose materials, the well-point driving method works best. You’ll need:
– A 1.25″ galvanized steel well point with screen
– Schedule 80 steel pipe couplings and 5-foot pipe sections
– A 10-20 lb sledgehammer or well point driver
The driving process:
1. Dig a 2-3 foot pilot hole, 3 feet wide
2. Attach the well point to your first pipe section
3. Place the driving cap on top and begin hammering
4. Add pipe extensions as you drive deeper
5. Continue until you reach 5-15 feet (or hit solid resistance)
This method works efficiently in ideal conditions but becomes impossible in clay or rocky soil. If you’re hitting bedrock at 3-15 feet as mentioned in the knowledge base, you’ll need to choose another location.
Jet-Down Method for Clay and Mixed Soils
For the common clay-heavy soils found across much of the US, the jetting method proves most effective. You’ll need:
– A high-volume 2-inch trash pump (6+ HP recommended)
– 2-inch PVC or steel pipe sections (10 feet each)
– Garden hose and fittings
– Driving cap
Step-by-step jetting process:
1. Start with a 10-12 inch starter hole using a manual auger (2-3 feet deep)
2. Connect your pump to the pipe system
3. Begin jetting water down the pipe while applying downward pressure
4. Rotate the pipe slightly to maintain straight descent
5. Add sections as the pipe sinks deeper
6. Stop when the slurry changes color, indicating you’ve hit the aquifer
Pro Tip: In sticky clay soils, adding a small amount of dish soap to your jetting water reduces adhesion and helps the pipe sink more smoothly.
Properly Construct Your Well for Clean Water
Drilling creates the hole, but proper construction ensures your water stays safe and your well lasts decades. Skip these steps and you’ll face contaminated water or a collapsed well.
Install Casing and Screen Correctly
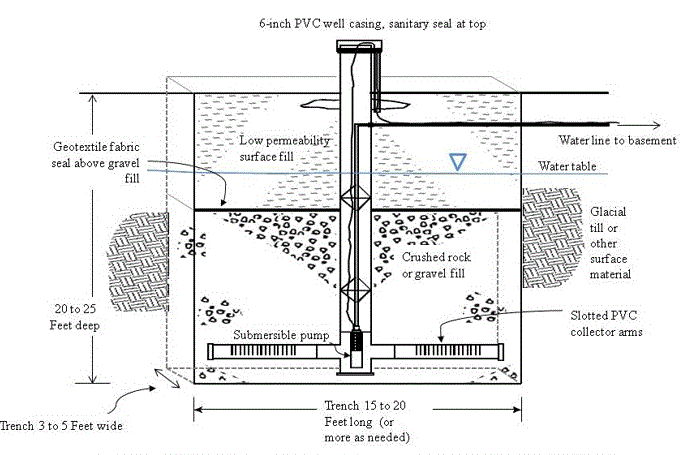
Your casing protects the borehole from collapsing and prevents surface contaminants from entering. For shallow wells:
– Use PVC Schedule 40 or 80 (most DIYers choose PVC for affordability)
– Drill the hole 2-3 inches wider than your casing diameter
– Lower casing to bottom of hole before backfilling
The well screen—perforated sections at the bottom—allows water in while keeping sediment out. Position it across the entire water-bearing zone, typically the last 5-10 feet of your well depth.
Create a Sanitary Seal to Prevent Contamination
This critical step separates your drinking water from surface contaminants:
1. Fill the space around the screen with 0.5-1.5 inch clean gravel (the “gravel pack”)
2. From the top of the gravel pack to 5-6 feet below surface, add bentonite clay or cement grout
3. Finish with native soil to grade level
Without this seal, rainwater can carry bacteria, chemicals, and other pollutants directly into your water supply.
Develop and Test Your New Well Immediately
Your well isn’t ready to use until properly developed—a process that removes drilling sediment and establishes clear water flow.
Complete Well Development in 4 Steps
- Initial pumping: Run water until it runs clear (may take hours)
- Surge development: Use a surge block or pump on/off cycles to clean the gravel pack
- Disinfection: Mix 1 gallon bleach with 5 gallons water, pour into well, and recirculate for 30 minutes
- Flush thoroughly: Run water until chlorine smell disappears completely
Mandatory Water Testing Before First Use
Never drink from a new well without testing. Contact your local health department for a certified lab kit. At minimum, test for:
– Total coliform and E. coli (indicators of harmful bacteria)
– Nitrates/nitrites (common from septic systems or fertilizers)
– Local contaminants (arsenic, lead, or region-specific pollutants)
If tests show contamination, install appropriate treatment like UV filtration or carbon filters before using the water.
Install the Right Pump System for Your Shallow Well
Choosing improper equipment leads to frequent breakdowns and poor performance. Match your pump to your specific well conditions.
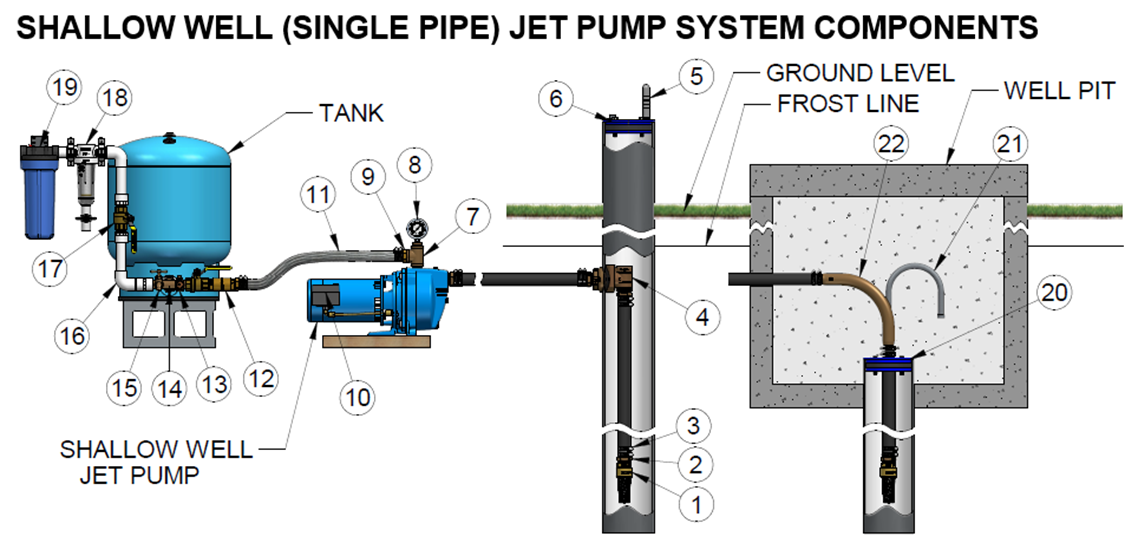
Select Between Jet and Submersible Pumps
For true shallow wells (less than 25 feet deep):
– Shallow well jet pumps: Sit above ground, pull water up (max 25-foot lift)
– Submersible pumps: Sit in the well, push water up (more efficient, quieter)
Critical measurement: Know your static water level (distance from surface to water when not pumping). If this exceeds 25 feet, you need a deep well system.
Essential System Components
Every complete well system requires:
– Pressure tank: Stores water to prevent pump cycling
– Pressure switch: Turns pump on/off automatically (typically 40/60 PSI)
– Check valve: Prevents water from flowing back into the well
– Sediment filter: Removes sand and particles
Pro Tip: Install a bypass valve on your pressure tank. This lets you access water during power outages by gravity feed if your storage tank is elevated.
Maintain Your Well for Long-Term Reliability
A well-maintained shallow well can provide clean water for 20+ years. Neglect leads to contamination, reduced flow, or complete failure.
Critical Maintenance Tasks
Monthly: Check pressure gauge readings and listen for unusual pump noises
Quarterly: Inspect sediment filters and test pressure switch operation
Annually: Shock chlorinate the well and conduct comprehensive water testing
Warning: Never store chemicals, fuels, or pesticides within 100 feet of your wellhead. Even small leaks can contaminate your entire water supply.
Troubleshoot Common Problems Early
- Reduced flow? Check for clogged well screens or sediment buildup
- Sand in water? Your gravel pack may be insufficient or screen damaged
- Pressure problems? Verify tank pre-charge (typically 2 psi below cut-in pressure)
If problems persist after basic troubleshooting, consult a professional well driller—some issues require specialized equipment to diagnose and fix.
Final Safety and Legal Considerations
Before starting your project, confirm local requirements:
– Permits: Most jurisdictions require drilling permits
– Setbacks: Minimum distances from septic systems (typically 50-100 feet)
– Water rights: Some states regulate groundwater usage
Never skip safety protocols: Excavations deeper than 5 feet require shoring to prevent collapse. Always wear eye protection when drilling, and ensure all electrical equipment has GFCI protection.
Drilling your own shallow well connects you directly to one of life’s most essential resources. With careful planning, the right method for your soil conditions, and proper construction techniques, you’ll enjoy clean, reliable water for years to come. Remember that when in doubt—especially with water quality issues—consulting a professional well driller or water treatment specialist is always the safest choice.


