
Drilling a hole in a rock seems straightforward until you hit the first obstacle—your standard drill bit shatters against granite or your hole wanders across smooth marble. Whether you’re creating jewelry from geodes, mounting stone decor, or working on a construction project, drilling into rock demands specialized knowledge that most DIY guides overlook. The difference between success and frustration comes down to matching your technique to the specific rock type and using equipment designed for stone’s unique challenges. This guide reveals exactly how to drill clean, precise holes in everything from soft sandstone to impossibly hard basalt—without destroying your tools or the rock.
Choosing Between Carbide-Tipped vs. Diamond Bits for Your Rock Type
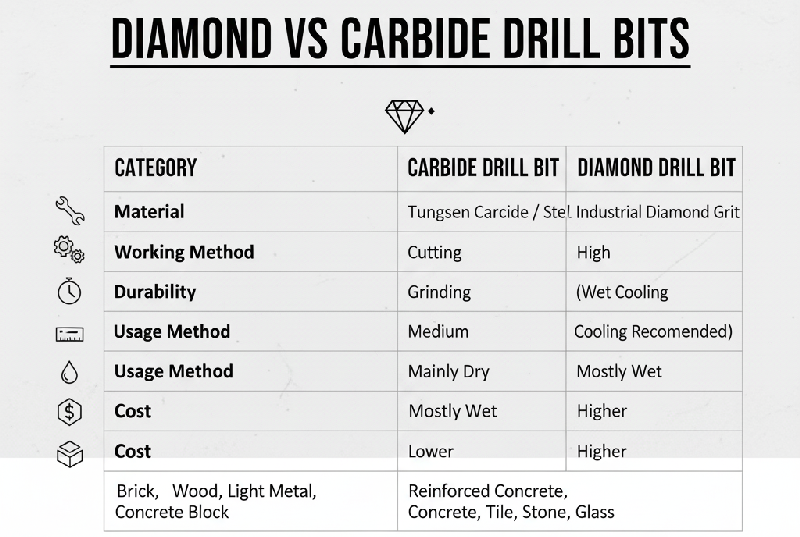
Your drill bit selection makes or breaks your rock drilling project before you even start. For sedimentary rocks like sandstone and limestone, carbide-tipped masonry bits (minimum 3/16″ diameter) provide the perfect balance of affordability and effectiveness. These bits feature tungsten carbide tips brazed onto steel bodies, handling moderate abrasion while resisting chipping. Start with these for shallow holes up to 1″ deep in softer stones, but recognize their limitations when you encounter harder materials.
Diamond-tipped bits become non-negotiable when drilling igneous or metamorphic rocks like granite, basalt, or quartzite. These premium bits embed industrial diamonds in a metal matrix that grinds rather than cuts stone. Unlike carbide bits that fracture against crystalline structures, diamond bits slowly erode the rock surface through microscopic abrasion. Invest in these when working with any rock that scratches glass—a simple field test that predicts whether standard bits will fail. For gemstone or fossil work requiring surgical precision, hollow-core diamond bits with water cooling produce the cleanest holes with minimal fracturing.
Why 3/16″ Is the Minimum Safe Size for Rock Drilling Bits
Attempting to drill rock with bits smaller than 3/16″ invites disaster—thin bits snap under stone’s resistance, especially in harder materials. The physics are simple: narrow bits concentrate drilling pressure into a tiny area, exceeding the steel’s tensile strength when encountering unexpected hardness variations. Always begin with a 3/16″ pilot hole even when your final diameter is smaller, then gradually step up sizes using the hole enlargement technique. This approach distributes force across a larger bit surface, preventing catastrophic breakage while maintaining control.
Identifying When Diamond Bits Are Non-Negotiable for Hard Rocks
Skip the diamond bit and you’ll waste hours—and potentially damage your specimen—on these rock types:
– Granite: Contains hard quartz crystals that shatter carbide tips
– Basalt: Fine-grained volcanic rock with abrasive minerals
– Quartzite: Metamorphosed sandstone harder than steel
– Obsidian: Volcanic glass that chips unpredictably
When in doubt, perform the scratch test: if the rock easily scratches glass, diamond bits are essential. The slight extra cost prevents ruined projects and dangerous bit failures.
Securing Your Rock to Prevent Slippage During Drilling
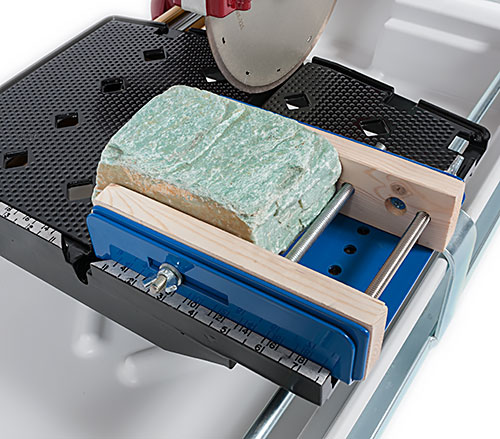
Rock movement during drilling guarantees crooked holes and broken bits. Start by creating a divot at your drilling point using a center punch and hammer—this tiny indentation guides your bit’s initial contact. For small specimens, secure them in a padded vise with non-marring jaws; for larger rocks, use heavy-duty C-clamps anchored to a solid workbench. Never rely on hand-holding, as even slight shifts when the bit catches can cause injury.
Creating the Perfect Starting Divot with a Center Punch
Position your center punch precisely on the marked spot, then strike it once with a hammer—no more. Excessive force creates micro-fractures that propagate during drilling. For polished stones, place masking tape over the drilling area first to prevent the punch from sliding. The ideal divot depth is 1/32″ deep: deep enough to guide the bit but shallow enough to avoid compromising structural integrity.
DIY Drill Guide Solutions for Precise Hole Placement
When drilling perpendicular holes, create a simple jig from scrap wood with a pre-drilled guide hole matching your bit size. Clamp this guide firmly against your secured rock, ensuring the guide hole aligns perfectly with your divot. For angled holes (like 45-degree mounting points), build a wedge-shaped jig that holds your rock at the exact angle. These low-cost solutions eliminate guesswork and deliver professional results on your first attempt.
Setting Up Water Cooling to Prevent Bit Overheating in Granite
Water isn’t optional when drilling hard rocks—it’s the critical factor preventing bit destruction. Diamond bits require constant moisture to carry away heat generated by friction; without it, the metal matrix softens and the diamonds dislodge. For small projects, keep a spray bottle filled with water and mist the drilling area every 10-15 seconds. Larger jobs demand a more systematic approach to maintain consistent cooling.
Simple Spray Bottle Technique vs. Professional Water Drip Systems
The spray bottle method works adequately for holes under 1″ deep in granite, but becomes impractical for deeper drilling. Upgrade to a drip system by puncturing a small hole in a water bottle cap and positioning it above your work area. For serious rock drilling, invest in a magnetic water pump that circulates coolant from a reservoir through a flexible tube directed at the bit. This continuous flow keeps temperatures below 140°F—the threshold where diamond bonds begin failing.
How Much Water Flow Is Actually Needed for Diamond Bit Drilling
Contrary to popular belief, you don’t need a torrent—just enough to create a slurry that carries away rock particles. For a standard 1/4″ diamond bit, a flow rate of 50-100 milliliters per minute suffices. Watch for visual cues: the drilling area should maintain a wet sheen without pooling water. If steam appears, increase flow; if the bit smokes, stop immediately and allow cooling. Proper hydration doubles bit life and prevents rock cracking from thermal shock.
Hammer Drill Settings for Soft Sandstone vs. Hard Basalt
Your drill’s mode selection dramatically impacts success rates across different rock types. For sedimentary stones like sandstone and limestone, use rotary mode only—these softer materials don’t require percussive action and the hammer function actually increases fracture risk. Set your drill to 500-800 RPM with moderate pressure, clearing dust every 1/4″ of depth.
Why Rotary Mode Alone Works for Limestone But Fails for Granite
Limestone’s uniform, porous structure allows clean cutting with rotation alone, while granite’s crystalline composition demands the micro-fracturing action of hammer mode. When drilling igneous rocks, engage both rotation and hammer functions at the lowest effective setting. Start in rotary mode to establish the pilot hole, then switch to hammer mode once the bit penetrates 1/8″ deep. This hybrid approach prevents surface chipping while maintaining drilling efficiency.
Optimal RPM Ranges for Different Rock Hardness Levels
- Sandstone/Limestone: 800-1200 RPM (rotary only)
- Slate/Marble: 600-800 RPM (rotary with light hammer)
- Granite/Basalt: 300-500 RPM (hammer mode engaged)
- Quartzite/Obsidian: 200-400 RPM (slowest setting)
Higher RPM generates more heat that fractures brittle stones, while too-slow speeds in soft rocks cause excessive dust buildup. Adjust incrementally based on the rock’s response—ideal drilling produces a steady stream of moist slurry, not dry powder.
Preventing Rock Cracks During Hole Drilling: Pressure Control Tips
Excessive pressure is the #1 cause of rock fractures during drilling. Let the bit do the work—your role is to maintain steady alignment, not force penetration. Apply just enough pressure to keep the bit engaged, typically 5-10 pounds of force for hand drilling. When drilling through thin sections (under 1/2″ thick), support the backside with a sacrificial wood block to prevent blowout.
The Peck Drilling Method for Deep Holes in Brittle Stone
For holes deeper than 1″, adopt the peck drilling technique: drill 1/4″ deep, then fully withdraw the bit to clear debris and allow cooling. Repeat this cycle until reaching full depth. This prevents dust accumulation that increases friction and heat, both major crack triggers. In extremely brittle materials like obsidian, reduce peck depth to 1/8″ increments and increase withdrawal time.
Why Starting with a Pilot Hole Saves Your Main Bit
Always drill a pilot hole 2mm smaller than your final diameter before stepping up to the target size. A 3/16″ pilot hole guides your larger bit perfectly while distributing drilling forces. This technique prevents wall collapse in porous stones and reduces the torque required for final sizing—critical for preserving expensive diamond bits. The time invested in pilot drilling saves far more time than correcting a wandering hole.
Solving Stuck Drill Bit Emergencies in Quartzite
When your bit seizes in hard rock, immediate action prevents permanent damage. Never force the drill clockwise—that only wedges it tighter. Instead, switch to reverse mode at low speed while applying gentle back-and-forth motion. If this fails, disconnect power and carefully apply penetrating oil around the bit’s collar. Wait 10 minutes for the oil to penetrate, then retry reverse rotation with light tapping on the chuck.
Step-by-Step Recovery for Bits Jammed in Hard Rock
- Stop drilling immediately and unplug the tool
- Apply penetrating oil liberally around the bit collar
- Wait 10 minutes for oil to wick into the interface
- Set drill to reverse at lowest speed
- Apply gentle back-and-forth motion while pulling outward
- If stuck, use pliers on the chuck (not the bit) for extra leverage
When to Apply Penetrating Oil vs. Gentle Back-and-Forth Motion
Use penetrating oil only for steel bits stuck in non-porous rocks like granite. For diamond bits or porous stones, skip the oil—water-based coolants already provide sufficient lubrication. Instead, focus on mechanical release: grip the chuck firmly and rock the entire drill assembly side-to-side while applying steady withdrawal pressure. This breaks the friction bond without damaging the bit’s cutting surface.
Safety Gear Essentials for Silica Dust Protection During Rock Drilling
Standard dust masks offer zero protection against crystalline silica—the microscopic particles released when drilling rock that cause incurable lung disease. You must use a respirator rated N95 or higher, preferably with a P100 filter. Pair this with safety goggles that seal completely around the eyes (regular glasses leave dangerous gaps) and ear protection for hammer drill noise exceeding 85 decibels.
Why Regular Dust Masks Fail for Rock Drilling (And What to Use Instead)
Cloth and surgical masks capture only large particles, letting dangerous silica dust pass through. OSHA requires N95 respirators for silica exposure, but for extended drilling, upgrade to a half-face respirator with P100 filters that block 99.97% of particles down to 0.3 microns. Fit-test your respirator by checking for air leaks around the seal—proper fit is non-negotiable for safety.
Creating a Dust-Controlled Workspace for Indoor Rock Projects
Set up a simple containment system using a plastic tarp anchored to your work surface with duct tape. Position a shop vacuum with HEPA filter nozzle just behind your drilling point to capture airborne particles. For water-cooled drilling, place the rock in a shallow tray to contain slurry. These measures reduce airborne dust by 90% compared to uncontrolled environments—critical for protecting your long-term health.


