
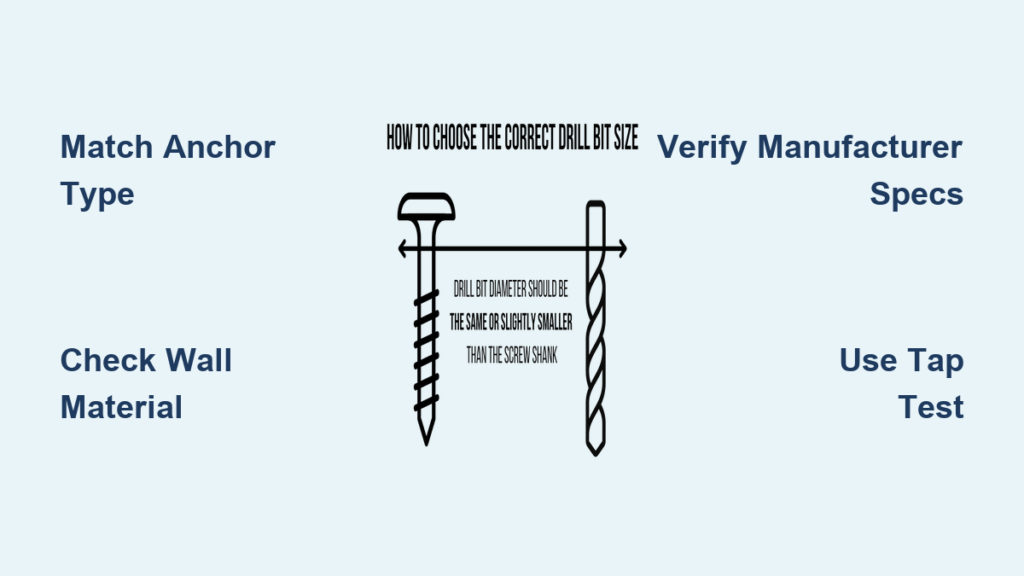
You just bought that sleek new shelf, measured your wall perfectly, and now you’re staring at a box of wall anchors wondering: What drill bit size do I actually need? Choosing the wrong size is the #1 reason anchors fail—sending your carefully hung artwork crashing to the floor. The secret isn’t guesswork; it’s matching three critical elements: your anchor type, wall material, and load weight. This guide cuts through the confusion with exact drill bit sizes for every anchor scenario, verified by industry standards. You’ll learn why a 1/16″ difference can mean failure, how to avoid the “spinning anchor” nightmare, and the one test that guarantees a perfect fit every time.
Why the Wrong Drill Bit Size Causes Anchor Failure Every Time
An anchor’s entire purpose relies on mechanical friction against your wall material. Drill a hole too small, and you’ll crack plastic anchors or damage masonry during insertion. Too large, and the anchor lacks surface contact to resist pull-out forces—causing it to spin freely when you tighten the screw. Concrete anchors are especially unforgiving; even 1/32″ of extra space prevents expansion wedges from gripping aggregate properly. The difference between holding 50 lbs versus 200 lbs often comes down to precise hole sizing. Always remember: The drill bit creates the anchor’s “foundation.” If that foundation is flawed, no amount of screw-tightening will save your installation.
How Material Science Dictates Your Drill Bit Choice
Drywall and concrete demand completely different approaches. In drywall, hole smoothness matters most—a rough hole tears the paper facing, reducing holding power. Use sharp high-speed steel (HSS) twist bits and drill slowly to avoid “feathering” the edges. For concrete, debris clearance is critical. Dust buildup prevents anchors from seating fully, so you must drill 1/2″ deeper than the anchor length and vacuum the hole clean. Brick requires extra caution—drill into mortar joints whenever possible, as the bit can skitter across hard brick faces. Always match your bit type to the material: carbide-tipped masonry bits for concrete/brick, standard HSS for drywall/wood, and diamond-tipped bits for tile.
Exact Drill Bit Sizes for Plastic, Toggle, and Concrete Anchors
Plastic Expansion Anchors: The Snug Fit Rule
For standard plastic or nylon sleeve anchors (like those holding picture frames), your drill bit must match the anchor’s body diameter, not the flared top. A 1/4″ anchor typically requires a 5/16″ (8mm) bit in drywall—but here’s the critical detail: In brick or block, use a 3/16″ bit instead. Why? Brick’s density requires less expansion space. Never force the anchor; it should tap in with light hammer pressure. If it slides in finger-tight, the hole’s too big. If you need a mallet to seat it, the hole’s too small. For #8 screw anchors (common for medium shelves), start with a 1/4″ bit in drywall, but verify with your anchor’s packaging—some require 5/16″.
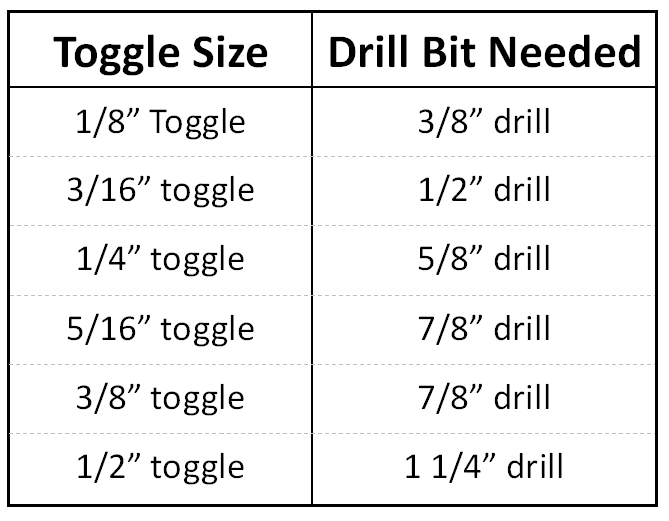
Toggle Bolts: Measuring Folded Wings, Not Screw Size
Most DIYers make this mistake: They drill for the screw size, not the folded toggle wings. A 1/4″ toggle bolt needs a hole sized for the collapsed wings—typically 1/2″ to 3/4″ depending on the model. Measure your specific toggle’s folded width with calipers, then add 1/16″ clearance. For standard SnapToggle anchors, a 5/8″ hole works for 1/4″ bolts. In ceilings, use toggles rated for overhead use and drill slightly deeper holes to accommodate wing deployment space. If the toggle won’t fold through the hole, don’t force it—enlarge the hole by 1/16″ increments until the wings pass smoothly.
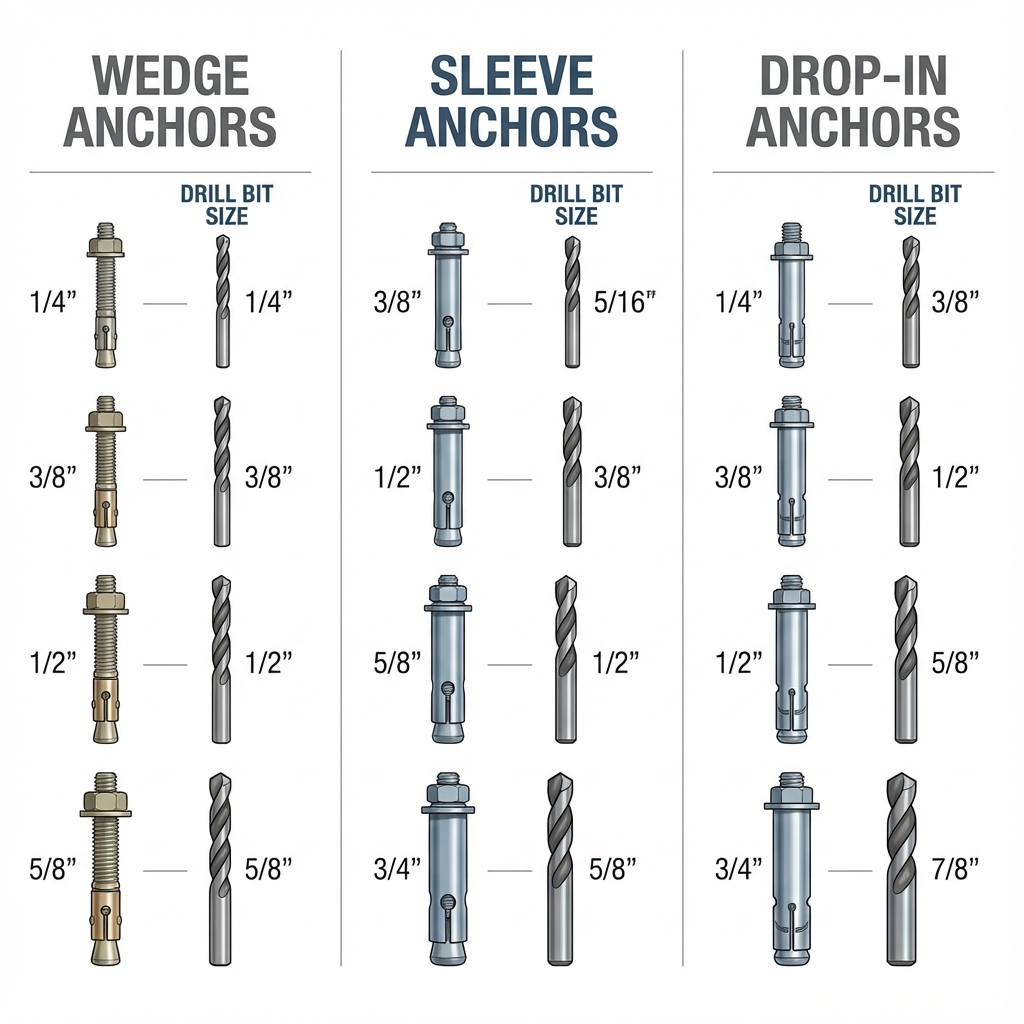
Concrete Anchors: Why 1/2″ Anchors Need Exactly 1/2″ Bits
Wedge and sleeve anchors in concrete have zero tolerance for error. A 3/8″ wedge anchor demands a precisely 3/8″ carbide-tipped masonry bit—no exceptions. Concrete’s variable aggregate means even slight oversizing prevents the wedge from expanding against solid particles. Drill depth must exceed anchor length by 1/2″ to capture dust. For sleeve anchors in hollow block, use a bit matching the anchor’s outer diameter (e.g., 1/2″ bit for 1/2″ anchor), but drill only 1″ deep to avoid blowing out the back of the block. Always use a hammer drill mode; standard rotation won’t cut concrete cleanly.
Anchor Drill Bit Size Chart: Match by Anchor Type and Material
Use this verified chart as your starting point—but always cross-check with your anchor’s packaging. Material density and anchor designs vary significantly between brands.
| Anchor Type & Size | Wall Material | Correct Drill Bit Size | Critical Notes |
|---|---|---|---|
| #8 Plastic Anchor | Drywall | 1/4″ HSS | Too big = anchor spins; too small = cracks anchor |
| 1/4″ Toggle Bolt | Drywall/Ceiling | 1/2″ HSS | Hole must clear folded wings (measure yours!) |
| 3/8″ Wedge Anchor | Concrete | 3/8″ carbide masonry | Depth = anchor + 1/2″; vacuum hole clean |
| 5/16″ Sleeve Anchor | Brick/Block | 1/2″ carbide masonry | Minimum 1″ embedment; drill into mortar joints |
| 1/4″ Concrete Screw | Concrete | 1/4″ carbide masonry | Self-tapping; no anchor needed—bit size = screw size |
| Heavy-Duty Molly Bolt | Plaster | 1/4″ HSS | Requires 1/8″ pilot hole for screw first |
Red Flag Alert: If your anchor packaging specifies “drill hole 1/8″ larger than anchor,” it’s likely for brick or block—not drywall. Drywall anchors always need snugger fits than masonry.
5-Step Method to Choose Drill Bit Size for Any Anchor
Step 1: Decode Your Anchor Type Instantly
Identify your anchor by its expansion mechanism:
– Plastic sleeves have flared tops that compress as you tighten the screw
– Toggle bolts have wings that spring open behind the wall
– Wedge anchors have a conical clip that slides up a threaded rod
– Sleeve anchors expand via a separate setting tool
When in doubt, measure the anchor body diameter with calipers—it’s the key sizing metric.
Step 2: Material-Specific Drilling Protocol
- Drywall/plaster: Use new sharp HSS bits at medium speed. Start with a pilot hole using an awl to prevent bit wandering.
- Concrete/brick: Carbide-tipped bits + hammer drill only. Drill at 300-500 RPM; forcing causes bit overheating.
- Tile: Diamond-tipped bit at 200 RPM. Apply water drip to cool the bit and prevent cracking. Start with 1/8″ pilot hole.
Step 3: The Manufacturer Spec Check (Non-Negotiable!)
Find the tiny drill size stamped on the anchor packaging or spec sheet. Example: A Toggler SnapToggle 1/4″ anchor requires a 5/8″ hole—ignoring this causes installation failure 90% of the time. No packaging? Measure the anchor body and subtract 1/16″ for drywall anchors (e.g., 0.22″ body = 3/16″ bit).
Step 4: The Tap Test for Perfect Fit
Drill a test hole in scrap material:
– The anchor should require a light tap with a hammer to seat fully
– If it drops in finger-tight: Hole is 1/16″ too big—use next smaller bit
– If it won’t seat after 3 taps: Hole is too small—go up 1/32″
For toggles, drop the folded wings through the hole—they should slide freely without wobbling.
Step 5: Screw Compatibility Check
Your drill bit size must accommodate both anchor and screw. A #8 screw needs a 1/8″ pilot hole through the anchor. If you skip this, the screw can split plastic anchors. For concrete screws, the bit size equals the screw diameter—no separate anchor needed.
Stop Anchor Spinning: Fixing Common Drill Bit Size Mistakes

“My Anchor Spins When I Tighten the Screw” (90% of Failures)
Cause: Hole oversized by even 1/32″. Fix: Remove anchor, insert epoxy putty into hole, re-drill at correct size after curing. For concrete, use a larger diameter anchor—never fill with drywall compound.
“Toggle Won’t Fold Through the Hole”
Cause: Hole sized for screw, not folded wings. Fix: Enlarge hole in 1/16″ increments until wings pass smoothly. Rotate the toggle as you push it through—some models deploy better at specific angles.
“Anchor Pulled Through Drywall”
Cause: Hole too large for toggle wings or material too thin. Fix: For heavy items, switch to a SnapToggle with wider wings, or install a backer board between studs. Never use plastic anchors for loads over 25 lbs in drywall.
Proven Tricks for Flawless Anchor Installation Every Time
The Tape Measure Hack: Wrap masking tape around your drill bit at the exact depth needed (anchor length + 1/2″ for debris). Stops you from drilling too deep in hollow walls.
Concrete Dust Solution: After drilling, insert a shop vac hose into the hole and run for 10 seconds. Then blow compressed air outward to clear residual dust—never blow inward (pushes dust deeper).
Tile Drilling Secret: Start at 100 RPM with light pressure. Once the bit bites, apply a water drip and increase speed gradually. Diamond bits require cooling to prevent glazing.
Weight Distribution Tip: For shelves over 50 lbs in drywall, use two toggles spaced 12″ apart instead of one heavy-duty anchor. Distributes stress and prevents drywall blowout.
Choosing the right drill bit size isn’t just a step—it’s the foundation of your entire installation. By matching the hole precisely to your anchor type and wall material, you transform fragile holds into rock-solid anchors. Remember the tap test for drywall, the vacuum-clean rule for concrete, and always—always—verify against manufacturer specs. Now grab that drill with confidence: Your next project won’t be held together by hope, but by physics. For heavy loads or structural projects, consult an engineer—but for 95% of home installations, this guide gives you the exact drill bit size to choose for anchor success.


