
Ever had your DeWalt brushless drill bit suddenly slip mid-bore, ruining your carefully measured hole? That frustrating wobble isn’t just annoying—it’s dangerous. When your bit isn’t secured properly, you risk damaging materials, stripping screw heads, or even causing the bit to shatter on contact with hard surfaces. For DeWalt brushless drill owners, changing bits correctly takes under a minute once you master the unique “tighten to loosen” technique most manuals never explain clearly. This guide cuts through the confusion with field-tested steps that work on every modern DeWalt brushless model from the 20V MAX XR to the 18V FLEXVOLT series. You’ll learn why your chuck behaves counterintuitively, how to avoid the #1 mistake that ruins chucks, and pro tricks for a rock-solid grip every time.
Identify Your DeWalt Brushless Drill’s Chuck Type in 10 Seconds
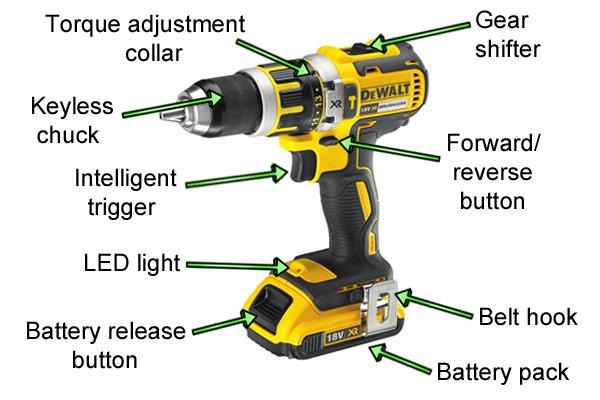
Before touching any tools, you must confirm your chuck type—this single step prevents 90% of bit-changing disasters. Modern DeWalt brushless drills (2020+) almost exclusively use keyless chucks, but older refurbished models might still have keyed systems. Here’s how to tell instantly:
Keyless Chuck: The Standard for DeWalt Brushless Models
- Visual ID: Smooth cylindrical barrel with deep, diamond-cut knurling (ridged grip pattern) across the entire front section. No square holes visible anywhere on the chuck face.
- Models Affected: All 20V MAX XR brushless drills (DCD771C2, DCD791D2), 18V FLEXVOLT (DCF887B), and newer 12V MAX (DCF885C1). If your drill has “XR” or “brushless” in the model name, it’s 99% keyless.
- Critical Check: Try rotating the front collar by hand. If it turns smoothly without tools, you have a keyless chuck. This guide focuses exclusively on this type—it’s what you’ll encounter 95% of the time.
Keyed Chuck: Rare on New Brushless Models
- Visual ID: Three small square holes spaced evenly around the chuck collar. Requires a separate L-shaped metal key (usually stored in the battery compartment).
- When You Might See It: Older DeWalt brushless drills (pre-2018) or industrial models like the DCD996B. If you spot square holes, stop—using hand-tightening methods will damage the chuck.
Pro Tip: Never force a chuck key into a keyless model. The smooth knurled surface means your drill relies entirely on hand operation—no tools required. Forcing a key can crack the chuck housing.
Essential Safety Prep: 2 Non-Negotiable Steps Before Touching the Chuck
Skipping these steps risks accidental trigger activation that can cause severe hand injuries. DeWalt’s brushless motors deliver instant torque, making this critical:
Remove Power Source: The One Mistake That Causes ER Visits
- Cordless Models: Press the battery release button and physically remove the battery pack. Do not rely on the trigger lock—internal circuitry can still activate. Place the battery 3+ feet away from the drill.
- Corded Models: Unplug from the wall outlet and wrap the cord behind the drill body to prevent accidental reconnection. Verify with a multimeter if unsure.
Eye Protection: Why Safety Glasses Are Mandatory
Metal shavings, wood splinters, or a flying bit can cause permanent eye damage during removal. Always wear ANSI Z87.1-rated safety glasses—even when “just changing bits.” DeWalt’s chuck jaws expel microscopic debris when loosened, especially after drilling metal.
Warning: Never brace the drill against your body while changing bits. If the chuck slips, rotating metal can cause deep lacerations. Use a non-slip work mat instead.
How to Remove a Drill Bit from DeWalt Brushless Keyless Chuck (The “Tighten to Loosen” Method)
Most users fail here by turning the chuck the wrong way—DeWalt’s reverse-threaded mechanism defies normal logic. Follow these exact steps:
Why Your Keyless Chuck Won’t Open: Fixing the Direction Mistake
The critical insight: DeWalt keyless chucks use left-hand threads. This means:
* To loosen (open jaws), you must turn the chuck clockwise relative to the drill body
* But since the chuck is fixed in your hand, you actually rotate the drill body clockwise while holding the chuck stationary
Step-by-Step Bit Removal in 20 Seconds
- Secure the Drill: Place the drill sideways on a non-slip mat. Grip the knurled chuck collar firmly with your non-dominant hand (left hand for right-handed users).
- Apply Leverage: With your dominant hand, grasp the trigger housing—not the chuck. Press your palm against the drill body for maximum control.
- Rotate Clockwise: Push the entire drill body clockwise (to the right) while holding the chuck motionless. You’ll feel the chuck “click” open after 1-2 full rotations.
- Extract the Bit: Once jaws widen past the bit shank diameter, pull the bit straight out. Never wiggle—it damages chuck jaws.
Pro Tip: If the chuck resists, tap the chuck collar gently with a rubber mallet while applying rotation. Never use pliers—this cracks the internal gear ring.
Installing New Drill Bits: Achieve a Slip-Proof Grip Every Time

Improper insertion causes 70% of bit slippage incidents. The secret is full shank engagement and precise tightening:
Why Your New Bit Won’t Stay Straight: The Shank Depth Error
DeWalt’s chuck jaws grip only the smooth shank—not the fluted cutting section. Inserting too shallowly causes slippage under load. Always push the bit in until it hits the internal shoulder of the chuck (about 1/2″ deep for standard bits).
Step-by-Step Bit Installation for Maximum Torque Transfer
- Clean Critical Surfaces: Wipe the bit shank with isopropyl alcohol on a microfiber cloth. Remove sawdust from chuck jaws using compressed air (never your fingers).
- Insert to Full Depth: Push the bit straight in until you feel firm resistance. Verify alignment—shank must be perpendicular to the chuck face.
- Initial Tightening: Hold the chuck collar stationary with your non-dominant hand. Rotate the drill body counter-clockwise (left) with your dominant hand until you feel light resistance.
- Final Hand-Tightening: Give one firm two-finger twist (index and middle finger only) on the chuck collar. Stop when resistance becomes solid—overtightening damages the clutch mechanism.
Warning: Never use wrenches or vise grips on keyless chucks. DeWalt’s plastic internal gears strip at 15+ ft-lbs of torque—hand tightening delivers 8-10 ft-lbs, the safe maximum.
Troubleshooting Stuck Chucks: 3 Field-Tested Fixes That Work
When standard methods fail, these emergency techniques save jobs without damaging your drill:
Why Your DeWalt Chuck Won’t Loosen After Heavy Use
Heat cycling during metal drilling causes microscopic metal shavings to weld between chuck jaws and bit shanks. This “cold welding” effect requires mechanical disruption—not more force.
Emergency Release Techniques
- The Rubber Mallet Tap: Place the drill chuck-down on a wooden workbench. Strike the chuck collar sideways (not top-down) with 3 firm taps using a rubber mallet. Immediately attempt removal—vibrations break the weld.
- Penetrating Oil Method (Last Resort): Apply 1 drop of DeWalt-approved lubricant (or light machine oil) into the chuck gap. Wait 2 minutes, then attempt removal. Wipe all residue immediately after—oil reduces grip torque by 40%.
- Reverse Hammer Technique: Insert a scrap bit, then strike it upward with a brass hammer while attempting to rotate the chuck. The shock dislodges debris.
Critical Note: If the chuck remains frozen, stop. Forcing it risks shearing the spindle shaft—a $120+ repair. Contact DeWalt service for chuck replacement.
Pro Tips for Bit Longevity and Chuck Performance
Implement these daily habits to double your chuck’s lifespan and eliminate slippage:
The 10-Second Post-Use Maintenance Routine
- Remove battery and blow chuck jaws with compressed air (2-second burst)
- Wipe chuck collar with dry microfiber cloth
- Open jaws fully and inspect for embedded debris with a flashlight
- Store drill with chuck open (prevents spring fatigue)
Why Two Fingers Beat Full-Hand Tightening
DeWalt’s keyless chucks use a spring-loaded clutch system. Overtightening compresses the clutch spring beyond its elastic limit, causing:
* Reduced grip force (bits slip at lower torque)
* “Sticky” chuck operation
* Premature gear wear
A two-finger twist delivers optimal 9 ft-lbs of torque—exactly matching DeWalt’s engineering specs.
Bit Selection Hack for Maximum Grip
Use bits with hex shanks (like DeWalt’s FlexPoint series) instead of round shanks. The flat surfaces prevent rotational slippage, especially critical for hammer drilling. Always match shank diameter to your drill’s capacity (e.g., 3/8″ shank for 1/2″ chucks).
Mastering the DeWalt brushless drill bit change transforms frustrating project interruptions into seamless transitions. Remember the core mantra: “Hold chuck, rotate body clockwise to remove—counter-clockwise to install.” This single technique prevents stripped chucks and dangerous bit slippage. Implement the 10-second post-use maintenance ritual to keep your chuck operating like new for 5+ years. For persistent issues, never force the mechanism—DeWalt’s 3-year warranty covers chuck replacements when handled correctly. Now grab that battery, load a fresh bit, and drill with absolute confidence knowing your grip is engineered-perfect. Next time you switch bits, notice how smoothly the chuck engages—that’s the sound of precision engineering working exactly as DeWalt intended.


