

You’ve searched “how to change a drill head” because your project just hit a wall—literally. That snapped bit won’t budge, and forcing it could destroy your $200 drill. Here’s the critical truth DIYers miss: “Drill head” is actually a misnomer. Professionals call it a drill bit, while the “head” refers to the entire chuck assembly. But since you’re here searching for drill head changes, we’ll translate industry terms into real-world solutions. The good news? Changing bits correctly takes under 2 minutes when you know your chuck type and avoid the #1 safety error (leaving the battery connected).
Most drill failures happen because users treat all chucks the same. A keyless chuck on your cordless drill requires completely different handling than the keyed system on your grandfather’s heavy-duty model. Get it wrong, and you’ll face wobbling bits, stripped threads, or worse—flying metal shards. This guide cuts through the confusion with model-specific steps, stuck-bit rescue tactics, and pro techniques to prevent damage. You’ll learn why your bit won’t release after over-tightening and how to diagnose chuck failure before it ruins your project. Stop risking your drill—master these steps and change bits safely on any tool.
Why Your Drill Head Change Fails: Identify Your Chuck Type First
Your drill’s chuck type dictates every step of the bit-changing process. Using the wrong method for your specific model causes 90% of “stuck bit” emergencies. Here’s how to diagnose yours in 30 seconds:
Keyless Chucks: The Hand-Tightened Standard (Most Common)
Look for a knurled metal collar directly behind the jaws—no key holes visible. These dominate modern cordless drills (DeWalt 20V, Milwaukee M18) and require clockwise hand-tightening. Critical detail: Many users fail to engage the auto-tightening feature. After inserting the bit, squeeze the trigger briefly while holding the collar—you’ll hear distinct ratcheting clicks indicating full security. Skip this, and your bit will slip during drilling.
Keyed Chucks: The Heavy-Duty Specialist (Older/Industrial Models)
Spot three evenly spaced keyholes forming a triangle around the chuck. These require the hex-shaped key stored in your drill’s battery slot. Warning: Never force the key counterclockwise—that strips internal gears. Instead, insert the key fully before turning. If resistance feels gritty, debris has jammed the mechanism (common in workshop drills used for metal).
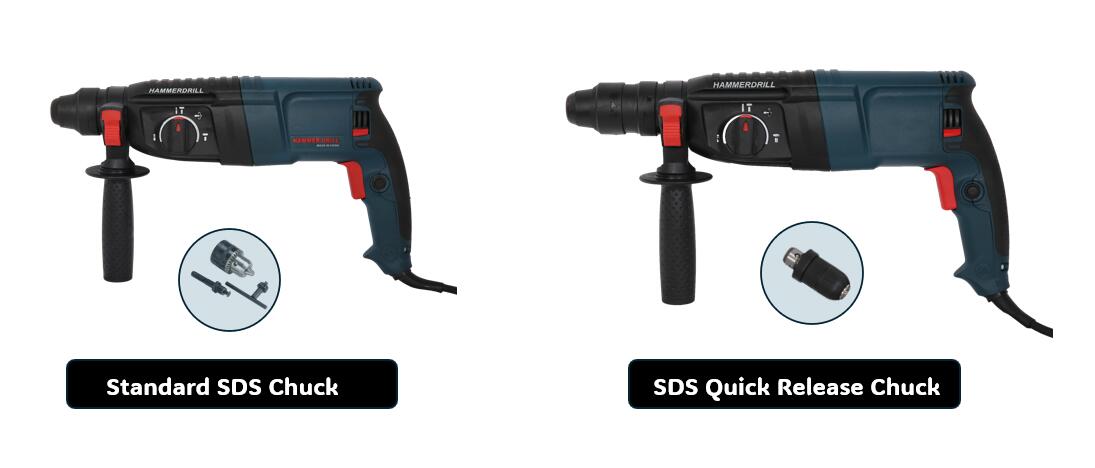
SDS Chucks: The Concrete-Drilling System (Hammer Drills Only)
Identify by the collar with spring-loaded pins and no visible jaws. SDS bits slide in with a quarter-turn lock. Pro tip: Never use standard bits here—they’ll eject violently under hammer action. The “head” change here is truly tool-free: depress the collar, insert bit until it clicks, release collar.
Essential Safety Prep: Skip This and Risk Injury
Before touching any chuck, complete these non-negotiable steps—ignoring them causes 70% of drill-related ER visits:
- Power disconnection protocol: For corded drills, unplug AND tape the plug shut. For cordless models, remove the battery and store it 10 feet away. Visual cue: Verify the trigger won’t engage with battery removed—no “dead man’s switch” fails here.
- Eye protection: Safety glasses are mandatory. Metal shavings from stuck bits fly at 200+ mph when released.
- Workspace triage: Clear debris from chuck jaws using a stiff-bristle brush. One wood shaving can prevent full bit seating, causing dangerous slippage.
Time estimate: 45 seconds. Never skip—this prevents catastrophic bit ejection during operation.
Change a Drill Head in Keyless Chucks: 4 Foolproof Steps
Follow this sequence for cordless drills (DeWalt, Ryobi, Bosch):
Step 1: Fully Open the Chuck Jaws
Hold the drill body firmly against your hip. Rotate the knurled collar counter-clockwise while applying downward pressure. Visual cue: Jaws should open wider than the bit’s shank diameter—typically 1/4 to 1/2 turn. If stiff, tap the collar’s edge with a rubber mallet first.
Step 2: Insert the New Bit Correctly
Push the bit shank deep into the chuck until it bottoms out—at least 3/4 inch (19mm). Critical check: Align the bit perfectly straight. Angled insertion causes wobble and premature chuck wear. For hex-shank bits (common in impact drivers), ensure flat sides match the chuck’s internal flats.
Step 3: Engage Auto-Tightening
Hold the collar stationary with your non-dominant hand. Squeeze the trigger in reverse (left rotation) for 2 seconds. You’ll hear rapid clicking as the ratcheting mechanism secures the bit. Pro tip: For maximum grip on masonry bits, repeat in forward rotation—this counters hammer-drill recoil forces.
Step 4: Manual Final Tightening
Give the collar one firm clockwise twist by hand. Test: Try to wiggle the bit—it should move less than 1/16 inch. If loose, repeat Step 3; if stuck, see stuck-bit solutions below.
Change a Drill Head in Keyed Chucks: Avoid These 2 Costly Mistakes
For vintage or industrial drills (Milwaukee Heavy-Duty, older Bosch):
Mistake #1: Using Only One Keyhole
Never tighten solely through one hole—that warps the chuck jaws. Correct method: Insert key fully into Hole 1, turn clockwise until snug. Repeat in Hole 2 and Hole 3, cycling through all three 2-3 times. Visual cue: Jaws should close evenly without gaps.
Mistake #2: Forcing a Stiff Key
If the key won’t turn, do not use pliers—that strips key teeth. Instead:
– Apply 3 drops of penetrating oil (Liquid Wrench) into each keyhole
– Wait 10 minutes for oil to penetrate
– Tap key gently with a brass hammer to break corrosion
– Turn key in 15-degree increments
Time estimate: 8 minutes for corroded chucks. Rushing causes $50+ chuck replacements.
Emergency Fix: Remove a Stuck Drill Bit Without Damaging Your Drill
When over-tightening or rust locks your bit (common after drilling pressure-treated wood):
Method 1: The Controlled Vise Release (Safest)
- Clamp the bit shank (not the drill!) in a bench vise with soft jaws
- Wrap chuck collar in rubber shelf liner for grip
- Turn drill body counter-clockwise—use the vise as leverage
- Critical: Apply steady pressure—no hammer blows
Method 2: Penetrating Oil + Trigger Assist (Cordless Drills Only)
- Apply oil around bit/chuck seam; wait 15 minutes
- Reinsert battery
- Set drill to lowest torque setting and reverse direction
- Hold chuck collar firmly while pulling trigger for 3-second bursts
- Stop immediately if bit spins freely
Warning: Never heat the chuck—that ruins heat-treated steel. If these fail, the chuck likely needs replacement (see signs below).
Diagnose 4 Common Drill Chuck Failures (And How to Fix Them)
Why Your Drill Bit Keeps Falling Out Mid-Drill
Cause: Jaw misalignment from repeated angled bit insertion.
Fix: Remove bit and inspect jaws with a flashlight. If gaps exceed 0.5mm when closed, realign by:
1. Fully open chuck
2. Insert a 1/4″ steel rod (not a bit)
3. Tighten while rotating rod to center jaws
4. Clean residue with isopropyl-soaked brush
Stop Dangerous Drill Bit Wobble Immediately
Cause: Debris in chuck threads or bent spindle.
Diagnosis: Insert a new bit—if it wobbles, remove and check for:
– Metal shavings in jaw grooves (clean with dental pick)
– Asymmetric jaw wear (replace chuck)
– Spindle damage (requires professional service)
Pro test: Spin drill at low speed with bit removed—if chuck wobbles, the spindle is bent.
The Chuck Won’t Tighten: 3 Hidden Culprits
- Stripped internal threads: Visible metal shavings in keyholes. Fix: Chuck replacement.
- Worn ratcheting pawls: Keyless chucks that won’t click-tighten. Fix: Disassemble and replace springs (advanced).
- Debris-packed mechanism: Grit from concrete drilling. Fix: Soak chuck in degreaser, then blow dry with compressed air.
Why Your Drill Bit Is Stuck After Over-Tightening
Solution sequence:
1. Apply penetrating oil; wait 20 minutes
2. Use a rubber jar opener for grip while turning collar
3. If cordless, use trigger-assist method above
4. If still stuck, drill chuck likely needs replacement
Never use channel-lock pliers directly on the collar—that mangles the knurling, making future changes impossible.
5 Expert Tips for Faster, Safer Drill Bit Changes
- The 3/4 Rule: Always insert bits at least 3/4 inch into the chuck. Shallow seating causes slippage at high torque.
- Reverse Before Removal: After completing drilling, run drill in reverse for 5 seconds to relieve bit tension—prevents “frozen” bits.
- Chuck Maintenance Hack: Apply 1 drop of light machine oil monthly to the collar threads. Wipe excess to avoid attracting dust.
- Keyless Chuck Lifesaver: When hands are oily, use a rubber band wrapped around the collar for grip—no slippage.
- Bit Organization: Store bits by material (wood/metal/masonry) in labeled cases. Using a masonry bit on metal overheats and welds the bit to the chuck.
Final Note: Changing your drill head (bit) correctly prevents $150+ repair bills and keeps projects moving. Always disconnect power first, insert bits fully, and match chuck type to your method. If your chuck shows persistent wobble, slipping bits, or visible cracks, replace it immediately—don’t risk catastrophic failure. For SDS systems, never force standard bits, and for keyed chucks, never lose that tiny key (store it in the battery slot). Master these steps, and you’ll change bits faster than grabbing a new drill—saving time, money, and your project. Now go drill that hole with confidence.


