
Ever wonder how a machine can drill through two miles of solid rock to tap ancient energy reserves? When you see those towering derricks on the horizon, they’re not just poking holes in the ground—they’re executing one of engineering’s most precise high-stakes operations. An oil drill works by combining immense mechanical force with geological intelligence to conquer crushing pressures and temperatures while preventing catastrophic blowouts. Understanding how an oil drill works transforms that distant rig from a mystery into a marvel of human ingenuity. In this guide, you’ll discover the exact sequence that turns raw earth into usable energy, why drilling mud is more critical than the drill bit itself, and the safety systems that keep million-dollar operations from becoming disasters.
How the Drill Bit Crushes Through Solid Rock Formations
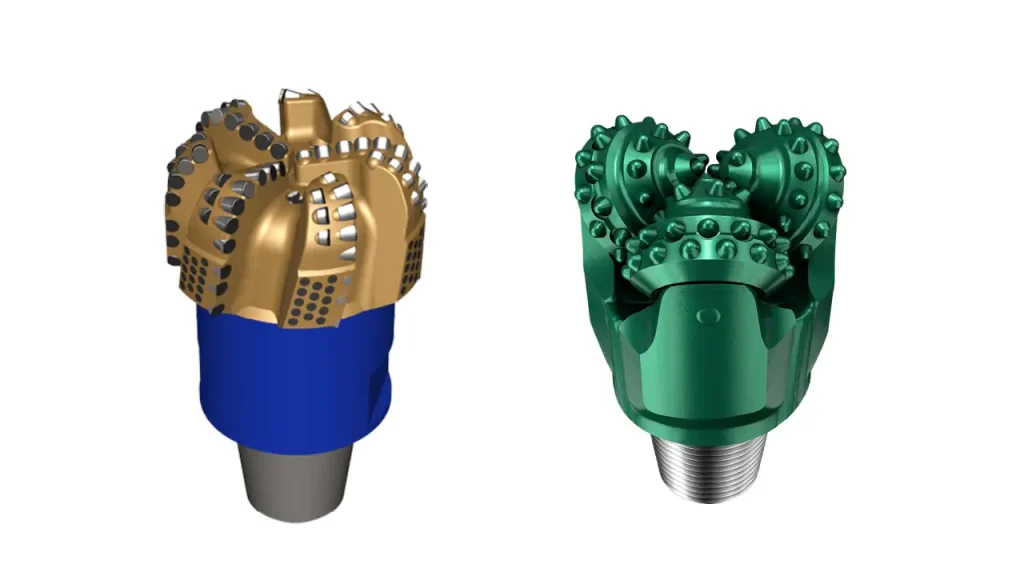
The drill bit is your rig’s frontline warrior, designed to pulverize rock formations that have remained undisturbed for millions of years. Unlike standard drill bits, oil drill bits feature industrial diamond cutters or tungsten carbide teeth engineered to shear through granite, shale, and sandstone at depths exceeding 10,000 feet. As the bit rotates under 50,000 pounds of downward force, its cutting structure grinds rock into fine cuttings while withstanding temperatures over 300°F. You’ll recognize a failing bit when torque readings spike unexpectedly or when cuttings at the surface suddenly become larger chunks—signs the cutting teeth have worn down and require replacement.
Why Diamond-Embedded Bits Dominate Hard Rock Formations
Hard rock layers demand specialized bits where industrial diamonds are either impregnated throughout the matrix or set as polycrystalline diamond compact (PDC) cutters. These bits don’t “drill” so much as fracture rock through continuous shearing action. When drilling through abrasive sandstone, PDC bits last 2-3 times longer than traditional roller-cone bits, saving critical rig time. Watch for consistent, sand-like cuttings at the shale shaker—that’s your visual confirmation the bit is performing optimally.
Recognizing When Your Bit Needs Replacement
Critical warning signs include:
– Sudden torque spikes indicating worn cutters
– Reduced rate of penetration (ROP) despite constant weight on bit
– Metal shavings in cuttings signaling bearing failure
– Excessive vibration felt through the drill string
Ignoring these signals risks catastrophic bit failure, potentially leaving expensive equipment stuck downhole—a scenario that can cost $500,000+ in recovery operations.
The Drill String: Your Power Transmission Lifeline
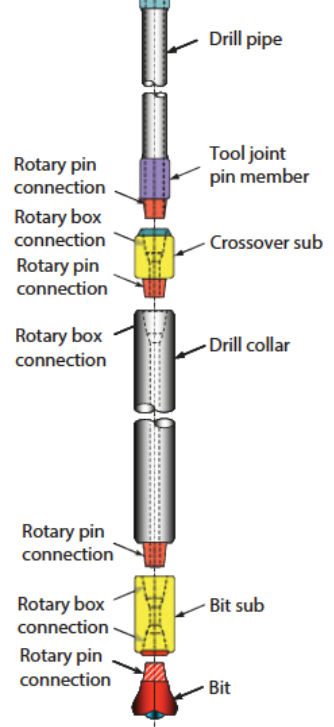
Your drill string isn’t just pipe—it’s a dynamic power conduit transferring rotational force and hydraulic energy to the bit while withstanding 200+ tons of tension. Composed of 30-45 foot steel joints screwed together, this assembly must flex through curved wellbores without parting. Every time you add a new joint during “making a connection,” you’re extending a mechanical lifeline that could stretch over 3 miles deep. The top drive system—a motorized unit suspended from the derrick—rotates the entire string while allowing continuous circulation, eliminating the need for a kelly drive and saving 25% in connection time compared to rotary tables.
How Top Drives Revolutionized Drilling Efficiency
Modern rigs use top drives instead of rotary tables because they enable:
– Faster tripping: 30% quicker pipe handling during drill string removal
– Continuous circulation: Mud pumps keep running during connections, preventing kicks
– Precise weight control: Digital sensors maintain exact downward force on bit
– Safer operations: Reduced manual handling of heavy pipe
When you see the top drive smoothly lowering a new pipe section, that’s $15,000/hour rig time being optimized.
Why Drilling Mud Prevents Catastrophic Blowouts
Forget everything you think you know about “mud”—this engineered fluid is your primary defense against uncontrolled reservoir pressure. Circulating at 3,000+ PSI through the drill string, drilling mud performs four life-or-death functions simultaneously: it cools the red-hot bit, carries cuttings to surface, stabilizes the wellbore walls, and critically, exerts hydrostatic pressure to counteract formation pressures. If underground pressure hits 8,000 PSI, your mud weight must be precisely calculated to exceed that—typically by 200-500 PSI—to prevent a “kick” where oil or gas surges uncontrollably into the wellbore.
Spotting Early Warning Signs of a Kick
Monitor these critical indicators:
– Unexpected pit gain: Sudden increase in surface mud volume
– Flow rate mismatch: More mud returning than pumped
– Reduced pump pressure: Signaling formation fluid entering the well
– Gas-cut mud: Bubbles appearing in circulating fluid
A single missed warning sign can escalate into a blowout within 90 seconds—this is why mud engineers constantly adjust barite content to maintain exact density.
Step-by-Step: Drilling From Surface to Target Depth
Drilling progresses in carefully planned stages, each requiring precise execution to avoid costly failures. This isn’t a continuous operation—you’ll repeatedly stop to run casing, cement, and evaluate formations. The entire process from spudding to reservoir penetration typically takes 30-60 days for a 15,000-foot well, with each phase building safety into the next.
Spudding In: Establishing Your Critical Foundation
Your operation begins by driving a 30-inch conductor pipe 100-200 feet into unstable surface layers. This large-diameter pipe—cemented in place—creates a stable base to prevent the wellhead from collapsing during deeper drilling. The “spud date” marks official drilling commencement, but this initial phase is purely about establishing a solid foundation that can handle the rig’s 1,000+ ton weight.
Making Connections: The Rig’s Most Repetitive Critical Task
Every 30-45 feet, you’ll perform this high-risk maneuver:
1. Suspend the drill string using slips on the rig floor
2. Break the connection with power tongs at the top joint
3. Lift a new joint into position with the iron roughneck
4. Make up the connection to 35,000 ft-lbs torque
5. Resume circulation before rotating
A single dropped tool during this process can cost $250,000 in fishing operations—this is why crews practice this hundreds of times.
How Casing and Cementing Seal Against Underground Collapses

Casing isn’t optional—it’s your structural backbone against wellbore collapse and groundwater contamination. As you drill deeper sections with progressively smaller bits, you insert steel casing strings cemented in place to isolate zones. The surface casing (typically 13⅜-inch) protects freshwater aquifers, while production casing (5½-inch) lines the final reservoir section. Critical to success is the cement job: slurry must completely fill the annular space between casing and rock to prevent channeling where fluids could migrate.
Why Cement Bond Logs Determine Well Viability
After cementing, you run a cement bond log tool that:
– Measures acoustic impedance between casing and formation
– Identifies micro-annuli or channels in the cement sheath
– Verifies zonal isolation for environmental safety
– Confirms structural integrity for production
A poor cement job here could lead to a blowout years later—this single evaluation prevents 90% of long-term well integrity failures.
Evaluating the Reservoir: Wireline Logging Decides Profitability
When the target depth is reached, pulling the drill string makes way for the decisive moment: reservoir evaluation. Wireline logging tools—lowered on an armored cable—measure formation resistivity, density, porosity, and fluid content while stationary. Real-time data streams to geologists who analyze whether hydrocarbons exist in commercial quantities. A single logging run costs $50,000 but determines whether $10 million gets spent on completion.
Interpreting Key Log Indicators for Oil Presence
Critical readings include:
– Neutron-density separation: Indicates gas or oil saturation
– Spontaneous potential (SP) deflection: Shows permeable zones
– Resistivity contrast: Distinguishes oil (high resistivity) from water
– Gamma ray spikes: Identifies shale barriers
If logs show 15% porosity with 60% hydrocarbon saturation, your well likely pays out—anything less may be abandoned.
Completing the Well: From Drill Bit to Oil Production
Completion transforms your drilled hole into a production asset. For conventional reservoirs, this means perforating the production casing opposite the oil zone using shaped charges that punch holes through cement and rock. Then, production tubing is run inside the casing with a packer isolating the annulus. At surface, the “Christmas tree”—a forest of valves—controls flow while monitoring pressure and temperature. Most modern offshore wells use intelligent completions with downhole sensors allowing remote flow adjustments from the control room.
Why Perforation Strategy Makes or Breaks Production
Optimal perforation requires:
– Phasing: 120° orientation to maximize inflow
– Density: 4-8 shots per foot for unconsolidated sand
– Depth: 12-24 inches into formation for maximum drainage
– Timing: Simultaneous firing to prevent formation damage
Poor perforation can reduce initial production by 40%—this single step determines your well’s economic lifespan.
Safety First: Blowout Preventers Stop Uncontrolled Surges
The blowout preventer (BOP) stack is your last line of defense—a 50-foot tall valve fortress mounted on the wellhead. When formation pressure overwhelms mud weight, hydraulic rams can seal the well in 30 seconds. Critical components include:
– Shear rams: Cut through drill pipe to seal the well
– Pipe rams: Seal around the drill string
– Annular preventers: Flexible seals for any diameter
– Control pods: Redundant hydraulic systems
During the 2010 Deepwater Horizon incident, BOP failure turned a kick into disaster—this is why modern rigs test BOPs weekly under full pressure.
Understanding how an oil drill works reveals why this process costs $100,000 per day yet remains essential to global energy. From the diamond-impregnated bit grinding through ancient rock to the precisely weighted mud holding back reservoir pressures, every component serves a critical safety and efficiency purpose. Remember that successful drilling hinges on three non-negotiables: maintaining exact mud weight to prevent kicks, executing perfect cement jobs for long-term integrity, and respecting BOP testing protocols. When you see a rig operating smoothly, it’s not luck—it’s the culmination of thousands of precise decisions keeping immense underground forces under control. For those looking deeper, studying directional drilling techniques shows how a single rig pad can access reservoirs miles away, proving that modern drilling is as much about subsurface navigation as brute force.


