
Ever tried drilling a precise hole only to have your bit wobble or slip mid-operation? That frustrating experience often traces back to the unsung hero of your drill—the chuck. This critical component sits at the business end of every drill press and handheld drill, silently ensuring your bits stay perfectly aligned and securely fastened during operation. Understanding how a drill chuck works isn’t just technical trivia; it directly impacts your drilling accuracy, safety, and the lifespan of your tools. When your chuck functions properly, it transfers rotational force from the motor to the bit with minimal runout—keeping your holes clean, precise, and exactly where you want them. In this guide, we’ll break down the mechanical magic that makes your drill chuck such an indispensable component.
Why Your Drill Chuck Suddenly Loses Its Grip on Bits
The drill chuck isn’t just a simple clamp—it’s a precision-engineered interface between your drill’s motor and the cutting tool. When you activate your drill, the chuck must maintain a firm hold while withstanding significant rotational forces and vibration. A properly functioning chuck grips the bit shank with enough force to prevent slippage yet allows for quick bit changes when needed. The consequences of a failing chuck extend beyond mere inconvenience; excessive runout (wobble) from a worn chuck can cause oversized holes, premature bit failure, and even dangerous kickback situations. Recognizing how this component works helps you identify problems before they compromise your work or safety.
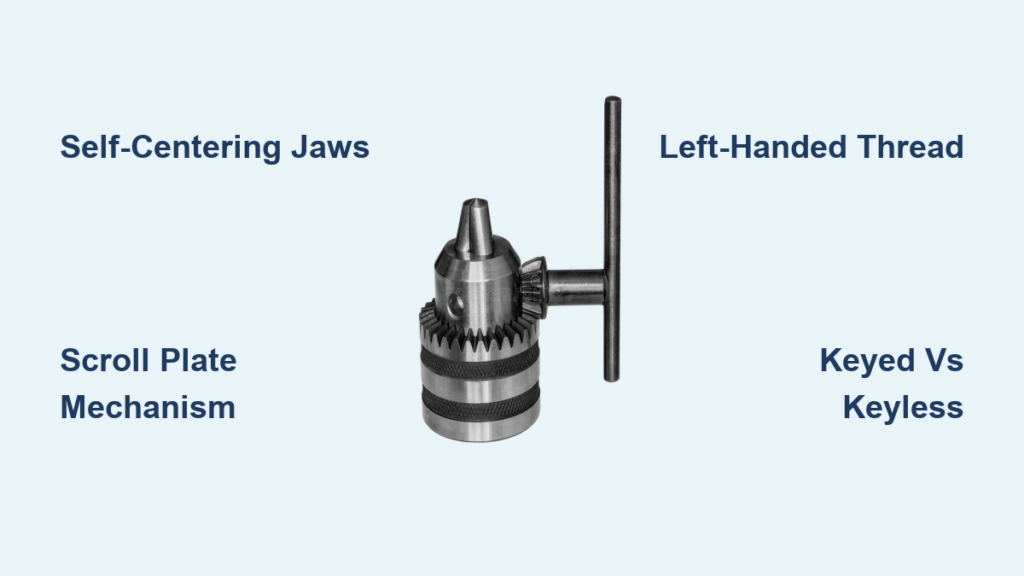
The Three-Jaw Mechanism That Centers Your Drill Bits Perfectly
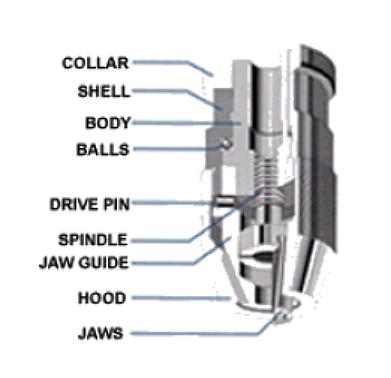
Most modern drill chucks employ a self-centering three-jaw design, a brilliant solution that automatically positions bits on the drill’s rotational axis. These three hardened steel jaws, spaced precisely 120 degrees apart, move in perfect unison through a sophisticated internal mechanism. When you tighten the chuck, these jaws follow angled tracks that draw them toward the center at exactly the same rate, creating three points of equal contact around the bit shank.
How the Scroll Plate Transforms Rotation into Radial Force
The secret behind this synchronized movement lies in the scroll plate—a circular component with a spiral groove cut into its surface. When you turn the chuck key or outer sleeve, this rotation transfers to the scroll plate through either a bevel gear system (in keyed chucks) or direct drive (in keyless models). As the scroll plate rotates, the spiral groove engages with matching teeth on the back of each jaw, converting rotational motion into precise linear movement. This mechanical transformation allows the chuck to apply tremendous clamping force—often exceeding 5,000 pounds per square inch—while maintaining perfect concentricity.
Why Your Chuck Uses a Left-Handed Thread Design
You might notice that tightening a drill chuck requires turning it opposite to the drill’s normal rotation direction. This intentional design uses a left-handed thread configuration for the central screw. As the drill spins during operation, this reverse threading creates a self-tightening effect—preventing the chuck from loosening under normal drilling forces. If your chuck used standard right-handed threading, the rotational force would gradually unscrew it during use, causing dangerous bit slippage. This clever engineering detail works silently in the background to keep your bits securely fastened.
Keyed vs. Keyless Chucks: Which System Delivers Superior Bit Holding Power

The choice between keyed and keyless chucks significantly impacts your drilling performance and workflow efficiency. Understanding their mechanical differences helps you select the right tool for your specific applications.
Why Industrial Drills Rely on Keyed Chucks for Maximum Torque
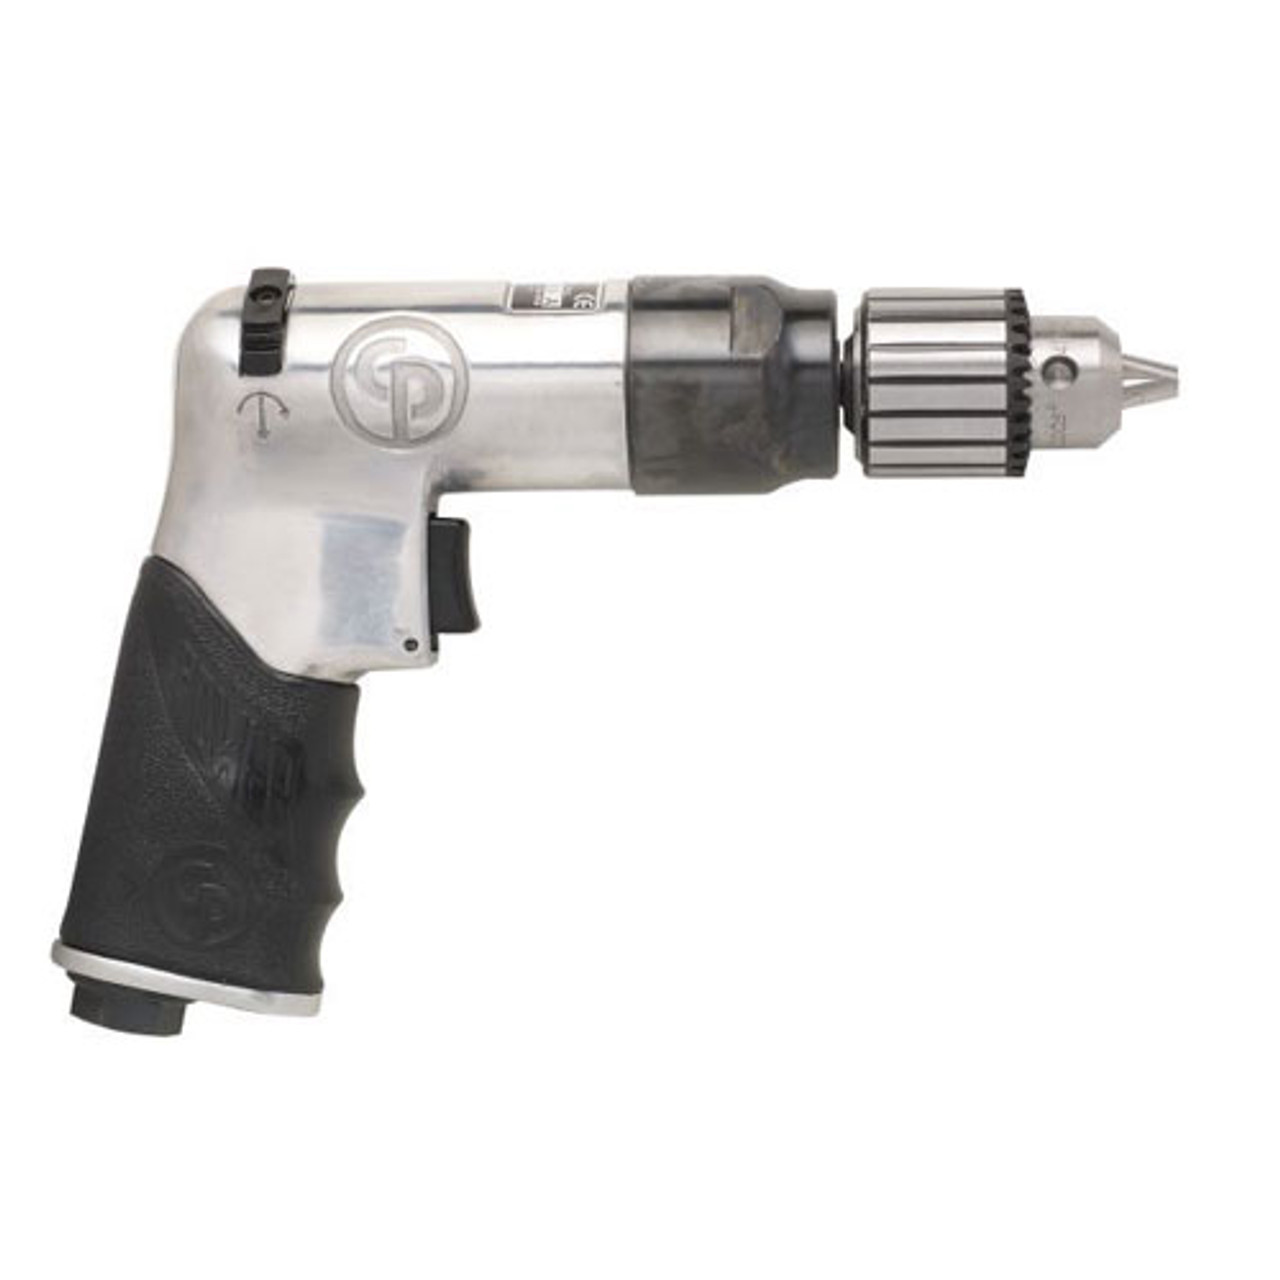
Keyed chucks dominate professional and industrial settings because their mechanical advantage provides unmatched clamping force. When you insert the chuck key—always verifying you’re using the correct size to avoid damaging the gear teeth—and apply torque, the small pinion gear on the key engages with the bevel gear surrounding the chuck body. This gear reduction multiplies your input force, allowing relatively modest hand pressure to generate extraordinary gripping power. The result? Bits stay firmly seated even during high-torque operations like drilling through steel or using large-diameter bits. This superior holding power makes keyed chucks essential for drill presses, milling machines, and other precision equipment where bit slippage could ruin expensive workpieces.
How Modern Keyless Chucks Achieve Hand-Tightening Without Sacrificing Security
Keyless chucks solve the perennial problem of misplaced chuck keys through clever internal gearing. When you grip the knurled outer sleeve and rotate it, you’re actually turning an internal gear system that multiplies your hand force. Many models incorporate a ratcheting mechanism that allows you to open or close the chuck with short back-and-forth motions, perfect for tight spaces. While traditionally offering less clamping force than keyed counterparts, modern keyless designs have closed this gap significantly. High-end keyless chucks now feature specialized tooth profiles and hardened components that maintain secure bit retention even under heavy loads, making them increasingly popular for both professional and DIY applications.
Critical Chuck Maintenance Steps That Prevent Costly Drilling Failures
Your chuck’s performance degrades silently over time—a gradual process that often goes unnoticed until drilling accuracy suffers. Implementing these maintenance practices keeps your chuck functioning like new.
How to Properly Clean Metal Shavings From Your Chuck’s Internal Mechanism
Metal chips and debris are the silent killers of chuck performance. After each metal drilling session, follow this cleaning protocol:
1. Open the chuck fully while the drill is unplugged
2. Use compressed air to blast debris from between the jaws and through the keyholes
3. Insert a stiff brush (like a toothbrush) to dislodge stubborn particles
4. Rotate the chuck slowly while continuing to blow out debris
5. Apply a single drop of light machine oil to the scroll mechanism—never automotive grease which attracts more debris
Why You Must Avoid Hammering on Your Chuck Key During Tightening
That tempting urge to tap your chuck key with a hammer when tightening a stubborn bit could permanently damage your chuck’s internal scroll. The delicate spiral grooves can crack or deform under impact, ruining the chuck’s ability to center bits properly. Instead, use proper technique: grip the drill firmly, place your foot on the base for stability, and apply steady, rotational force to the key. If you consistently struggle with bit slippage, your chuck may already be worn and need replacement rather than brute-force tightening.
Troubleshooting Your Chuck When Drill Bits Won’t Stay Secure
When your bits slip during operation, diagnosing the problem requires systematic investigation of several potential failure points.
How to Diagnose Whether Worn Jaws or Internal Damage Is Causing Bit Slippage
Perform this simple test to identify chuck problems:
1. Clean the chuck thoroughly as described above
2. Insert a new, high-quality bit with a smooth shank
3. Tighten the chuck to normal operating force
4. Attempt to rotate the bit by hand—if it turns easily, the chuck is likely worn
5. Measure runout by inserting a precision-ground rod and checking wobble with a dial indicator
Excessive runout (more than 0.005 inches at 1 inch from the chuck) indicates internal damage or wear that requires chuck replacement. Minor runout might be corrected by cleaning and proper lubrication, but significant wobble means the scroll plate or jaw tracks have worn beyond acceptable tolerances.
Why Your Keyed Chuck Won’t Turn and How to Free It Safely
A seized chuck often results from metal shavings packing the mechanism or corrosion from moisture exposure. Before resorting to destructive methods:
1. Apply penetrating oil around the keyholes and let it soak for 15 minutes
2. Insert the chuck key and gently tap it with a soft mallet to break initial resistance
3. Use two strap wrenches—one holding the chuck body stationary while the other turns the key
4. Apply steady, incremental force rather than sudden jerks
If these methods fail, the chuck may need professional servicing or replacement. Never use pliers or pipe wrenches directly on the chuck body, as this damages the precision-machined surfaces essential for proper bit alignment.
Pro Maintenance Practices That Extend Your Chuck’s Service Life
Implement these expert techniques to maximize chuck performance and longevity:
Always center-punch your drilling locations—this prevents bit walking that causes lateral forces which can damage chuck alignment over time. The initial resistance when starting a hole creates significant side-loading on the chuck mechanism.
Match chuck capacity to your bits—never force an oversized bit into a chuck. A 1/2-inch capacity chuck should only accept bits up to 0.490 inches in diameter. Overstressing the jaws by exceeding capacity causes premature wear and reduces gripping power.
Perform monthly chuck inspections—disassemble removable chucks to check for wear patterns on the jaws and scroll mechanism. Replace chucks showing uneven wear, chipped teeth, or excessive play between components.
Store your drill with the chuck open—leaving the chuck tightly closed for extended periods can cause spring fatigue in keyless models and promotes corrosion in the closed position.
Final Thoughts: Maximizing Drilling Precision Through Chuck Knowledge
Understanding how a drill chuck works transforms you from a tool user into a tool master. That seemingly simple collar at the end of your drill contains precision engineering that directly determines your drilling accuracy, bit lifespan, and even your safety. By recognizing the scroll mechanism’s role in centering bits, appreciating the mechanical advantage differences between keyed and keyless systems, and implementing proper maintenance protocols, you ensure every hole you drill meets professional standards. Remember that a chuck’s condition often reveals itself through subtle signs—slight wobble, difficulty changing bits, or inconsistent bit retention. Address these issues promptly through proper cleaning, lubrication, or replacement to maintain peak drilling performance. When you respect the engineering behind this critical component, you’ll consistently achieve cleaner holes, longer bit life, and greater confidence in your drilling operations.


