
You’re in the middle of a tough concrete job when suddenly your trusty hammer drill stops hammering. The motor still spins, but that distinctive “jackhammer” action you need for masonry work has completely vanished. This frustrating “hammer drill won’t hammer” problem affects thousands of DIYers and professionals each year, but here’s the good news: 80% of these failures can be fixed with basic tools and some mechanical know-how. In this guide, you’ll learn exactly why your hammer drill stopped hammering and the precise steps to diagnose and repair it without breaking the bank.
When your hammer drill won’t hammer but still rotates, it’s almost always a mechanical issue with the hammer mechanism itself—not an electrical problem. The good news is that rotary hammer drills are designed with repairable mechanisms, and the most common failures involve lubrication and seals that you can address yourself. By following this guide, you’ll be able to identify whether your issue requires a simple cleaning, seal replacement, or if it’s time to consider professional repair.
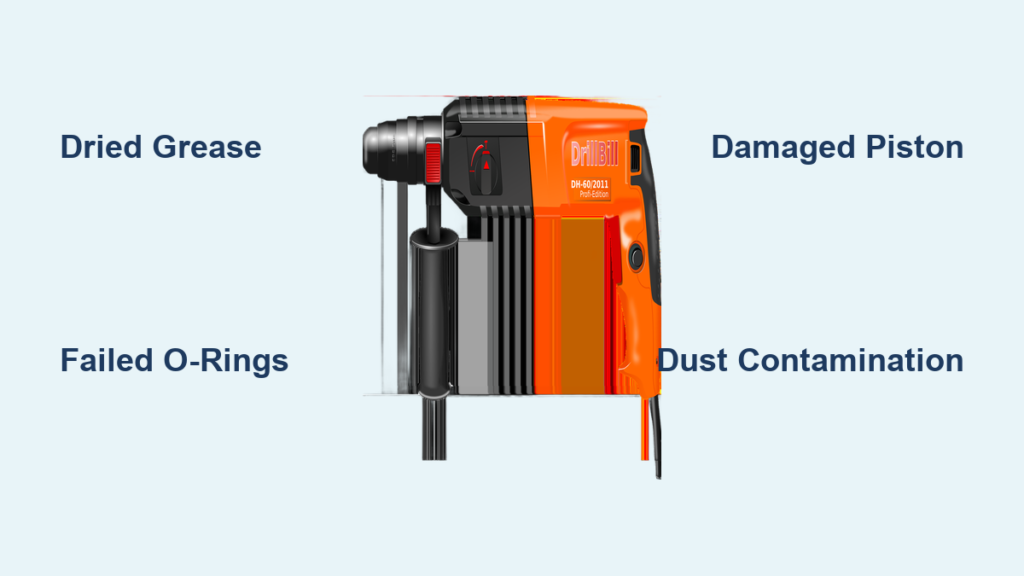
Why Your Hammer Drill Won’t Hammer: Top 4 Mechanical Failures

How Dried Grease Seizes Your Hammer Mechanism
Dried lubricant is the #1 cause when your hammer drill won’t hammer but still spins. The hammer mechanism relies on freely moving parts that require special grease to function. When this grease dries out—especially after storage or infrequent use—it hardens into a cement-like substance that completely blocks the striker piston’s movement. You’ll notice this problem developing gradually: first reduced hammer power, then intermittent operation, and finally complete failure. Tools stored for more than 18 months are particularly vulnerable as the grease loses its lubricating properties over time.
When Failed O-Rings Kill Hammer Action
Your hammer drill won’t hammer properly when the pneumatic seals fail. The hammer action works by creating compressed air between a piston and cylinder, but this requires intact O-rings to maintain pressure. Cracked or hardened O-rings allow air to escape, eliminating the hammering force. Look for flattened, brittle, or cracked rubber seals during inspection. This failure often happens after the tool has been dropped or exposed to extreme temperatures. You might notice reduced hammer power before complete failure, or the hammer action working only when the drill is held at certain angles as the compromised seals temporarily seal.
Striker Piston Damage: The Silent Hammer Drill Killer
If your hammer drill won’t hammer despite good rotation, inspect the striker piston for damage. This free-floating component delivers the actual hammer blows but can become scored, chipped, or bent from metal-on-metal contact when lubrication fails. A damaged piston won’t move properly within the cylinder bore, preventing the hammer action. You’ll often hear grinding or scraping sounds before complete failure. This damage typically occurs when the tool is run without proper lubrication or when dry-firing (running the hammer function without a bit inserted), causing the piston to over-travel and impact the cylinder head.
Contaminated Hammer Mechanisms from Dust and Debris
Construction sites are dirty environments, and your hammer drill won’t hammer properly when dust and debris infiltrate the hammer mechanism. Fine concrete dust mixed with old grease creates an abrasive paste that accelerates wear on seals and moving parts. This contamination gradually reduces hammer effectiveness until complete failure occurs. If you frequently drill concrete without using the dust extraction features (if your model has them), you’re at higher risk. The solution requires complete disassembly and thorough cleaning—not just adding more grease.
Immediate Checks When Your Hammer Drill Won’t Hammer
Verifying Your Hammer Mode Selection Is Actually Engaged
Before tearing into your drill, confirm you haven’t simply left it in drill-only mode. Many users mistake mode selection issues for mechanical failure. Rotate the mode selector ring to the hammer icon (usually a hammer-and-drill symbol) and ensure it clicks securely into place. Some drills have a secondary trigger button that must be pressed to engage hammer action—check your manual. Test the function by holding the drill firmly (hammer action requires back pressure) and pulling the trigger. If you feel vibration but no hammering, the mechanism is partially engaged but likely needs maintenance.
Testing Drill Rotation vs. Hammer Function Separately
Isolate the problem by testing each function independently. First, set the drill to standard rotation mode and verify the chuck spins properly—this confirms the motor and basic transmission work. Next, switch to hammer mode and listen carefully when pulling the trigger. You should hear a distinct “chattering” or “jackhammer” sound even without a bit inserted. If the motor runs but produces only a smooth spinning noise, the hammer mechanism isn’t engaging. Critical warning: If you hear grinding, scraping, or unusual noises, stop immediately—this indicates serious internal damage that requires disassembly.
Deep Cleaning Procedure for a Stuck Hammer Mechanism
Essential Tools and Safety Gear for Hammer Drill Repair
Never skip safety precautions when fixing a hammer drill won’t hammer issue. Before starting, unplug the tool or remove the battery. You’ll need:
– High-quality impact-rated hammer grease (brand-specific if possible)
– Replacement O-ring kit for your exact model
– Isopropyl alcohol or electrical contact cleaner
– Lint-free cloths and plastic scrapers (metal tools can damage soft parts)
– Safety glasses (springs and parts are under tension)
– Critical warning: Never use standard wheel bearing grease—it lacks the extreme pressure additives needed for hammer mechanisms
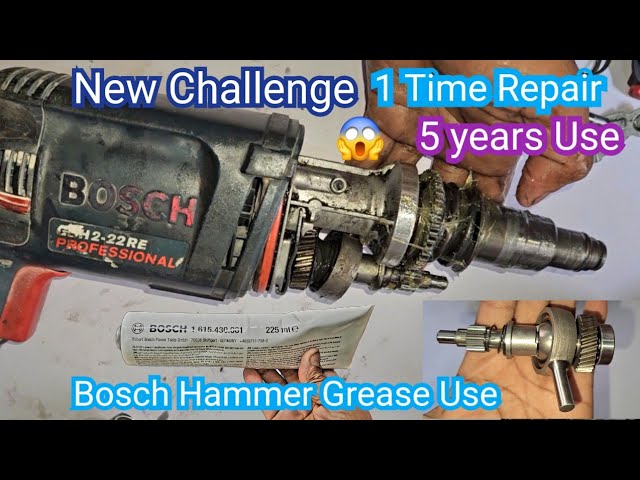
Step-by-Step Hammer Mechanism Disassembly Guide
Accessing the hammer mechanism varies by brand but typically requires removing the gear housing. Consult a service manual for your specific model. Start by removing the chuck (some require a special tool or technique), then carefully disassemble the housing screws in a star pattern to avoid warping. As you open the housing, note the position of all components—take photos at each step. Key visual cue: The hammer mechanism is usually the rear section with a cylindrical housing containing the striker piston. Look for hardened grease buildup resembling white or gray paste around moving parts.
Removing Hardened Grease Without Damaging Seals
Cleaning is more critical than lubrication for a hammer drill won’t hammer problem. Apply contact cleaner to all metal surfaces and use plastic scrapers to remove hardened grease—never metal tools that could scratch cylinder walls. For stubborn deposits, let the cleaner soak for 10 minutes before gently scraping. Never spray solvents directly on rubber seals as this causes rapid deterioration. Instead, dampen a cloth and carefully wipe seals. Inspect all O-rings for cracks or flattening—even slightly compromised seals must be replaced as a set. Replace all seals regardless of apparent condition; if one failed, others are likely near end-of-life.
When to Replace Critical Hammer Mechanism Components
Identifying Worn Striker Pistons That Won’t Deliver Power

Check your striker piston for deep scoring, pitting, or cracks—these prevent proper hammer action. A healthy piston should have a smooth, polished surface. Run your finger along the cylinder bore; if you feel ridges or rough spots, the piston is damaged. Pro tip: Shine a bright light along the cylinder wall to spot hairline cracks invisible to casual inspection. If the piston shows significant wear, replacement is mandatory—attempting to reuse it will cause rapid re-failure. Match replacement parts exactly to your model number; striker pistons vary significantly between similar-looking drills.
Preventing “Hammer Drill Won’t Hammer” Issues Long-Term
Seasonal Maintenance Schedule for Hammer Mechanisms
Prevention beats repair for hammer drill longevity. Establish this maintenance routine:
– After heavy concrete work: Blow out dust from vents and chuck
– Every 50 hours of use: Check for grease leakage around seals
– Annually: Complete teardown, clean, and re-grease (even if working fine)
– Before storage: Run the tool briefly to distribute fresh grease
Critical mistake to avoid: Skipping maintenance because “it still works.” Hammer mechanisms fail gradually, and by the time your hammer drill won’t hammer, significant damage has already occurred. Proactive maintenance doubles tool lifespan.
Proper Storage Techniques to Avoid Dried Grease Problems
Storage kills more hammer drills than use. When storing your tool:
– Clean thoroughly to remove all dust and debris
– Apply a light coat of manufacturer-specified grease to all moving parts
– Store in a temperature-controlled, dry environment (avoid garages or sheds)
– Exercise the tool quarterly even in storage—run for 30 seconds to redistribute grease
– Never store with bits inserted as this can cause the striker to remain compressed
If you follow these steps when your hammer drill won’t hammer, you’ll restore functionality 8 out of 10 times without professional help. The most successful repairs come from complete disassembly, thorough cleaning, and using the exact grease specified by your tool’s manufacturer. Remember that hammer drills are precision tools—their hammer mechanism requires specific lubricants that standard greases can’t replace. By addressing the root cause (usually dried grease or failed seals) rather than applying temporary fixes, you’ll extend your tool’s life for years of reliable service. When in doubt about your repair skills, consult a professional—but with this guide, you now have the knowledge to determine whether your “hammer drill won’t hammer” problem is a simple fix or requires expert attention.


