Your drill bit isn’t just making a hole—it’s creating a functional component critical to your project’s success. Using the wrong drill hole type causes splintered wood edges, stripped metal threads, or cracked tile surfaces that force costly rework. Every DIY disaster story starts with someone ignoring how hole function dictates technique: a stripped hinge mount because a pilot hole was skipped, or a shattered tile from excessive pressure. This guide cuts through the confusion with exact drill hole types matched to real-world applications. You’ll learn why a countersink hole differs from a counterbore, when to use step drill bits for clean sheet metal work, and how to prevent blowout in wood projects—all verified through professional drilling protocols. By the end, you’ll consistently drill professional-grade holes that fit fasteners perfectly and survive structural stress.
Why Hole Function Dictates Your Drilling Technique
The purpose of your hole determines everything from bit selection to drilling speed—treating all holes as identical guarantees failure. A pilot hole isn’t just a small starter hole; it’s your insurance against wood splitting and metal wandering. When drilling into oak for a cabinet hinge, skip the pilot hole and you’ll tear out the grain as the screw bites unevenly. In steel, an undersized pilot hole causes tap breakage during threading. Through-holes require different handling than blind holes: exit-side blowout ruins projects when you don’t clamp a backer board behind softwoods.
How Countersinking Differs From Counterboring in Practice
Countersinking creates a 82° conical recess so flat-head screws sit perfectly flush—a non-negotiable for furniture building. Use a dedicated countersink bit after drilling the pilot hole, not a drill bit’s tip. One mistake DIYers make: drilling the countersink too deep, leaving the screw head recessed below the surface where it catches dirt. Counterboring solves this with a flat-bottomed cavity for hex bolt heads. When installing a tabletop bolt, drill a 1/2″ counterbore over a 3/16″ pilot hole—this hides the nut completely while allowing full torque application. Always drill the pilot hole first; attempting both in one step with combo bits causes misalignment in hardwoods.
Why Tapped Holes Demand Precision Sizing
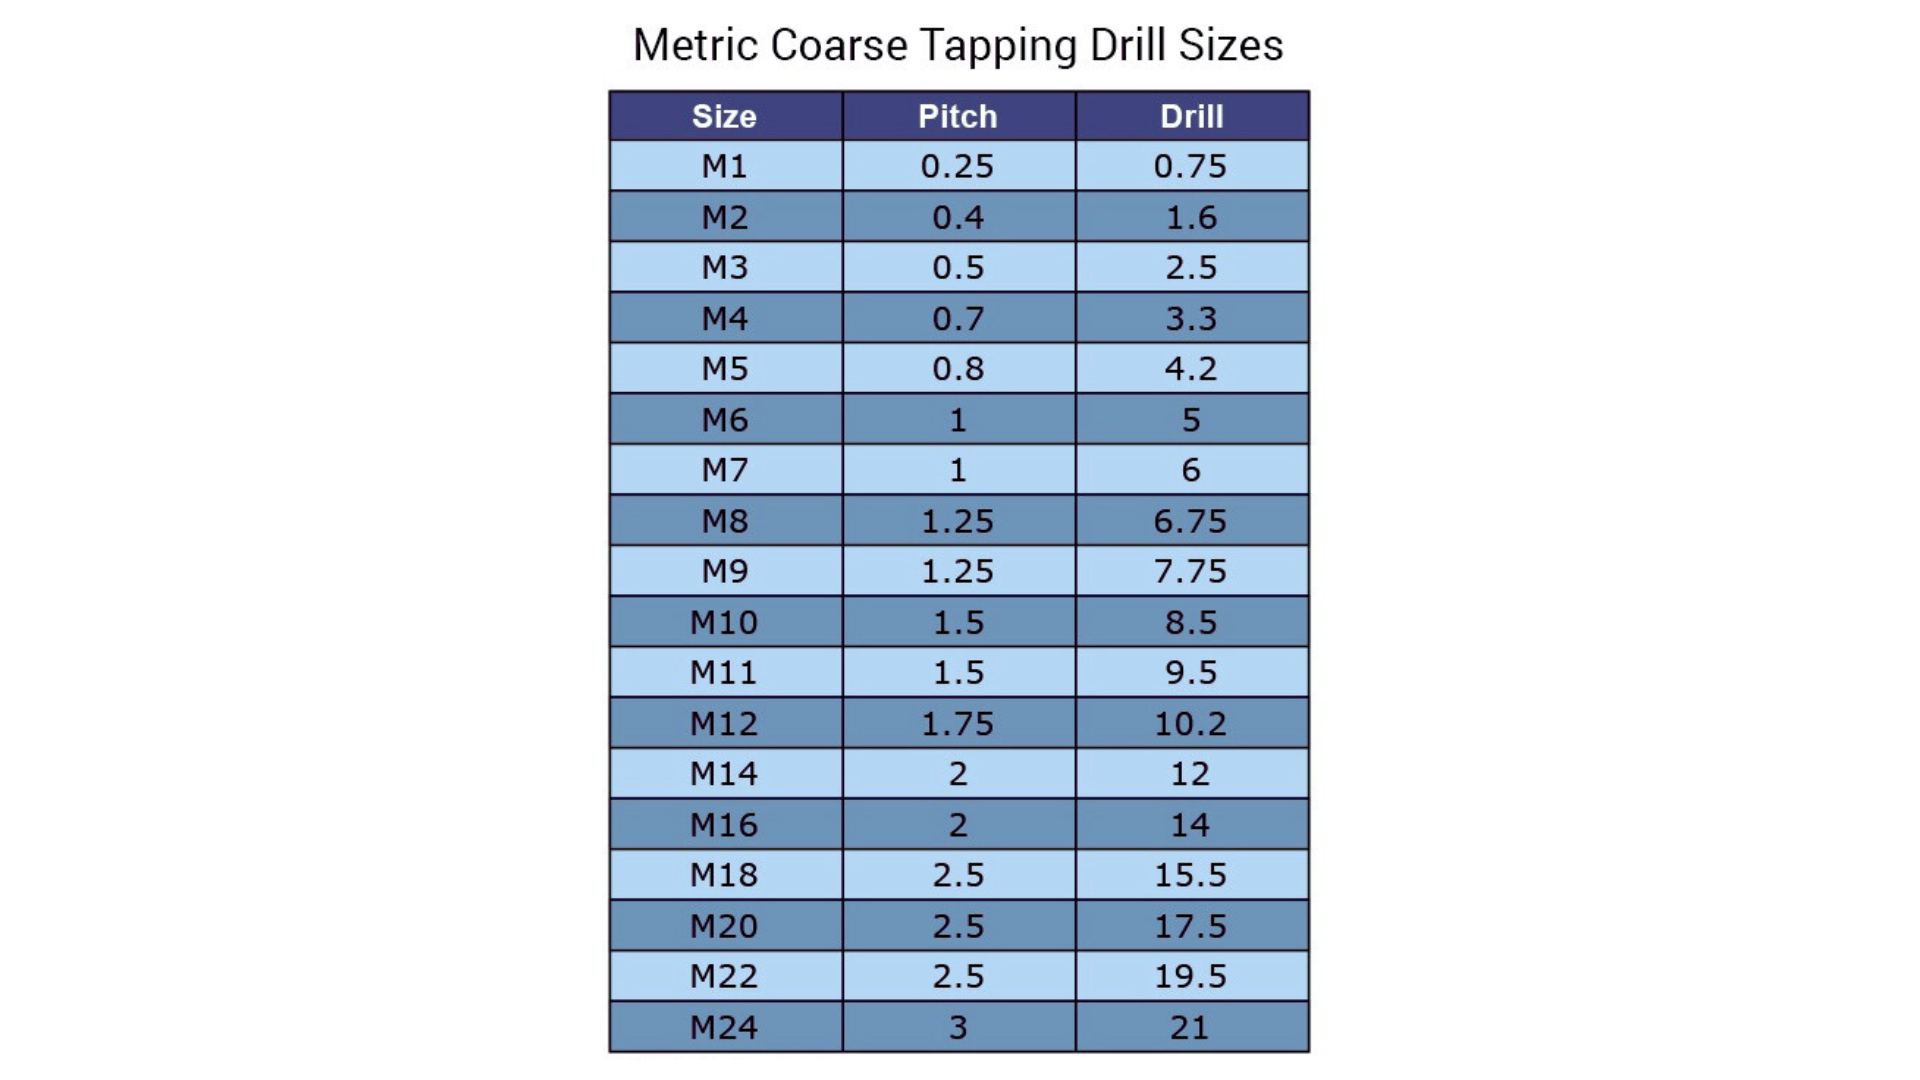
Tapped holes require mathematical accuracy: drill a 5/32″ hole for a 1/4″-20 bolt in steel, but 11/64″ for the same bolt in aluminum. The tap drill size chart isn’t optional—it’s physics. Drill too small and the tap snaps under stress; too large and threads won’t grip. For a 10-32 machine screw in brass, use a #21 drill bit (0.159″). Start with light pressure until threads engage, then back out 1/4 turn to break chips. Never force a tap—the “screaming metal” sound means immediate withdrawal to prevent breakage inside your workpiece.
Essential Drill Bits for Specific Hole Types

Your bit choice makes or breaks hole quality. Generic “multi-material” bits often perform poorly everywhere—a specialized bit for the exact hole type saves time and materials.
Twist Drill Bits: When to Choose HSS vs. Cobalt
Twist bits create standard cylindrical holes but material matters intensely. High-Speed Steel (HSS) bits handle wood and soft metals but shatter in stainless steel. For drilling 304 stainless through-holes, use cobalt (M35) bits—they withstand 1,100°F heat without softening. Titanium-coated bits last 50% longer in wood but offer no advantage in metal drilling. Critical technique: When drilling overlapping holes in plywood, reduce speed by 30% to prevent burning at the intersection point. Always withdraw the bit every 1/2″ to clear chips—clogged flutes cause overheating and work hardening in aluminum.
Why Forstner Bits Beat Spade Bits for Precision Holes
Spade bits (paddle bits) bore rough through-holes for plumbing in studs but tear out grain at exit points. Forstner bits deliver surgical precision: their rim cuts a clean edge before the center chisel removes material. When drilling a 1-1/2″ hinge cup hole in maple, set your drill press to 400 RPM and apply steady pressure—no jerking. The secret? Clamp a sacrificial board underneath to eliminate blowout. Forstner bits excel at angled holes too; tilt your drill press to 15° for cabinet face frames without bit walking.
Hole Saws vs. Step Drill Bits: Material-Specific Decisions

Hole saws remove material as a solid plug, ideal for 1-1/2″ electrical boxes in drywall. But in 16-gauge steel, they bind and overheat. Switch to step drill bits (unibits) which gradually enlarge the hole without grabbing. For a clean 3/4″ hole in a metal junction box: start at the smallest step, drill through, then incrementally step up while applying cutting oil. Step bits also deburr holes automatically—rotate them backward after drilling to smooth edges. Never use hole saws on tile; the jagged rim causes catastrophic cracking.
Concrete, Tile, and Metal: Material-Specific Hole Drilling Protocols
Each material demands unique hole types and physics-defying techniques to avoid destruction.
Concrete Drilling: Avoiding the “Dust Plug” Failure
Masonry bits fail when concrete dust clogs the flutes, overheating the bit. Solution: drill in 1-inch increments, then fully withdraw to clear dust. For 3/8″ anchor holes in block walls, start with a 5/16″ bit to create clearance before switching to the final size. Hammer drill mode is non-negotiable—rotary-only drills just grind bits dull. Safety critical: wear a respirator; concrete dust contains crystalline silica, a known carcinogen. If the bit stops advancing after 2″, you’ve hit rebar—stop immediately and relocate.
Tile Drilling Without Cracks: The Water Trick
Tile’s brittleness requires specialized hole types. Diamond-grit hole saws only work with constant water cooling—dry drilling generates heat that shatters glaze. Tape the drilling spot first to prevent bit skating. For a 2″ shower valve hole: place a wet sponge against the bit tip, drill at 150 RPM with feather-light pressure (3-5 lbs), and pause every 15 seconds to re-wet. Never force progression; let the grit do the work. If you hear a high-pitched squeal, you’re applying too much pressure—back off instantly.
Sheet Metal Mastery: Step Drill Bit Secrets
Standard twist bits tear jagged holes in thin metal. Step drill bits solve this with their tapered design. For a clean 1/2″ hole in HVAC ductwork: clamp the metal between two wood blocks, start at the smallest step, and drill until the step clears the material. Then rotate the bit 90° and finish—this prevents “hourglassing” where holes narrow in the middle. Deburr both sides by reversing the drill at low speed. Critical: use cutting oil on steel but not aluminum (oil traps heat).
Pro Techniques for Flawless Hole Execution
These verified methods eliminate common failures that waste hours of work.
Preventing Wood Blowout: The Backer Board Method
Blowout occurs when drill bits exit the workpiece, splintering fibers. Solution: clamp a scrap wood backer board behind your project piece. For a clean through-hole in pine shelving: mark the exit point, clamp the backer board tightly against it, and drill until the bit tip pierces through. The backer board supports the wood fibers, eliminating tear-out. For veneered plywood, place masking tape over both surfaces first—this prevents chipping at entry and exit points.
Depth Control for Counterbored Holes: Tape Measure Hack
Inconsistent counterbore depth ruins assembly. Instead of unreliable drill stops, wrap painter’s tape around the bit at your target depth (e.g., 1/2″ for a #8 bolt head). When the tape reaches the surface, you’re done. For multiple identical holes in cabinet bases, use a depth stop collar on your drill press—set it once for perfect repeatability. Never guess depth; a 1/16″ shallow counterbore leaves bolt heads protruding, while too deep compromises structural integrity.
Speed and Pressure: The Material-Specific Formula
Drill speed errors cause 80% of hole defects. Wood requires high RPM (3,000+ for 1/4″ bits) to slice fibers cleanly. Metal demands slow speeds: 500 RPM for 1/4″ holes in steel. Apply pressure until chips form, then ease off—consistent “feel” matters more than force. In cast iron, reduce speed by 25% to prevent glazing. If metal shavings turn blue, you’re overheating; stop and apply cutting oil immediately. Let the bit cut; forcing it only creates poor holes and dulls the tool.
Conclusion
Drill hole types aren’t academic concepts—they’re functional requirements that determine project success. A properly drilled pilot hole prevents wood splitting, a correctly sized tap drill hole ensures thread integrity, and concrete drilling with dust-clearing intervals avoids bit failure. Remember the hierarchy: function dictates hole type, which dictates bit selection, which dictates technique. Always start with a pilot hole in hardwoods, use water cooling for tile, and match drill speeds to material science. These protocols eliminate guesswork—transforming frustrating rework into precision results. For critical structural applications like load-bearing beams or electrical conduit, consult engineering specifications before drilling. Your next project’s durability depends on the hole types you choose today.