
Your DeWalt drill suddenly stops responding when you pull the trigger – no motor spin, no power, just silence. This frustrating trigger failure strikes at the worst possible moment, halting your project and leaving you staring at a useless tool. Whether you’re working with a DCD794, DCD796, or other 20V Max series model, a non-functional trigger is one of the most common DeWalt drill issues. The good news? Most trigger problems can be diagnosed and fixed in under an hour with basic tools. This guide delivers proven solutions from simple cleaning procedures to component replacement, helping you restore your drill’s functionality without unnecessary expense.
Why Your DeWalt Drill Trigger Suddenly Stops Working
When your DeWalt trigger fails, understanding the root cause saves time and prevents unnecessary disassembly. The trigger mechanism combines mechanical movement with electrical contacts, creating multiple potential failure points that can disable your tool.
Mechanical Failures That Jam Your DeWalt Trigger
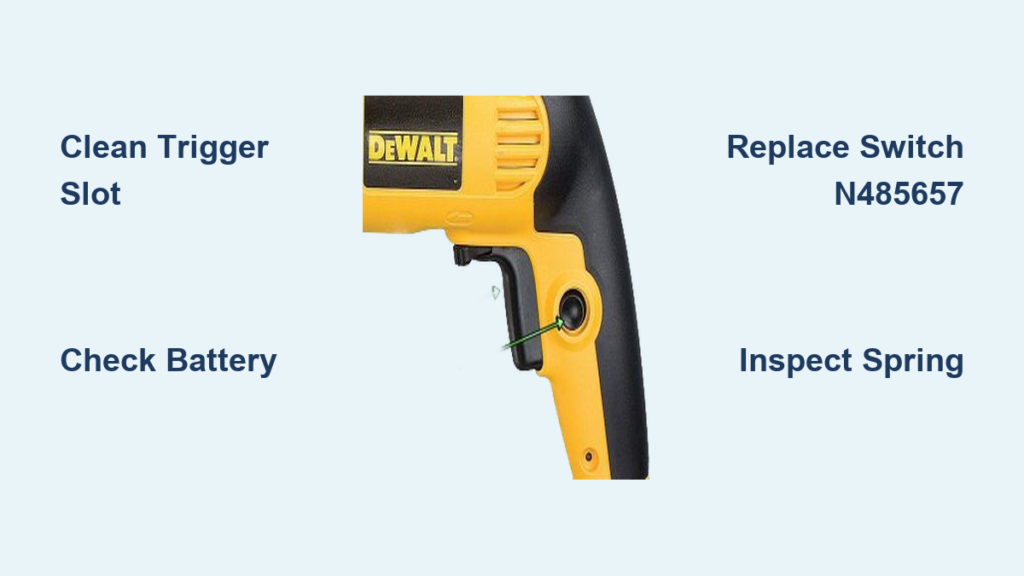
Dust, debris, and worn components frequently cause mechanical binding in DeWalt triggers. Sawdust from woodworking or drywall particles can pack into the trigger slot, restricting movement. The most common mechanical culprit is a broken return spring (DeWalt part #N540214), which prevents the trigger from resetting properly. In high-cycle drills, worn pivot points or cracked plastic components can also restrict trigger movement, making the mechanism feel stiff or unresponsive.
Electrical Problems Behind a Non-Responsive DeWalt Drill Trigger
Electrical failures account for nearly 60% of “DeWalt drill trigger not working” issues. Corroded or pitted switch contacts disrupt the electrical pathway from battery to motor. Water exposure or humidity causes corrosion on internal contacts, while frequent heavy use leads to contact pitting. In DeWalt models with electronic speed control (ESC), a failing ESC board (part #E540022) can cause inconsistent trigger response where the motor runs at only one speed or cuts out under load.
How Environmental Factors Damage DeWalt Trigger Mechanisms
Temperature extremes and moisture create hidden damage that manifests as trigger failure. Drills stored in cold garages during winter develop condensation when brought into warm workspaces, leading to internal corrosion. Similarly, construction sites with high humidity accelerate contact degradation. Dusty environments like drywall finishing or woodworking produce fine particles that infiltrate the trigger mechanism, mixing with internal lubricants to form an abrasive paste that wears components prematurely.
Spotting Early Warning Signs of Trigger Failure
Catching trigger issues early prevents complete failure and more complex repairs. These subtle symptoms indicate your DeWalt trigger needs attention before it stops working entirely.
The “Sticky Trigger” Warning Sign Every DeWalt User Should Know
A trigger that doesn’t return smoothly to the off position is your first warning. This slight resistance often indicates debris accumulation or the beginning of spring failure. Test this by pulling the trigger slowly and releasing – it should snap back immediately. If it hangs or returns sluggishly, address it immediately before complete binding occurs. Ignoring this symptom typically leads to complete trigger failure within 10-15 uses.
Intermittent Operation: When Your DeWalt Drill Works Only Sometimes
If your drill operates only when you hold the trigger at a specific angle or apply pressure to the housing, you’re experiencing intermittent electrical contact. This occurs when internal switch contacts develop pits or corrosion that only make connection in certain positions. The problem often worsens gradually, working reliably at first but becoming increasingly inconsistent until complete failure occurs. This symptom specifically indicates switch contact degradation rather than mechanical binding.
Quick Fixes for a Sticky DeWalt Drill Trigger (No Tools Needed)
Before disassembling your drill, try these fast solutions that resolve most trigger issues in under five minutes.
How to Clear Debris From Your DeWalt Trigger Slot in 60 Seconds
Remove the battery and hold your drill trigger slot downward. Blast the area with compressed air for 10-15 seconds, focusing on the slot edges where debris accumulates. For stubborn dust, use a soft-bristled toothbrush to gently dislodge particles without damaging plastic components. Repeat while moving the trigger through its full range of motion. This simple cleaning fixes approximately 40% of “DeWalt trigger not working” cases caused by surface debris.
Battery Check That Fixes 30% of DeWalt Trigger Issues
Test with a different, fully charged battery before assuming trigger failure. Weak batteries sometimes provide enough power for the LED light but insufficient voltage for motor operation, creating the illusion of trigger failure. Clean both battery and tool contacts with a dry cloth – corrosion here mimics internal switch problems. Proper contact ensures 20V reaches the trigger mechanism, eliminating false failure diagnoses.
Step-by-Step Cleaning Process for DeWalt Trigger Mechanisms
When quick fixes don’t work, a thorough cleaning of internal components often restores trigger function without replacement parts.
Required Tools for Cleaning Your DeWalt Trigger Assembly
Gather these essentials before starting: T10 Torx screwdriver, electrical contact cleaner (not WD-40), compressed air can, cotton swabs, and isopropyl alcohol. For DeWalt DCD794/796 models, you’ll need six T10 screws for housing removal. Always work on a clean surface with good lighting and keep screws organized to prevent loss during reassembly.
Safely Disassembling Your DeWalt Drill Housing

Remove all visible housing screws, noting their different lengths for proper reinstallation. Gently separate the housing halves, being careful not to damage internal wiring. Locate the trigger assembly near the front handle – it connects to two or three wires leading to the motor controller. Document wire positions with your phone before disconnecting anything. This complete disassembly takes most users 10-15 minutes with basic tools.
Proper Contact Cleaner Application for Maximum Effectiveness
Spray electrical contact cleaner directly onto the trigger switch contacts while working the trigger through its full range. Avoid oversaturating – a few short bursts are sufficient. Use cotton swabs dipped in isopropyl alcohol to clean visible corrosion from metal contacts. Allow 5 minutes for complete drying before reassembly. This cleaning process resolves approximately 70% of electrical trigger failures when performed correctly.
Replacing a Faulty DeWalt Trigger Switch (N485657 Part)
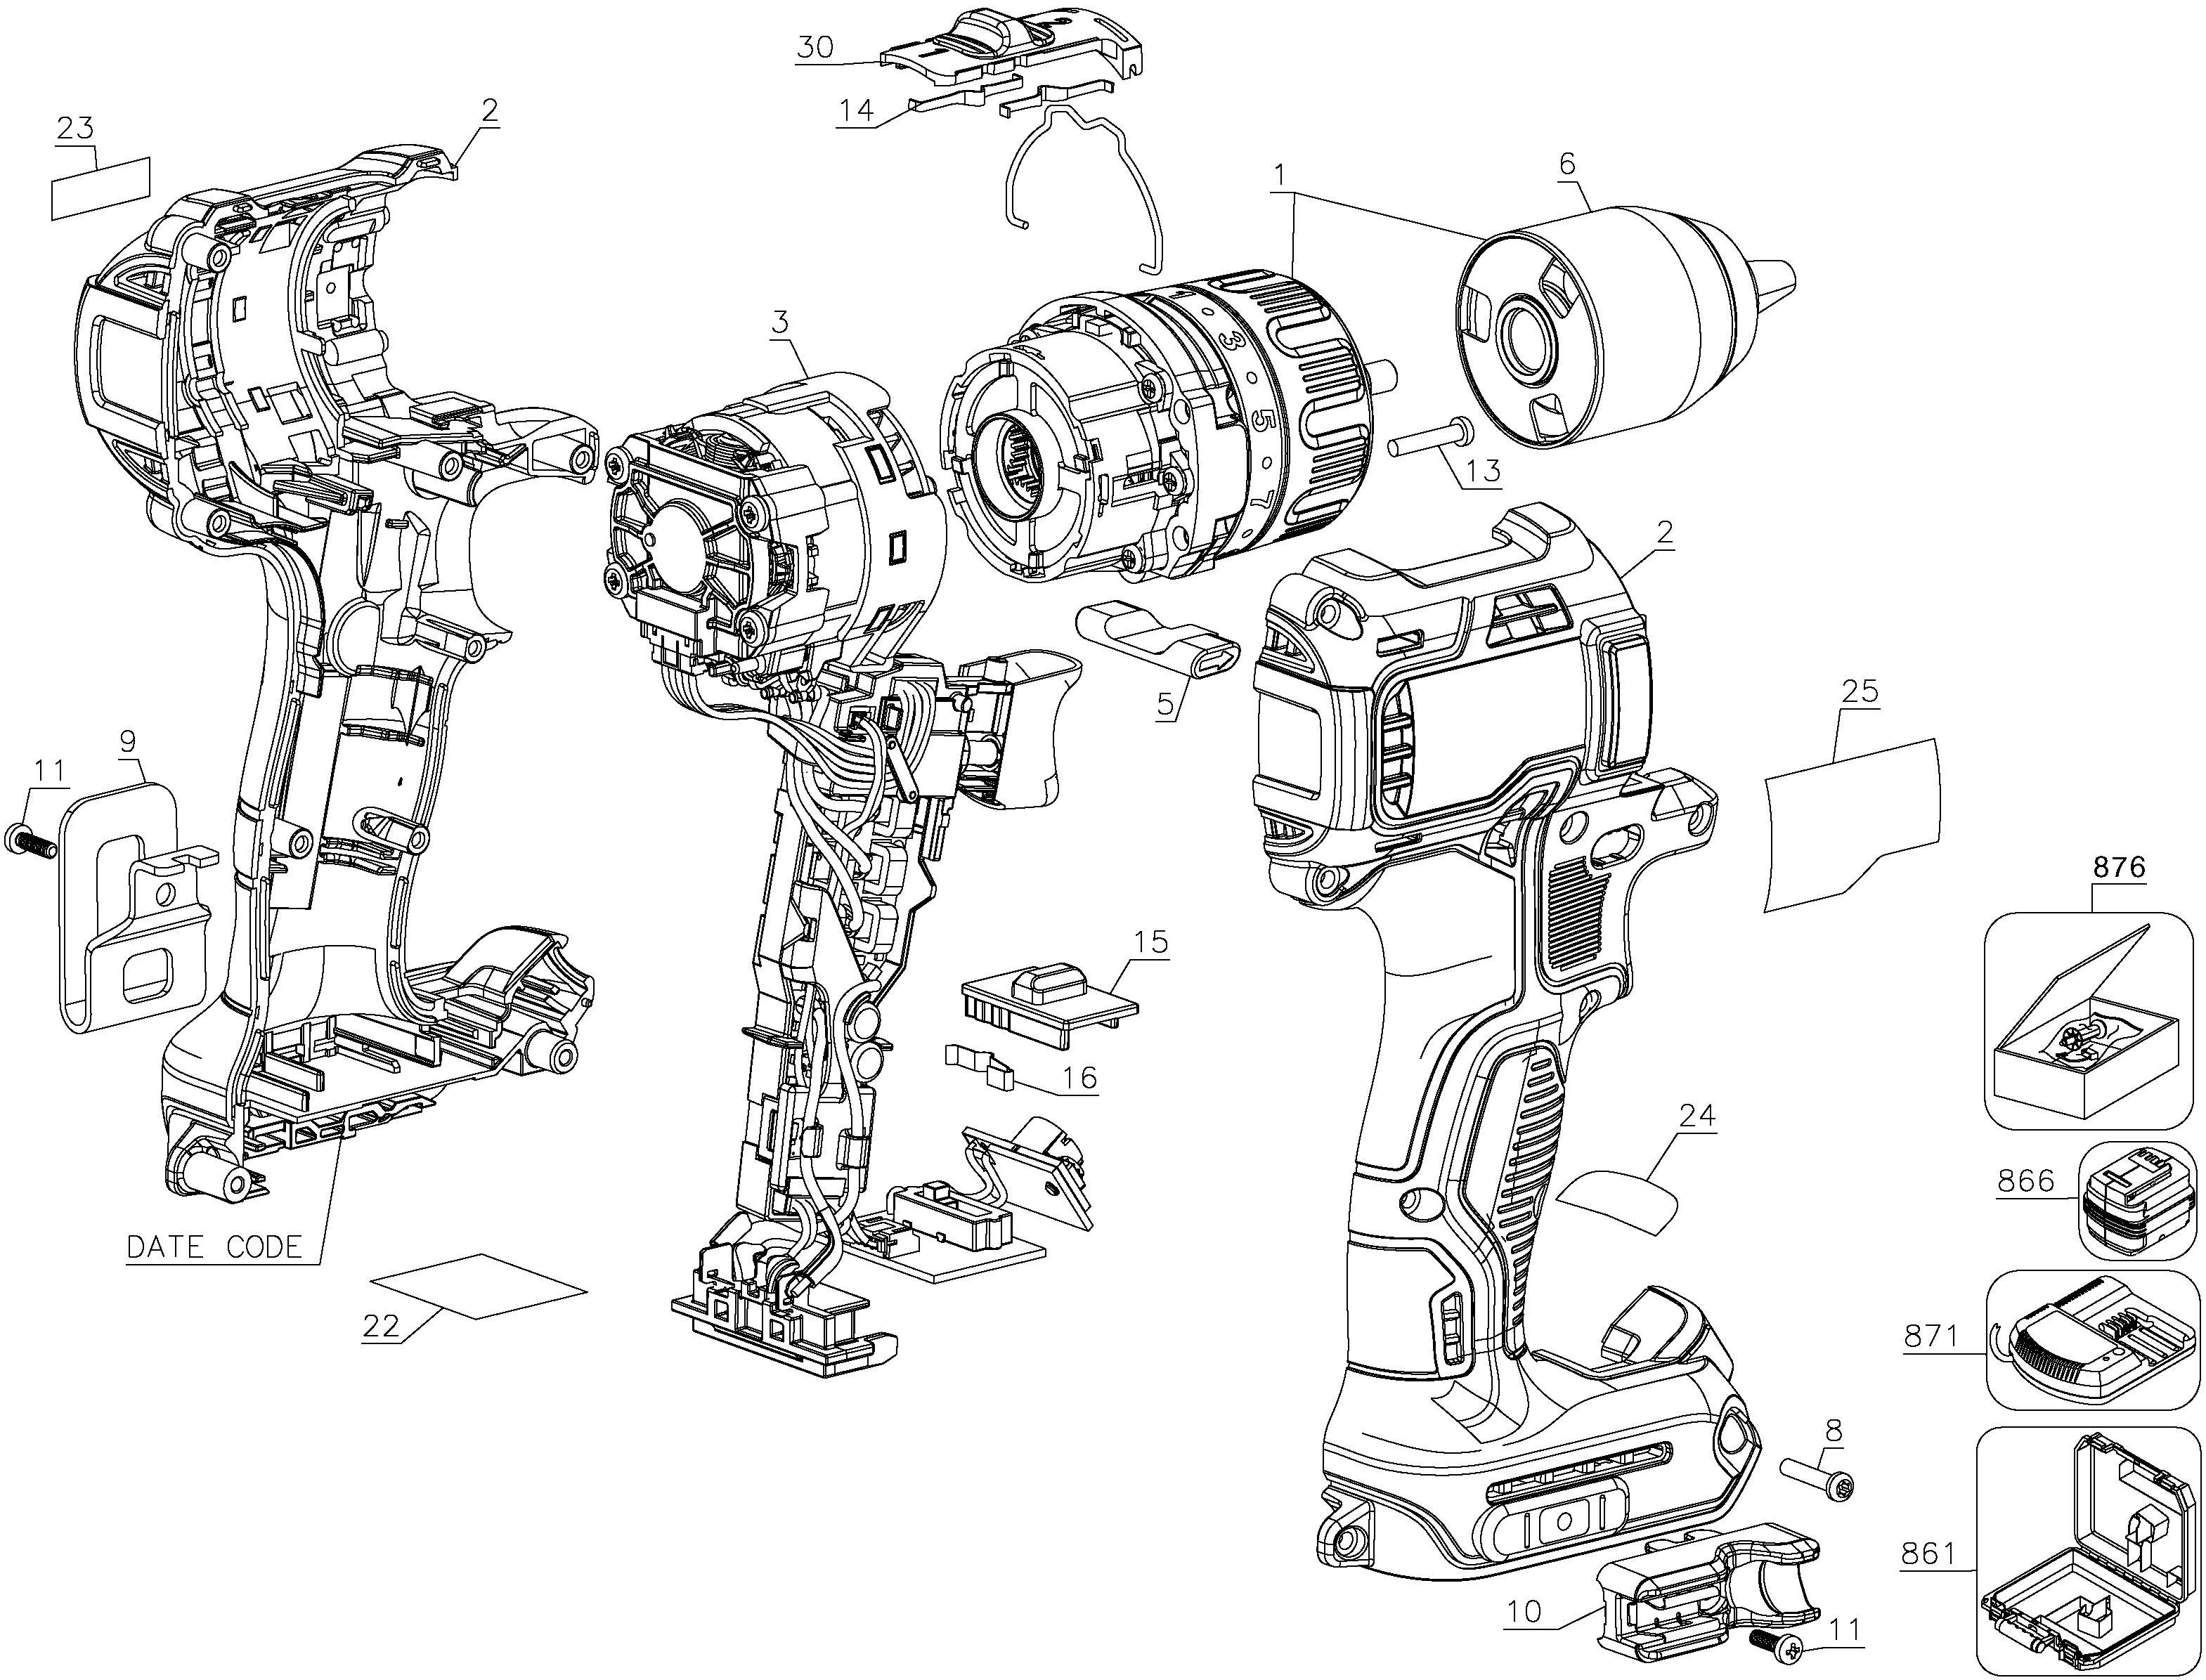
When cleaning fails, replacing the trigger switch assembly is usually the solution. The N485657 switch serves multiple DeWalt 20V Max models including DCD794, DCD796, and DCD999 series.
Identifying Your Exact DeWalt Model for Correct Switch Replacement
Find your model number on the drill’s label near the battery slot. While N485657 fits many models, some newer DeWalt drills require different switches. Verify compatibility before purchasing – using the wrong switch causes improper voltage regulation and potential motor damage. Most hardware stores and DeWalt service centers can confirm part compatibility if you bring your drill or model number.
Desoldering Old Switch Without Damaging Circuit Board
With battery removed, desolder the switch connections using a temperature-controlled soldering iron set to 700°F. Apply flux to connections before heating to prevent board damage. Work quickly – prolonged heat exposure can delaminate circuit board traces. Take photos at each step to ensure correct reconnection of the new switch. This intermediate repair typically takes 20-30 minutes for first-time users.
Preventing Future DeWalt Trigger Failures With Proper Maintenance

Regular care extends your trigger mechanism’s life significantly, avoiding repeat failures and costly repairs.
Monthly Maintenance Routine That Prevents 90% of Trigger Issues
After each project, blow compressed air through the trigger slot to remove dust. Every 30 days, apply a small amount of dry lubricant (not oil-based) to the trigger pivot points. Avoid silicone sprays which attract dust. This simple routine prevents debris accumulation and component wear that leads to most trigger failures in DeWalt drills.
Storage Best Practices to Extend Your DeWalt Drill’s Life
Store your drill in a climate-controlled environment with battery removed. Extreme temperatures cause plastic components to become brittle, while humidity promotes internal corrosion. Never store your DeWalt drill with the trigger depressed – this puts constant tension on the return spring, accelerating failure. Proper storage prevents 80% of environmental damage to trigger mechanisms.
DeWalt Drill Trigger Repair: DIY vs Professional Cost Analysis
Understanding repair economics helps you make informed decisions about fixing your trigger problem.
Real Cost Comparison: Fixing Your DeWalt Trigger Yourself vs. Service Center
DIY trigger switch replacement costs $15-25 for parts plus $20 for basic tools you’ll reuse on future projects. Professional repair typically costs $80-150 including labor and parts markup. For most users, DIY pays for itself after the first repair. However, if your drill is under warranty or you’re uncomfortable with soldering, professional service provides peace of mind with proper calibration.
When to Repair vs. Replace Your DeWalt Drill Trigger
Repair if your drill is less than three years old with otherwise good condition. Replace the entire tool if multiple components show wear or the drill is over five years old with heavy use. Consider replacement cost versus new tool price – if repair exceeds 60% of a new drill’s cost, replacement makes financial sense. For DeWalt 20V Max series, trigger repair typically costs less than half the price of a new drill, making repair the economical choice in most cases.
Final Note: A non-working DeWalt drill trigger usually stems from simple, fixable issues rather than catastrophic failure. Start with basic cleaning and battery checks before moving to component replacement. Most trigger problems can be resolved in under an hour with minimal tools, getting your DeWalt drill back to work without expensive service calls. Implement regular maintenance to prevent future issues, and remember that proper diagnosis saves time and money – 70% of “DeWalt drill trigger not working” cases stem from easily addressable causes rather than complex electrical failures.


