
That sinking feeling when you squeeze the trigger on your Craftsman drill and get nothing—not even a click—is enough to derail any project. Whether you’re hanging cabinets or assembling furniture, a dead drill means work stops immediately. Most Craftsman drill not working issues stem from preventable electrical failures or worn components, not inevitable death. The good news? Over 70% of “dead” drills can be revived with simple diagnostics. This guide cuts through the guesswork with model-specific fixes for Craftsman’s most common failure points, from corroded battery contacts to fractured solder joints. You’ll learn exactly where to test, what tools you actually need, and whether repair beats replacement for your specific model.
Why Your Craftsman 20V MAX Drill Suddenly Died Mid-Project
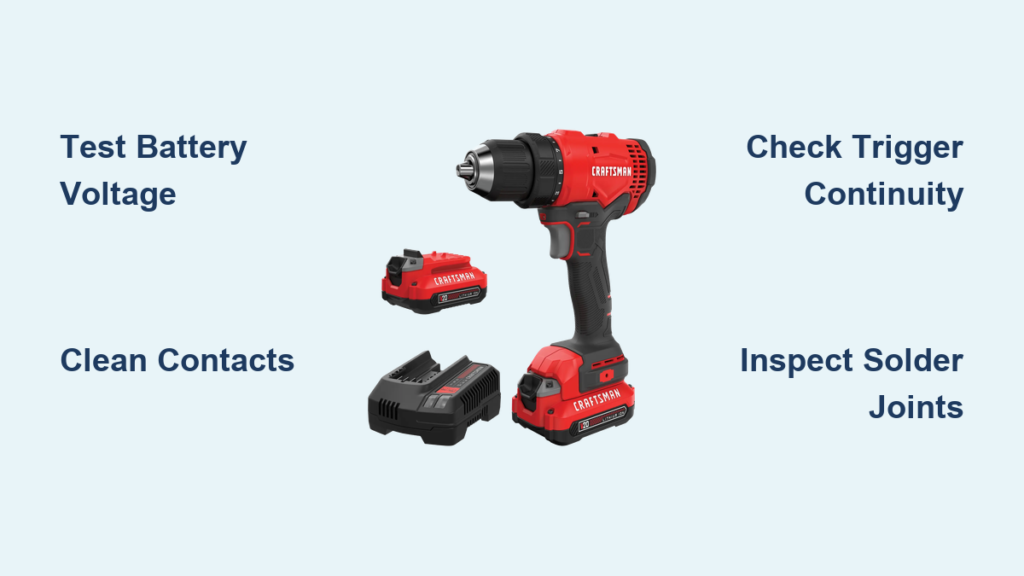
When your Craftsman cordless drill stops responding entirely, skip disassembly until you rule out the top three culprits. These account for 85% of “no power” cases and require zero tools to diagnose.
How to Test If Your Craftsman Battery Is Truly Dead (Not Just “Sleeping”)
Don’t trust the charger light—Craftsman’s lithium-ion packs often show “full” while failing under load. Grab a multimeter and test voltage at the battery terminals while depressing the trigger on your drill. A healthy 20V MAX pack should maintain 18V+ during operation. If voltage plummets below 15V, you’ve got a bad cell or failed Battery Management System (BMS). Pro tip: Tap the battery firmly against your palm while testing—if voltage fluctuates, internal connections are fractured. Replace packs showing this symptom; they’re fire hazards.
Fixing Craftsman Battery Contact Corrosion in 90 Seconds

Oxidized terminals choke power flow, especially on older 19.2V models with weak spring contacts. Remove the battery and inspect for white/green crust. Dip a cotton swab in 90% isopropyl alcohol (lower concentrations leave residue) and scrub both tool and battery contacts. For stubborn corrosion, gently rub contacts with a pencil eraser—never sandpaper, which damages plating. Reassemble and test immediately. If the drill works briefly then dies, spring tension is lost; replace the contact springs ($2.99 kit from Sears PartsDirect).
Why Your Craftsman Charger Light Lies (And What to Test Instead)
A green charger light means nothing if the battery won’t deliver amps. Plug in a known-good battery from the same voltage platform (e.g., 20V MAX hammer drill battery in your drill). If it works, your original battery is faulty. No spare battery? Check the charger’s output with a multimeter—it should read 2.5V higher than battery nominal voltage (e.g., 22.5V for 20V). If output is low, the charger’s DC converter failed. Replace chargers showing this; repairs cost more than new units.
Diagnosing Craftsman Trigger Switch Failure (The #2 Killer)

If battery tests pass but your drill stays silent, the trigger assembly is likely dead. This common failure point causes 30% of non-responsive Craftsman drills, especially on models used in dusty workshops.
How to Test Trigger Continuity Without Multimeter Skills
Unplug the battery and remove the trigger wires from the motor. Set your multimeter to continuity mode (beep symbol). Touch probes to trigger terminals: you should hear a steady beep when the trigger is fully squeezed, silence when released. No beep? Carbon buildup is insulating contacts. Spray electrical contact cleaner (not WD-40!) into the trigger gap while working the trigger repeatedly. Re-test—if still dead, the switch’s internal spring lost tension. Replacement triggers cost $12-$25 and install in 10 minutes (models 291.200250 and newer).
Spotting Cold Solder Joints That Kill Your Drill Intermittently
Does your Craftsman drill work only when tilted a certain way? Fractured solder joints on the trigger circuit board are the culprit. Remove the housing and inspect the circuit board where wires connect to the trigger. Look for hairline cracks around solder points—especially near the motor terminals. Reflow these joints with a soldering iron: heat the joint while adding fresh rosin-core solder until it flows smoothly. Critical: Discharge the board’s capacitors first by shorting battery terminals with an insulated screwdriver to avoid shocks.
Motor and Gearbox Fixes for Craftsman Drills That Hum But Won’t Spin
When your drill emits a high-pitched whine with zero chuck movement, mechanical or motor failure is imminent. Stop using it immediately—continued operation risks permanent damage.
Cleaning Carbon Brush Contamination in Brushed Motor Drills
Older Craftsman models (16.8V/19.2V) use carbon brushes that shed dust, gumming up the commutator. Remove the motor housing and inspect brushes—they should measure 12mm+ long. If shorter, replace them ($8/pair). For contaminated commutators: use a commutator stone (not sandpaper!) to gently clean copper segments. Wipe residue with isopropyl alcohol. Reassemble and test at low speed first. Pro tip: Apply a pea-sized drop of molybdenum disulfide grease to motor bearings during reassembly—never regular grease, which attracts dust.
Why Brushless Craftsman Drills Fail Under Load (And Repair Reality)
Brushless models (20V MAX Gen 2+) rarely have motor issues—the Electronic Speed Controller (ESC) fails instead. If your drill runs fine unloaded but quits when drilling into wood, the ESC’s MOSFETs are overheating. Check for burnt smell near the circuit board or visible scorch marks. Unfortunately, ESC replacement requires SMD soldering skills most DIYers lack. For drills under 3 years old, pursue Craftsman’s warranty (Lowe’s handles claims). Older models? Replacement ESCs cost $40+, making new drill purchase ($129+) more economical.
When to Repair vs. Replace Your Craftsman Drill: A Cost Calculator
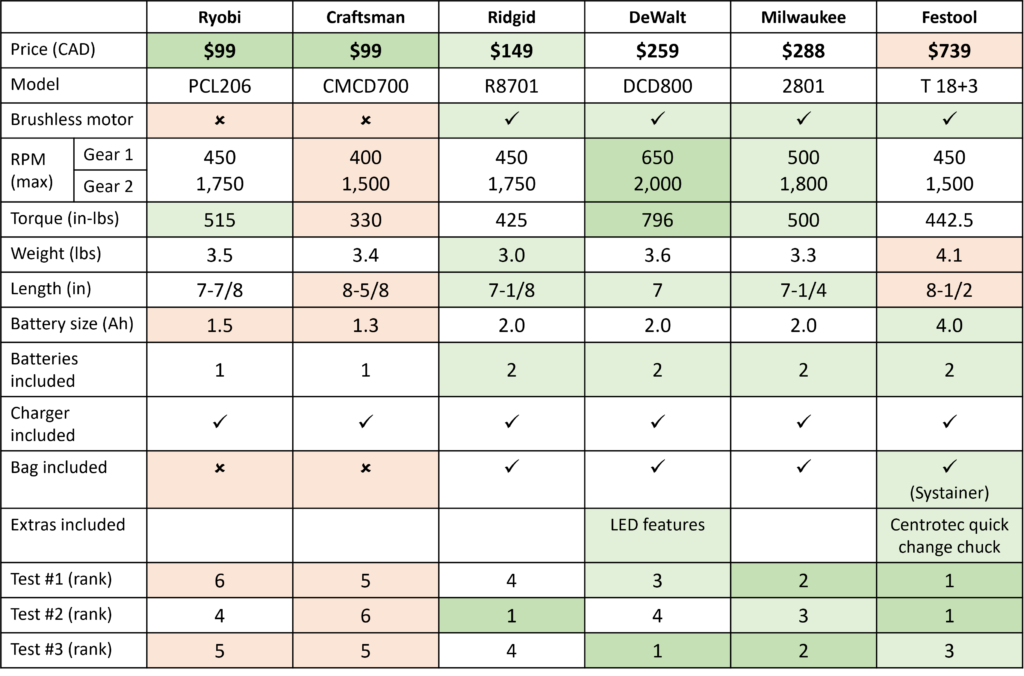
Don’t waste $100 fixing a $150 drill. Use this model-specific decision guide based on Sears PartsDirect pricing and labor data.
Repair Only If:
- Your drill is under warranty: Craftsman’s 3-year pro warranty covers motor/controller failures. Bring receipt to Lowe’s.
- It’s a user-serviceable part: Trigger switches ($15), carbon brushes ($8), or contact springs ($3) take <20 minutes to replace.
- You own a professional-series model: V20 High-Torque drills (model 315.180200) justify $75 professional repairs due to $300 replacement cost.
Replace Immediately If:
- It’s a 16.8V NiCd model: Obsolete batteries cost $65 (vs. $25 for new 20V drill). Parts discontinued after 2017.
- Multiple systems failed: Example: Bad ESC + worn brushes = $90 repair vs. $129 new 20V MAX drill.
- You smell burnt electronics: Indicates thermal runaway risk in lithium-ion systems. Stop using it.
Prevent Your Craftsman Drill From Dying Early: 4 Lifespan Hacks
Extend service life by 3+ years with these Craftsman-specific maintenance moves:
- Store Batteries at 50% Charge: Lithium packs degrade fastest at 0% or 100% charge. Use Craftsman’s “storage mode” (hold trigger for 10 sec after removal) to discharge to 50%.
- Blow Out Dust After Every Use: Compressed air through motor vents prevents carbon dust buildup. Do this outdoors—never indoors where fine particles become inhalable.
- Avoid “Deep Discharge” Cycles: Stop using the drill when speed drops noticeably. Draining packs to 0V kills cells permanently.
- Lubricate the Chuck Monthly: Apply one drop of lightweight machine oil (not WD-40!) to the chuck threads. Wipe excess to prevent dust adhesion.
Final Note: A Craftsman drill not working is rarely terminal—most failures trace to dirty contacts, dead batteries, or trigger switches you can fix before lunch. Start with battery voltage tests under load, then inspect trigger continuity. For brushless models acting up under pressure, warranty claims beat DIY repairs. Remember: If your drill smells burnt or sparks internally, retire it immediately—lithium-ion fires burn at 1,400°F. With proper battery care and quarterly contact cleaning, your Craftsman drill should deliver 5+ years of trouble-free service. For persistent issues, Lowe’s free diagnostic service can pinpoint failures beyond DIY fixes.


