
Dull drill bits transform simple projects into frustrating ordeals. When your twist bits lose their edge, they drill slower, generate dangerous heat, and cause bits to wander off-center—ruining precision and damaging materials. A sharp bit cuts cleanly with minimal pressure, while a dull one fights you at every rotation, overheating and producing rough, oversized holes. This isn’t just inconvenient; it wastes time, destroys expensive workpieces, and risks snapping bits mid-drill. Discovering the best way to sharpen drill bits solves these problems instantly, saving you money on replacements and ensuring professional results every time you pick up your drill. In this guide, you’ll master techniques ranging from quick field fixes to workshop-perfect sharpening that restores factory precision.
Why Dull Drill Bits Destroy Project Quality Instantly
Dull bits fundamentally change how your drill interacts with materials. Instead of cutting cleanly, they scrape and rub, generating excessive heat that can discolor metal or scorch wood. This friction causes bits to “walk” across surfaces before finally catching, creating inaccurate holes that compromise structural integrity. You’ll notice increased vibration, unusual noise, and difficulty maintaining straight drilling paths. The most dangerous consequence? Overheated bits lose their temper—the critical heat treatment that maintains hardness—making them brittle and prone to snapping. This isn’t theoretical; one snapped bit in a critical project can mean scrapped materials and days of rework. Recognizing these symptoms early prevents costly mistakes and extends your bit collection’s lifespan significantly.
How to Identify Bit Wear Before It’s Too Late
Check your bits before each use for these critical warning signs:
– Visible rounding at the cutting edge under magnification
– Excessive heat during drilling (metal bits turn blue when overheated)
– Poor chip formation—dull bits produce powder instead of clean curls
– Increased feed pressure required to advance through material
– Wandering that requires constant redirection to stay on target
Pro Tip: Hold bits against a light source. A sharp cutting lip creates a clean, unbroken shadow line. Dull bits show broken or fuzzy edges where light leaks through imperfections.
Drill Doctor: Set-and-Forget Sharpening for HSS Bits
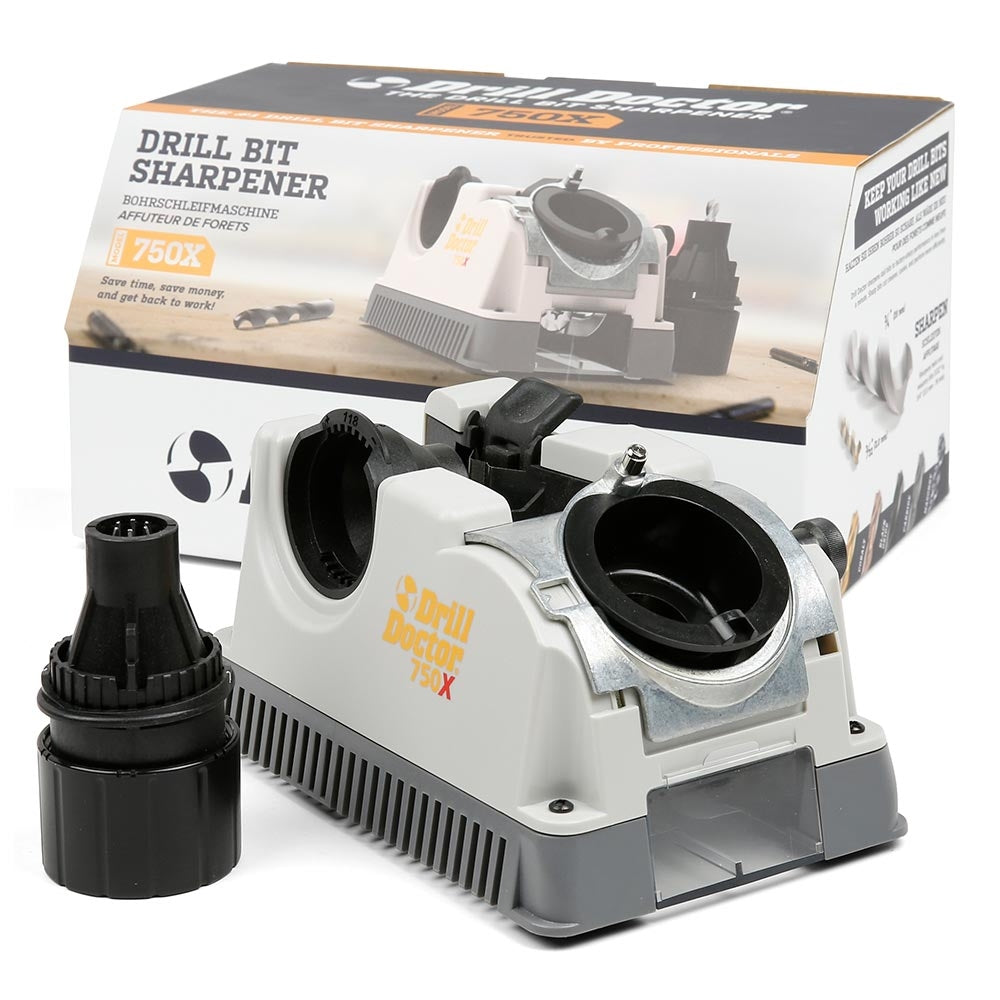
For users with multiple high-speed steel (HSS) bits, the Drill Doctor automates precision sharpening at consistent 118° or 135° angles. This dedicated tool eliminates guesswork by clamping bits securely and guiding them across abrasive wheels at factory-calibrated angles. It handles standard twist bits from 3/32″ to 1/2″ diameter in under 60 seconds per bit. The process requires zero skill—simply insert the bit, press the lever, and rotate until sharpening completes. Ideal for workshops where speed matters, it produces reliable results without wheel-dressing expertise. While the $100-$200 investment seems steep initially, it pays for itself after rescuing 20+ dull bits from the scrap bin.
Why Drill Doctor Beats Manual Methods for Beginners
- Zero learning curve: No angle calculations or hand-eye coordination needed
- Perfect symmetry: Eliminates uneven lip grinding that causes bit walking
- Consistent relief angles: Automatically maintains the critical 12°-15° clearance
- No overheating risk: Short contact time prevents temper loss in steel
Note: Drill Doctors struggle with carbide-tipped or specialty bits. Stick to HSS twist bits for best results.
Bench Grinder Mastery: Freehand Sharpening for Precision Results
The traditional bench grinder remains the professional’s choice for ultimate control. When sharpening by hand, you customize the point geometry for specific materials—like steeper 135° angles for stainless steel. This method requires practice but delivers superior results once mastered. Start by securing your grinder to a stable surface and dressing the wheel to remove glazing. Adjust the tool rest to sit 1/16″ below the wheel’s centerline and 1/8″ from the wheel face. Always wear safety glasses—grinding produces hot, sharp metal particles that can cause serious eye injury.
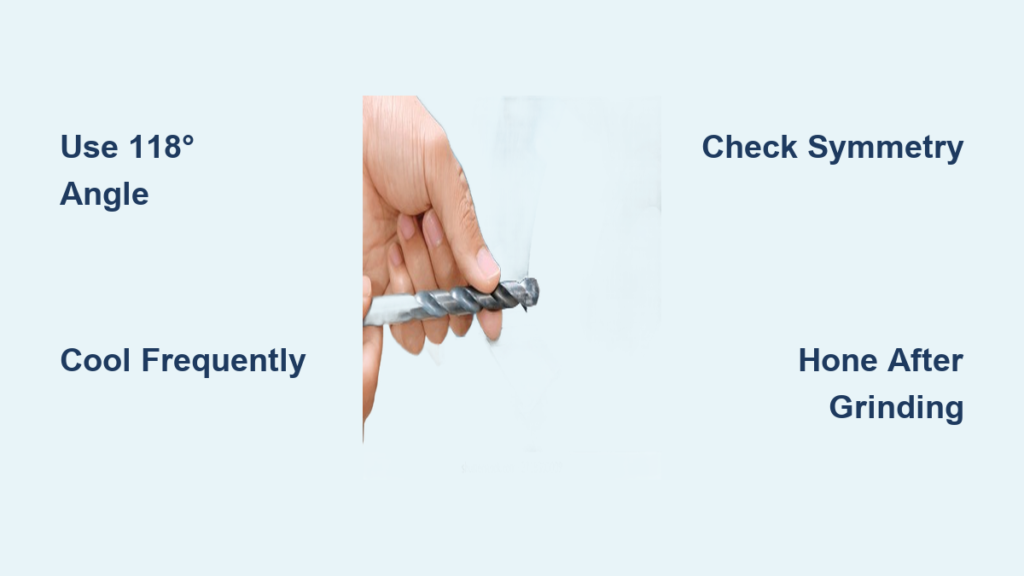
Step-by-Step: Perfecting the 118° Point Angle
- Position the bit correctly: Hold the bit horizontally with the cutting lip parallel to the floor. Angle the shank downward 12°-15° to create clearance behind the cutting edge. The bit’s axis should form 59° with the wheel surface (half of 118°).
- Make initial contact: Gently touch the lip to the wheel’s face while moving the bit sideways in small strokes. Apply feather-light pressure—let the abrasive do the work.
- Create a smooth facet: Grind until you see a clean, continuous bevel from the chisel point to the outer lip. Stop after 2-3 seconds to prevent overheating.
- Check progress: Dip the bit in water, then inspect the facet. It should be uniform with no dips or waves. The cutting edge must remain straight.
- Repeat for symmetry: Rotate the bit 180° in your fingers while maintaining hand position. Grind the second lip identically.
Critical Check: Hold the bit point-up to a light. Both cutting edges must be identical in length, and the chisel point must be centered. Uneven lips cause wobble and oversized holes.
Belt Sander Technique: Quick Field Sharpening Without Special Tools

When a bench grinder isn’t available, a belt sander delivers surprisingly effective touch-ups. This method excels for emergency sharpening on job sites using standard 36-80 grit belts. Clamp the sander vertically and position the bit so the cutting edge contacts the belt’s upward-moving side. Maintain the critical 59° angle while moving the bit across the belt’s width. Focus on light, consistent strokes—aggressive grinding removes too much material. Limit contact to 5-10 seconds per lip to avoid heat damage. While not as precise as jig methods, this technique rescues mildly dull bits enough to finish urgent tasks.
Why Belt Sanders Beat Files for Edge Restoration
Files create micro-burrs that accelerate dulling, while abrasive belts produce clean, burr-free edges. The continuous motion of the belt also prevents localized overheating better than stationary tools. For best results:
– Use a fine-grit (120+) belt for final honing
– Always move the bit sideways during contact
– Keep the cutting edge horizontal during grinding
– Stop frequently to check symmetry
Warning: Never grind the bit’s shank or flute—this destroys dimensional accuracy.
Sharpening Jigs: The DIYer’s Secret to Professional Angles

Sharpening jigs bridge the gap between automated tools and freehand grinding. These affordable accessories (like the Drill Doctor jig or homemade blocks) clamp to your bench grinder and hold bits at perfect 118° angles. Simply insert the bit, secure the jig, and guide it against the wheel. Jigs eliminate angle guessing while maintaining the essential clearance behind the cutting edge. They’re ideal for sharpening multiple bits quickly with consistent results. Set-up takes 2 minutes, and each bit sharpens in under 30 seconds. For under $30, this is the smartest upgrade for occasional users who demand professional results without freehand expertise.
How to Choose the Right Jig for Your Needs
- Magnetic base jigs: Best for metalworking shops (holds securely to grinder)
- Clamp-on models: Ideal for portable grinders (no base required)
- Adjustable-angle blocks: Essential for specialty bits (countersinks, masonry)
- Wooden templates: DIY option using pre-cut 59° slots for HSS bits
Pro Tip: Test jig angles on scrap metal before sharpening valuable bits. Even 2° deviation causes poor performance.
Honing Stones: The Final Polish for Long-Lasting Sharpness
After grinding, honing stones remove microscopic burrs that shorten bit life. A fine-grit diamond stone (600+ grit) or Arkansas stone smooths the cutting edge without altering geometry. Hold the stone flat against the newly ground facet and draw the bit backward 5-10 times with light pressure. This eliminates the brittle “wire edge” left by abrasives—a hidden flaw that chips during first use. For carbide bits, use a diamond hone specifically designed for hard materials. This 30-second step doubles edge longevity by creating a smooth transition from cutting edge to relief surface.
When to Skip Honing (And When It’s Critical)
- Essential for: HSS bits, precision drilling in hardwoods/metals
- Optional for: Masonry bits (rough edges help grinding action)
- Never skip for: Thin materials like sheet metal (burrs cause tearing)
Warning: Excessive honing rounds the cutting edge. Stop when the edge feels smooth under fingernail test.
The 4 Costly Mistakes That Ruin Drill Bit Sharpening
Overheating: The Silent Bit Killer
Dipping bits in water every 5-10 seconds prevents blue discoloration—a sure sign of lost temper. Once steel turns blue, the bit’s hardness degrades permanently. Use a cup of water within easy reach and cool frequently. Never let bits glow red—even brief overheating destroys the molecular structure that holds an edge.
Uneven Lip Grinding: Why Your Bits Wander
Asymmetric cutting edges cause bits to pull to one side. Always compare lip lengths after sharpening. Hold the bit point-up to a light—if one lip catches more light, it’s longer. Re-grind the longer lip in 2-second increments until symmetry matches. This single adjustment prevents 90% of drilling inaccuracies.
Incorrect Relief Angles: The Rubbing Trap
Grinding without sufficient clearance (12°-15°) makes bits rub instead of cut. You’ll see shiny spots behind the cutting edge where metal contacts the workpiece. To fix: tilt the shank downward more during grinding until the relief angle creates a shadow behind the lip.
Ignoring the Chisel Edge: The Centering Failure
A poorly ground chisel point won’t penetrate material, causing bits to skate across surfaces. The chisel must form a sharp V-point centered between cutting lips. If it’s blunt or off-center, regrind both lips equally until the chisel self-centers.
Testing Your Sharpened Bits: What Perfect Performance Feels Like
A properly sharpened bit bites instantly with minimal pressure. In metal, it produces tight, continuous chips—not powder. In wood, it creates clean holes with no splintering. Test on scrap material matching your project:
– Wood: Should drill without burning or excessive smoke
– Metal: Must cut smoothly without grabbing or squealing
– Plastic: Requires light pressure to prevent melting
If the bit wanders, check lip symmetry. If it overheats, verify relief angles. Perfect sharpening feels effortless—like the bit is pulling itself through the material.
Final Note: Mastering the best way to sharpen drill bits transforms frustrating projects into precision work. Start with a sharpening jig for foolproof results, then advance to freehand techniques as your skills grow. Always cool bits during grinding, check symmetry religiously, and finish with honing for edges that last 3x longer. Keep a dedicated sharpening station in your workshop with your bench grinder, jig, and honing stone—this 5-minute routine saves hours of rework and extends bit life dramatically. For immediate improvement, sharpen your three most-used bits tonight using the step-by-step bench grinder method. You’ll feel the difference tomorrow when they slice through materials like new.


