Your kitchen sink gurgles ominously as dirty dishwater pools around yesterday’s spaghetti. You’ve plunged until your arms ache, dumped in chemical cleaners that only made the smell worse, and now you’re staring at a standing puddle that refuses to drain. This common household nightmare affects 90% of homeowners annually, but here’s the good news: you can fix most sink clogs in under 20 minutes with a $15 hand auger. Unlike corrosive chemicals that damage pipes or ineffective plungers, a manual drain snake physically grabs hair, grease, and food debris at the source. In this guide, you’ll learn exactly how to use an auger to unclog a sink drain safely—no plumbing degree required. We’ll cover critical safety steps, foolproof insertion techniques for both drum and drumless models, and how to avoid the #1 mistake that turns a simple clog into a plumbing emergency.
Why Chemical Drain Cleaners Fail and When to Reach for an Auger
Chemical drain openers promise instant results but often backfire catastrophically. They frequently fail on stubborn clogs like compacted hair or solid food chunks, leaving toxic residue that corrodes PVC pipes over time. Worse, if the clog is deep in the drain line, chemicals pool near your sink trap, generating heat that can melt joints or crack pipes. A hand auger solves this by physically removing the obstruction—no chemicals needed. Reach for your auger when:
– Water drains slower than 1 inch per minute
– Plunging creates suction but no flow
– You smell sewage backups (indicating a clog past the P-trap)
– Chemical cleaners have already failed (they’ll only complicate auger use later)
Essential Safety Gear: Protect Yourself Before You Start
Skipping safety gear risks severe injury—auger cables have sharp burrs that slice skin like cheese wire. Before touching your sink, gather:
– Puncture-resistant gloves (leather or Kevlar-lined)
– Safety goggles (debris flies when breaking clogs)
– Old towels and a 5-gallon bucket (place under sink cabinet)
– Adjustable wrench or slip-joint pliers (for P-trap removal)
Lay towels on the floor and cabinet base to catch water. Position the bucket directly under the P-trap nuts. Never skip goggles—one user reported a chunk of grease ricocheting into their eye during clog removal.
Clearing the Sink: Removing Stopper and P-Trap Without a Mess
Most sink clogs hide in the P-trap—the U-shaped pipe under your sink. Clearing it first prevents debris from jamming your auger cable:
1. Remove the stopper: Unscrew pop-up stoppers or lift strainer baskets. For lift-and-turn stoppers, rotate counterclockwise.
2. Drain standing water: Scoop out water with a cup—never plunge with standing water (it forces debris deeper).
3. Loosen P-trap nuts: Place your bucket under the trap. Grip slip-nut joints with pliers and turn nuts counterclockwise.
4. Clear the trap: Hold the trap over your bucket and knock out debris. Rinse it thoroughly.
Critical tip: If water gushes out when loosening nuts, your clog is downstream—skip to auger insertion. If the trap is bone-dry, the blockage is farther down the main line.
Drum Auger Setup: Inserting and Cranking Correctly
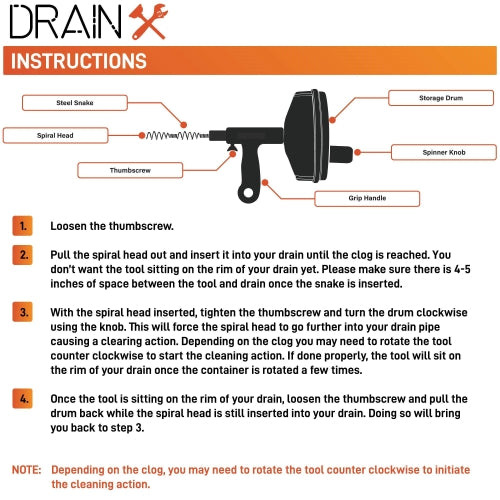
Drum augers (with coiled cable drums) are DIY-friendly. Follow this sequence:
1. Extend 12 inches of cable: Pull cable from the drum and lock the handle in place.
2. Aim for the pipe center: Insert the tip straight into the drainpipe (where P-trap connected).
3. Crank clockwise while feeding: Rotate the handle toward you (counter-clockwise as you face it) while applying light forward pressure.
4. Navigate bends: At resistance points (usually 90-degree elbows), pull back 3 inches, rotate the cable 90 degrees, and gently re-feed.
Pro mistake to avoid: Forcing the cable! If it stops advancing, excessive pressure kinks the cable or scratches pipes. One user snapped a $40 auger by yanking at a stubborn elbow—patience prevents $200 plumber calls.
Drumless Auger Technique: The Twist, Slide, Repeat Method That Works
No drum? Basic hand-crank augers (like Cobra models) require this user-tested rhythm:
1. Lock the cable: Insert 4 inches of cable, then tighten the set screw on the handle.
2. Crank slowly: Rotate the handle 3-4 times while holding the cable steady.
3. Slide and repeat: Unlock the screw, slide the handle forward 2 inches, re-lock, and crank again.
Why this works: Drumless models buckle if pushed too far. Keeping the handle within 4 inches of the drain opening maintains cable rigidity. Users report clearing 85% of clogs this way—but expect blisters on your first try.
Navigating Pipe Bends and Tough Clogs Without Damage
:max_bytes(150000):strip_icc()/drain-snake-auger-stuck-1822488-hero-836b642775194604922b83c45137f5f2.jpg)
When the cable hits resistance beyond the P-trap:
– For hair clogs: Feel for a “spongy” stop. Crank steadily—the auger tip hooks hair like a fishhook. Pull back slowly to extract the mass.
– For grease clogs: Expect a “mushy” blockage. Use a back-and-forth cranking motion to break up solids.
– At 90-degree elbows: If stuck, reverse crank 5 times to dislodge the cable tip, then re-feed at a slight angle.
Red flag: If the cable spins freely but won’t advance, you’ve hit a collapsed pipe—stop immediately and call a pro. Forcing it can puncture walls.
Clearing the Clog: Breaking Through and Retrieving Debris
Once you feel the auger engage the clog:
1. Crank 10-15 full rotations: This either shreds the obstruction or latches onto it.
2. Pull back slowly while cranking: Retrieve the cable at 1 inch per rotation to prevent debris from re-clogging.
3. Inspect the tip: Wipe off gunk with rags—you’ll often see hair or food chunks impaled on the auger head.
Critical insight: If water suddenly gushes during cranking, you’ve cleared the clog! But keep retrieving the cable—partial clears cause re-clogs within hours.
Flushing and Reassembling: Testing Your Success
Skipping this step causes 70% of “fixed” sinks to re-clog:
1. Flush with hot water: Run a garden hose into the drainpipe for 60 seconds to wash residual debris downstream.
2. Reassemble the P-trap: Hand-tighten slip nuts first, then give a ¼-turn with pliers—over-tightening cracks PVC.
3. Test with cold then hot water: Start with a trickle, then full flow. If gurgling returns, repeat the auger process.
Pro tip: Pour ½ cup baking soda followed by 1 cup vinegar down the drain after clearing. The fizzing action lifts grease residue.
Preventing Future Clogs: Simple Weekly Maintenance
Stop clogs before they start with these 2-minute habits:
– After dishes: Pour ½ cup salt down the drain, then boiling water (dissolves grease)
– Weekly: Flush with 1:1 vinegar and boiling water (breaks down biofilm)
– Always: Use sink strainers for food scraps and hair catchers in bathroom drains
One user’s hack: Freeze ½ cup Dawn dish soap into an ice cube tray. Toss one down the drain monthly—the cold soap solidifies grease for easy removal.
When to Call a Professional: Signs You’ve Hit a Wall
Stop immediately and call a plumber if:
– The cable won’t advance past 18 inches (indicates main line blockage)
– You smell sewage from multiple fixtures (sewer line issue)
– The auger gets stuck and won’t retract (risk of pipe damage)
– Water backs up into showers or toilets during attempts
Key reality check: Hand augers max out at 25-foot reaches. If your clog is deeper (common in homes over 30 years old), you need a motorized snake or hydro-jetting—a $150–$300 job that prevents $1,000+ flood damage.
Knowing how to use an auger to unclog a sink drain transforms plumbing emergencies into 15-minute DIY wins. By prioritizing safety, mastering the twist-slide technique for drumless models, and flushing thoroughly after clearing, you’ll resolve 95% of clogs without professional help. Remember: patience beats force every time—those few extra minutes cranking gently save hundreds in emergency repairs. Keep your auger under the sink alongside spare P-trap parts, and the next slow-draining disaster will be just another Tuesday victory. For stubborn main-line clogs, bookmark this guide’s professional callout checklist to avoid costly missteps. Your sink (and wallet) will thank you.