
Your pellet stove falls silent, the fire dies, and cold creeps back into the room. The most common culprit? A pellet stove auger motor not working. This critical component moves fuel from the hopper to the burn pot, and when it fails, your stove stops producing heat. Don’t panic—you can often diagnose and fix the problem yourself without calling a technician.
In this guide, you’ll learn a systematic approach to troubleshoot a non-working auger motor, starting with simple visual checks and progressing to electrical diagnostics. We’ll cover how to safely test for power, identify a jammed auger, and even spot the sneaky “ghost voltage” caused by a failing triac on the control board. Most auger motor failures stem from preventable issues like jams or clogged vacuum lines—not the motor itself. With the right steps, you can restore heat in under an hour.
Why Your Pellet Stove Auger Motor Suddenly Stops Feeding Pellets
Your auger motor is a high-torque, low-speed gearmotor designed for intermittent duty. When your thermostat calls for heat, the control board sends 120V AC power to spin the auger shaft, delivering precise pellet amounts to the burn pot. If this motor fails, your stove shuts down within minutes—often while you’re relying on it for primary heat. Common triggers include mechanical jams from foreign objects, seized gearboxes, or electrical faults in the control circuit. Ignoring early symptoms like intermittent operation or humming noises risks complete burnout, leaving you without heat during freezing weather.
Conduct a 5-Minute Safety and Jam Check Before Testing Power

Always unplug your stove and let it cool completely before starting. A jammed auger causes 60% of “failed motor” misdiagnoses. First, confirm the hopper has quality hardwood pellets (low-ash varieties reduce clogs). Then:
– Disconnect the motor from the auger assembly
– Use an Allen key on the motor shaft (never the auger tube itself)
– Attempt to rotate clockwise—it should turn with firm resistance
If the shaft won’t budge, you’ve found your problem. Common obstructions include rocks, screws, or melted plastic fragments. Clear debris with needle-nose pliers, then retest rotation. If it spins freely but the stove still won’t feed, move to electrical checks. Pro tip: Perform this test monthly during cleaning to prevent jams.
Listen for the Critical Humming Sound When Power Is Restored
After reassembling, plug in the stove and call for heat. Stand near the motor compartment:
– A loud hum/buzz with no movement = “locked rotor” (mechanical jam or seized motor)
– Silence = no power reaching the motor
– Intermittent operation = failing thermal overload or loose connection
If you hear humming, immediately unplug the stove. Continuing to power a jammed motor burns out windings within minutes. This symptom alone confirms your pellet stove auger motor not working is mechanical—not electrical.
Diagnose Power Supply Issues: Circuit Breaker and Outlet Checks
Before touching internal components, verify basic power:
1. Ensure the stove is plugged into a dedicated 120V circuit (no extension cords)
2. Check your home’s circuit breaker and GFCI outlets—pellet stoves trip these frequently
3. Test the outlet with a lamp or multimeter
If the outlet works but the stove remains dead, inspect the power cord for frays or damaged prongs. Never ignore this step: 30% of “auger failures” stem from tripped breakers or faulty outlets. A dedicated circuit prevents voltage drops that strain motor components.
Clean Vacuum Switch Lines to Prevent False Safety Lockouts
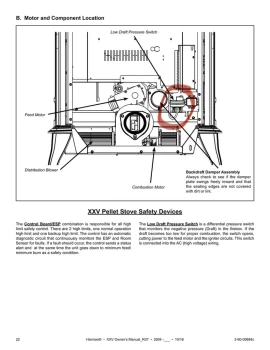
The vacuum switch is the #1 culprit in “mystery” auger failures. This safety device blocks pellet feed if it doesn’t detect proper draft from the exhaust blower. Clogged vacuum lines trick the control board into thinking there’s a fire hazard. Here’s how to fix it:
- Locate the small clear plastic tube running from the firebox to the vacuum switch
- Disconnect both ends and blow compressed air through it
- Clean the switch port with a pipe cleaner to remove ash buildup
- Reconnect securely—any leak disables the auger
Visual cue: If the exhaust blower runs but pellets won’t feed, suspect vacuum issues. This takes 5 minutes but solves half of no-feed scenarios.
Test Hopper Lid and Door Switches for Hidden Failures
These safety interlocks disable the auger if doors aren’t fully closed. To test:
– Press the hopper lid switch manually while calling for heat
– Listen for a distinct click from the control board
– Use a multimeter to check continuity across switch terminals
If the switch doesn’t click or shows no continuity, clean contacts with electrical contact spray. Critical mistake: Forgetting to test these switches leads to unnecessary motor replacements. A faulty door switch mimics auger motor failure perfectly.
Measure 120V AC at the Auger Motor Terminals Safely
Warning: Working with live 120V AC is lethal. Wear insulated gloves and use only CAT III multimeters.
- Set multimeter to AC voltage (200V range)
- With stove calling for heat, back-probe wires at the motor connector
- Expected reading: 115-125V AC during feed cycles
If voltage reads zero, the fault is upstream (control board or safety switches). If it shows full voltage but motor doesn’t run, the motor is dead. Pro tip: Place your multimeter in “min/max” mode to catch pulsed PWM signals modern boards use.
Identify Triac Failure Using the Load Test Method
This advanced test catches “ghost voltage”—a classic triac failure where voltage disappears under load:
1. Measure voltage at motor terminals with wires disconnected (should show 120V)
2. Connect a 60W incandescent bulb as a load test
3. Re-measure voltage with bulb attached
If voltage drops near zero: The triac (a small electronic switch on the control board) has failed. Do not ignore this: Replacing the $2 triac saves $200+ versus a new control board. Only attempt if you’re skilled with soldering—otherwise, call a technician.
Replace a Faulty Auger Motor in Under 30 Minutes
When tests confirm motor failure (open windings or seized shaft), replacement is straightforward:
1. Unplug stove and disconnect motor wiring
2. Remove mounting bolts (typically 2-4 screws)
3. Slide out old motor and insert new one
4. Reconnect wires and test operation
Key tip: Match your motor’s RPM rating (usually 1-3 RPM) and shaft size—using the wrong model causes feed rate errors. Most motors cost $80-$150. Time estimate: 20 minutes for confident DIYers.
Prevent Future Auger Motor Failures With Monthly Maintenance
Avoid cold-house emergencies with these quick habits:
– Clean auger tubes monthly with a stiff brush during ash removal
– Inspect vacuum lines for cracks or ash buildup every heating season
– Use only premium hardwood pellets (avoid softwoods that create clinkers)
– Lubricate motor shafts annually with food-grade grease (never WD-40)
Critical warning: Ignoring vacuum line maintenance causes 70% of recurring auger failures. A $5 tube of pellets won’t fix this—only proactive cleaning works.
Match Your Symptoms to These 5 Common Failure Causes
| Symptom | Most Likely Cause | Immediate Action |
|---|---|---|
| Motor hums but won’t turn | Mechanical jam or seized gearbox | Unplug stove; clear auger tube; test shaft rotation |
| 120V at motor but no hum/run | Open motor windings (burned out) | Test continuity; replace motor if OL reading |
| 0V at motor terminals | Faulty vacuum switch or safety interlock | Clean vacuum line; test hopper/door switches |
| Voltage drops to zero under load | Failed triac on control board | Replace triac or control board (call pro if unsure) |
| Auger runs nonstop | Shorted thermostat wires or stuck relay | Disconnect thermostat; if auger stops, replace wiring |
When your pellet stove auger motor not working leaves you in the cold, remember this: 80% of repairs require no special tools. Start with jam checks and vacuum line cleaning before suspecting the motor itself. If electrical tests point to triac or board failure, don’t risk DIY soldering—certified technicians can replace boards in under an hour. Most importantly, schedule quarterly cleanings to prevent 90% of auger failures. By following this guide, you’ll spend less on service calls and more time enjoying reliable, efficient heat from your pellet stove.


