
Nothing ruins a carefully planned acrylic project faster than cracking your plexiglass during drilling. Unlike wood or metal, acrylic is a thermoplastic that softens with heat, meaning standard drilling techniques will melt, chip, or crack your material. When your drill bit generates excessive friction, the acrylic can weld to the bit, creating rough, melted edges that require extensive repair. This guide delivers the precise, manufacturer-approved methods for drilling clean, professional holes in acrylic plexiglass—whether you’re working with 1/8″ craft sheets or thick 1/2″ display panels.
The Right Drill Bits That Won’t Crack Your Acrylic Sheet

Using the wrong drill bit is the #1 cause of failed acrylic drilling projects. Standard twist bits designed for wood or metal simply won’t cut it—literally.
Why Standard Twist Bits Fail on Acrylic (and What to Use Instead)
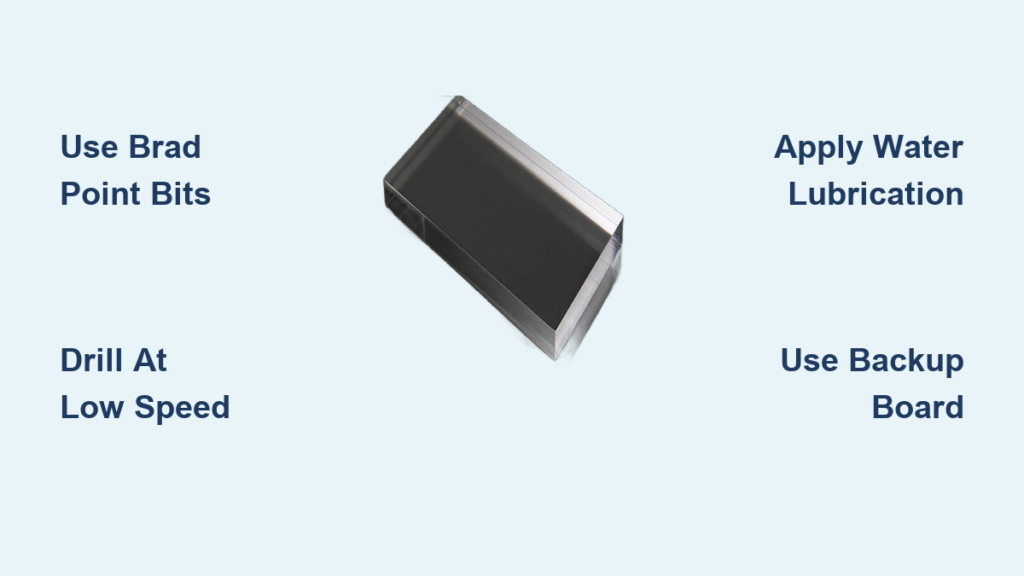
Standard 118° twist bits grab and tear acrylic rather than cutting cleanly, causing immediate chipping around the hole perimeter. For flawless results, switch to bits with specialized geometry: Brad point bits feature a sharp central spur that scores the surface before the main cutting edges engage, preventing the bit from “walking” across the smooth acrylic surface. Step bits gradually increase hole size with minimal stress, making them perfect for thin acrylic sheets under 1/4″ thick. For holes larger than 1″, use hole saws but run them in reverse for the initial cut to score the surface before switching to forward rotation.
Brad Point vs. Step Bits: Which Is Best for Your Project?
For precision work on display cases or picture frames, brad point bits create the cleanest entry and exit holes with virtually no chipping. Their sharp spurs cut cleanly through the acrylic surface rather than tearing it. Step bits shine when you need multiple hole sizes or are working with thinner acrylic (1/8″ to 1/4″), as their gradual stepped design reduces stress concentration that causes cracks. Never use dull bits—acrylic requires razor-sharp cutting edges to prevent melting; replace or sharpen bits after every few holes.
Setting the Perfect Drill Speed for Different Acrylic Thicknesses
Drilling speed makes or breaks your acrylic project. Too fast creates heat that melts the plastic; too slow causes binding and cracking.
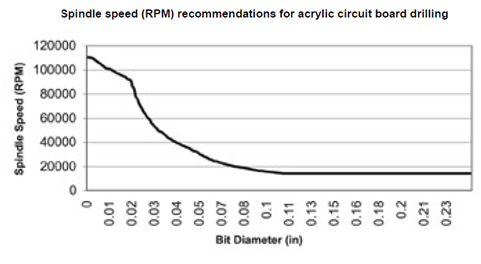
RPM Guide: Matching Speed to Hole Size (1/8″ to 1″ Holes)
For 1/8″ holes, use 3,000 RPM; for 1/4″ holes, drop to 1,500 RPM; for 3/8″ holes, use 1,200 RPM; and for 3/4″ holes, slow to 900 RPM. This inverse relationship between hole size and speed prevents heat buildup that melts acrylic. Your drill’s sound provides instant feedback—a smooth cutting sound indicates proper speed, while a high-pitched squeal means you’re going too fast. For handheld drills, set to the lowest possible speed setting that still allows the bit to cut.
How to Tell If Your Drill Speed Is Too High (3 Warning Signs)
Watch for these critical indicators that your RPM is melting your acrylic: 1) Plastic shavings that are powdery rather than curling (indicating melting), 2) Visible smoke or a burning plastic smell at the drill point, and 3) The drill bit becoming uncomfortably hot to touch. If you notice any of these, stop immediately, let the material cool, and reduce your speed by 25-50% before continuing.
Why Water Lubrication Is Non-Negotiable for Clean Acrylic Holes
Water isn’t just helpful—it’s absolutely essential for successful acrylic drilling. Unlike metalworking where cutting oils are standard, acrylic requires water-based cooling.
Water vs. Cutting Oils: Why Water Wins for Acrylic
Cutting oils trap heat in acrylic rather than dissipating it, accelerating melting and creating a sticky mess that clogs drill flutes. Water’s high thermal capacity rapidly cools both the bit and acrylic. For best results, add a few drops of dish soap to your water—it reduces surface tension, allowing better chip removal and preventing acrylic shavings from sticking to the bit. A simple spray bottle provides adequate application for most DIY projects.
The Simple Water Drip System That Prevents Melting
Create an effective cooling system with just two items: a plastic water bottle with a pinprick hole in the cap, and tape to secure it above your workpiece. Position it so water drips directly onto the drill bit contact point. This continuous flow keeps temperatures low, flushes away chips that could cause re-melting, and virtually eliminates the risk of your acrylic welding to the bit—a common disaster with dry drilling.
Step-by-Step: Drilling Clean Holes in 1/4″ Acrylic Without Cracks
Follow this precise sequence for professional results every time, whether you’re using a handheld drill or drill press.
Securing Your Acrylic: The Backup Board Technique That Prevents Blow-Out
Place your acrylic sheet on a sacrificial backing board of scrap plywood or MDF—this is non-negotiable for clean exit holes. Clamp both materials firmly to your work surface using soft-jawed clamps to prevent vibration. Apply masking tape over both sides of the acrylic at your drill point; mark your center through the tape with a fine-tip marker. The tape prevents surface chipping while the backing board eliminates the “blow-out” that ruins the underside of your hole.
The Angle Trick That Stops Bits From Walking on Smooth Surfaces
Start drilling at a 45-degree angle to create a shallow groove that anchors the bit. After 1/8″ of penetration, gradually straighten to 90 degrees while maintaining steady, light pressure. This technique prevents the bit from skating across the smooth acrylic surface—a common frustration that leads to misplaced holes. Maintain constant, firm pressure (about 3-4 inches per minute feed rate) but never force the bit; let the sharp cutting edges do the work.
How to Prevent Cracks When Drilling Thick Acrylic (1/2″ and Above)
Thick acrylic requires special techniques to prevent internal stress fractures that may not appear until hours after drilling.
The Pilot Hole Method for Large Diameter Drilling
For holes larger than 1/4″ in thick acrylic, always start with a 1/8″ pilot hole. This guides your larger bit and prevents binding that causes cracks. Drill through completely with the pilot bit, then switch to your final size. The pilot hole also provides an exit channel for chips, reducing heat buildup. For holes over 1/2″, consider drilling from both sides to minimize exit chipping.
Step Drilling: Gradual Hole Enlargement Without Stress
For large holes in thick acrylic, use a step bit or incrementally increase bit sizes (1/8″ → 3/16″ → 1/4″). Drill each size only halfway through before switching to the next size. This distributes stress evenly and prevents the sudden material failure that cracks thick acrylic. Between size changes, clean the hole with compressed air to remove chips that could interfere with the next bit.
Fixing Melted Edges and Chipping: Common Acrylic Drilling Mistakes
Even experienced DIYers encounter problems—here’s how to diagnose and fix them immediately.
Why Your Acrylic Is Melting (and How to Stop It)
Melting occurs when drill speed generates more heat than the material can dissipate. Immediately reduce speed by 30-50% and increase water flow. If melting persists, your bit is likely dull—replace it. For future projects, remember: acrylic cuts best with sharp bits at low speeds and constant coolant. Never drill dry—even brief interruptions in water flow can cause localized melting.
Repairing a Chipped Hole: Can You Salvage Your Project?
Minor chipping around the hole edge can often be repaired. Use a countersink bit to gently bevel the damaged area, then wet-sand with 400-grit followed by 1000-grit paper. For severe chipping, enlarge the hole slightly with a step bit and cover with a decorative washer. Prevention is better—always use backing boards and proper speed settings to avoid this issue entirely.
Acrylic Dust Safety: Protecting Yourself While Drilling Plexiglass
Acrylic dust poses serious health risks that many DIYers overlook until it’s too late.
Essential Safety Gear for Acrylic Drilling Projects
Always wear ANSI Z87.1 safety glasses—acrylic chips can cause permanent eye damage. Use an N95 respirator mask to prevent inhaling fine particles that irritate lungs. Work gloves protect against sharp edges, but choose thin ones that maintain dexterity. A dust collection system or shop vacuum with HEPA filter is highly recommended, especially for multiple holes or thick acrylic.
Ventilation Solutions for Indoor Drilling Workspaces
Drill in a well-ventilated area with cross-ventilation to disperse fumes. For indoor projects, position a box fan in a window blowing outward, and place your work area between the fan and the window. Never drill acrylic near open flames—acrylic dust is flammable. After drilling, wipe down your workspace with a damp cloth to capture residual dust before it becomes airborne.
Finishing and Polishing Your Drilled Acrylic Holes
The final step transforms a functional hole into a professional-looking feature.
Deburring Techniques for Professional-Looking Results
After drilling, remove the sharp burr on the exit side with a deburring tool or countersink bit at low speed. For hand finishing, wrap 400-grit sandpaper around a dowel and gently rotate it in the hole. Always sand in the direction of the hole (not across it) to avoid visible scratches. Wipe away all dust with a microfiber cloth before polishing.
Achieving Crystal Clear Edges With Simple Polishing Methods
For glass-smooth edges, wet-sand sequentially with 600, 1000, then 2000-grit sandpaper. Finish with a plastic polish compound applied with a soft cloth or buffing wheel at low speed. For ultimate clarity, apply acrylic scratch remover according to product instructions. Properly finished holes will appear as if they were molded into the acrylic rather than drilled.


