
You’ve stared at that wine bottle, glass tile, or decorative pane for weeks, dreaming of turning it into a stunning lamp or custom shelf. But one question stops you cold: how to drill into glass without shattering your project? The truth is, 90% of glass-drilling failures happen before the drill even touches the surface—using the wrong bit, skipping stabilization, or rushing the first critical seconds. I’ve seen countless DIYers curse as their masterpiece explodes into shards, all because they treated glass like wood or metal. But with the right approach, you can drill flawless holes in glass bottles, windows, or thick panels in under 10 minutes. This guide reveals the exact techniques professional glass artisans use, from creating microscopic starter grooves to preventing blowout on the exit side. You’ll learn why water alone isn’t enough for thick glass, how to salvage a slipping drill bit, and the one RPM setting that makes all the difference.
Diamond Drill Bits vs. Hole Saws: Which Saves Your Glass Project?
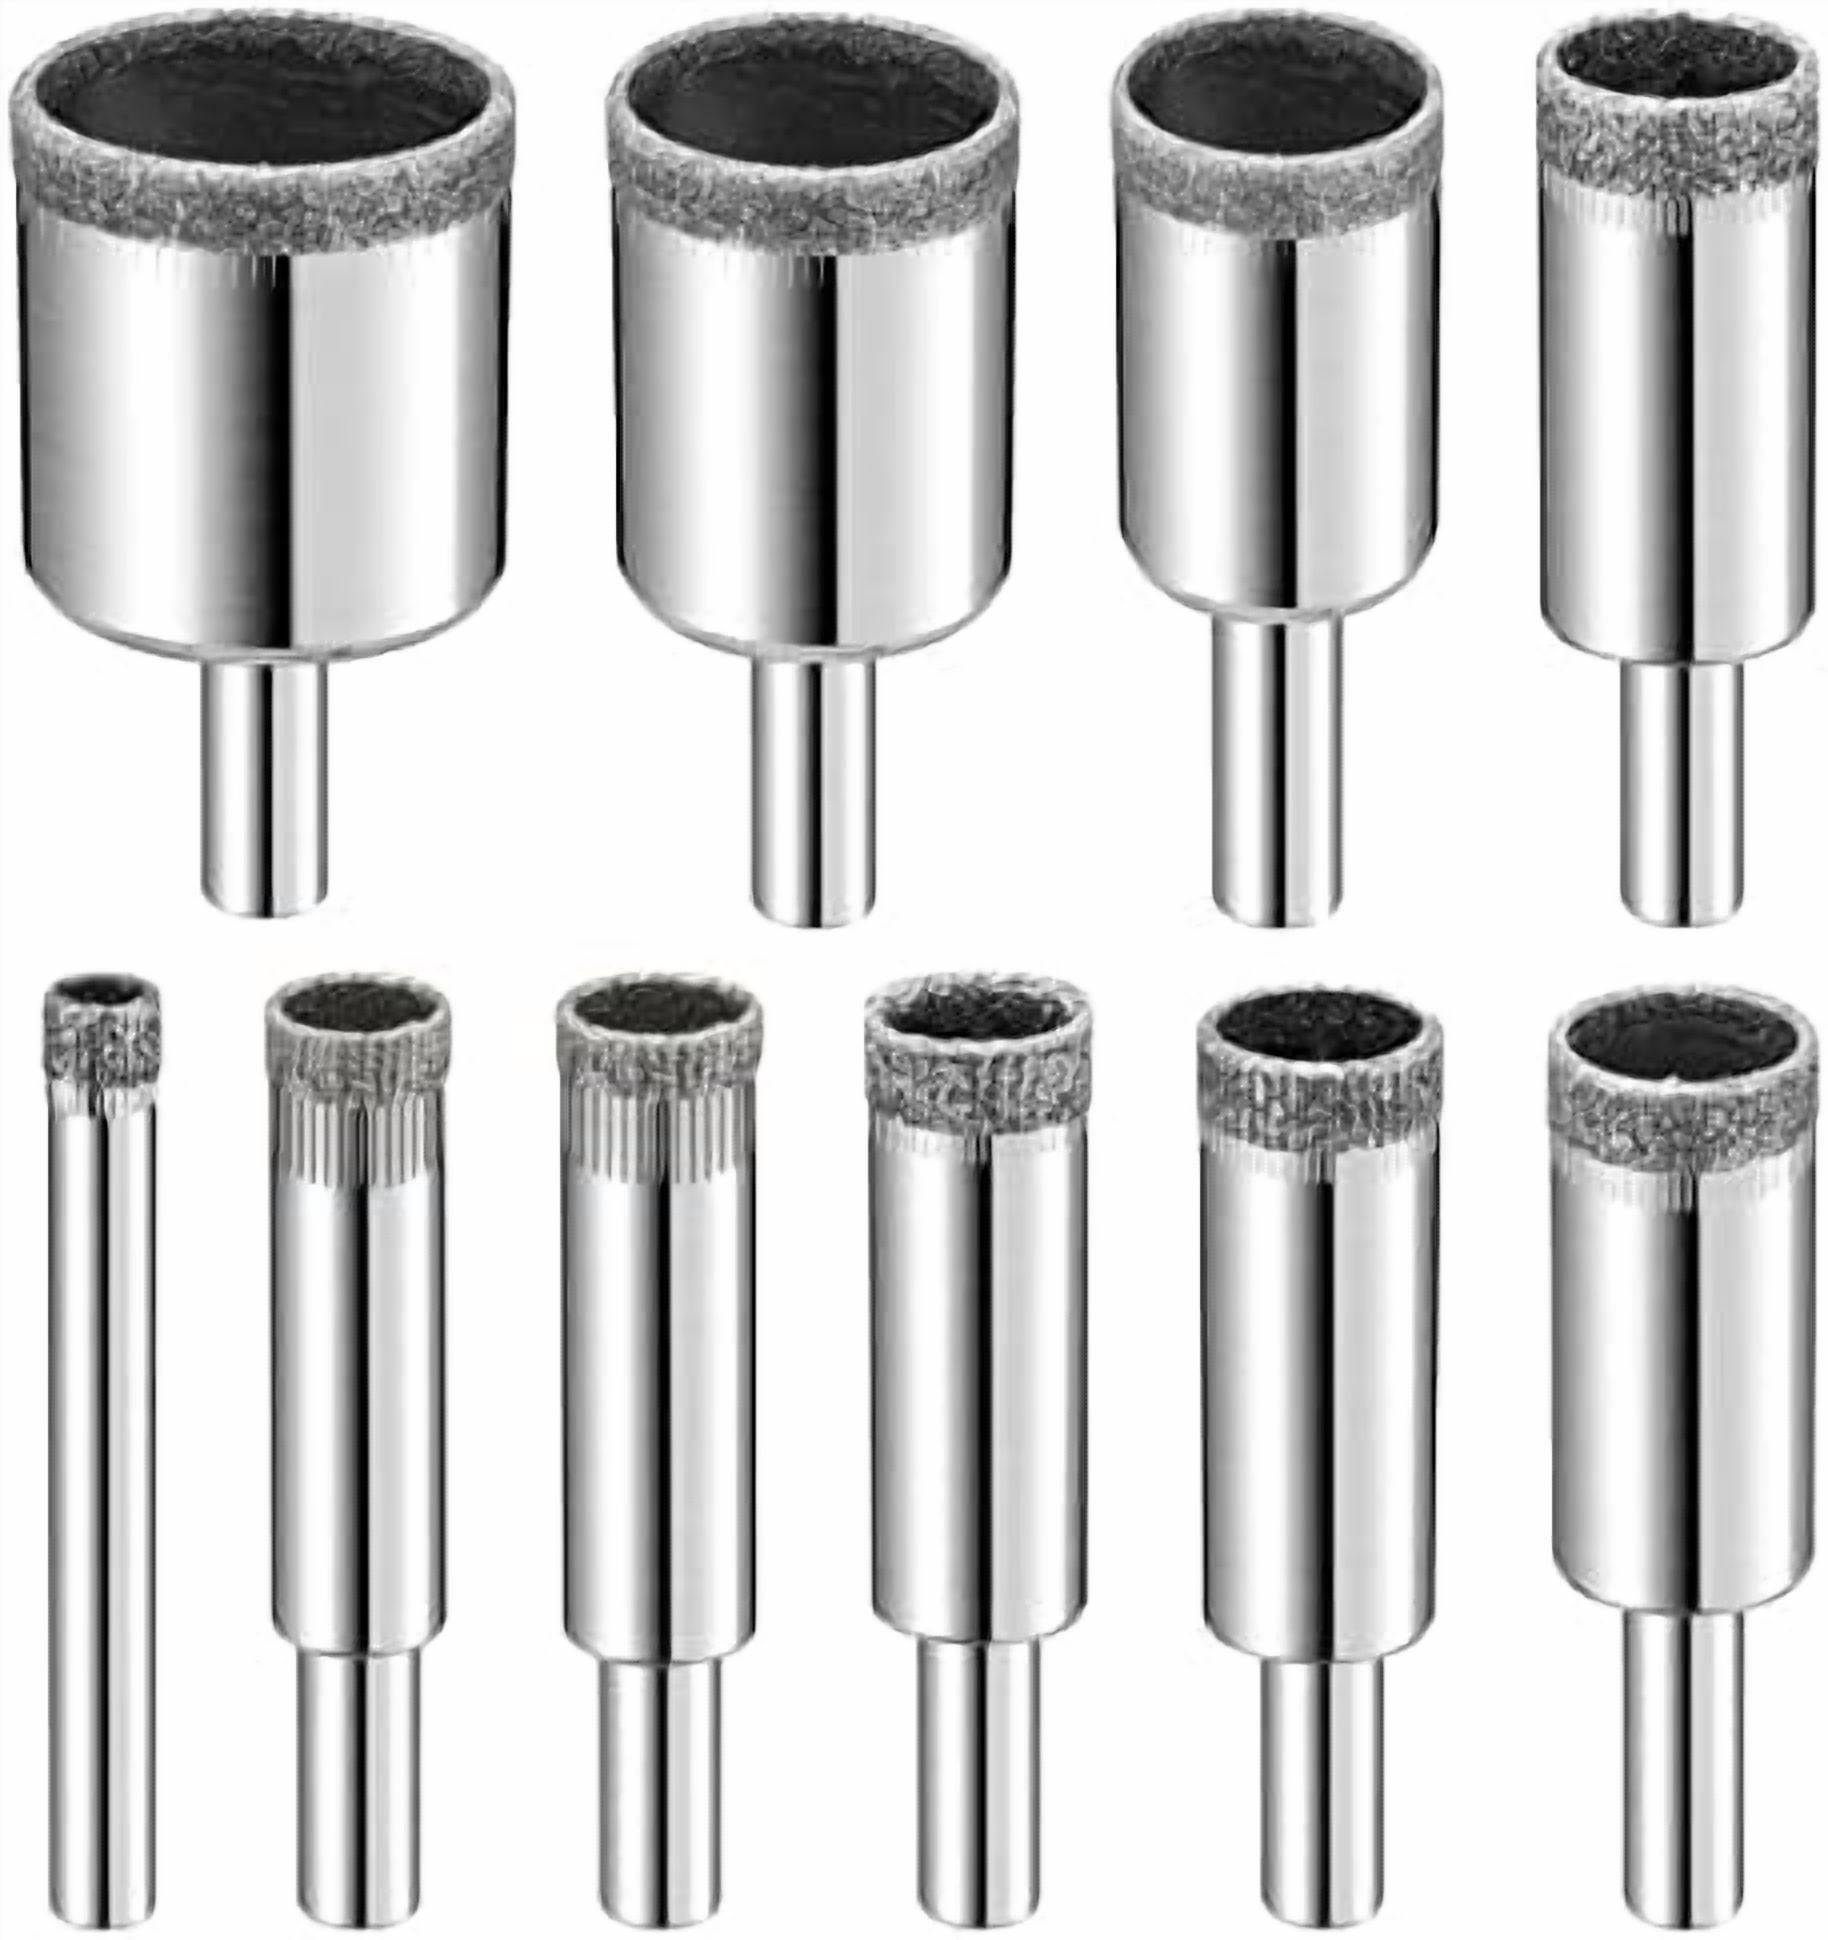
Forget standard metal drill bits—they’ll shatter glass instantly. Diamond-coated bits are non-negotiable for how to drill into glass cleanly because they grind rather than cut. For holes under 1/2 inch, use solid diamond-tipped bits (like 1/4″ or 3/8″ sizes) that create precise starter holes. They work by abrasion, not impact, generating minimal heat. For larger openings (1/2 inch and above), diamond hole saws are essential—they cut a clean ring while leaving the center intact. Never substitute with tile bits for thick or tempered glass; their carbide tips crack under pressure. Pro tip: Inspect bits under magnification before starting—any nicks or missing diamond grit mean immediate replacement. A damaged bit creates uneven pressure points that spiderweb your glass in seconds.
Why a Drill Press Beats Hand Drills for Glass (and Hand-Drill Fixes)
A drill press delivers the perpendicular consistency glass demands, but most DIYers rely on handheld drills. If you’re using a hand drill, clamp it vertically in a vise with the glass below—a $10 setup that mimics a drill press. Battery-powered drills win over corded models because their torque control prevents sudden jolts. Set speed to 100-400 RPM: too fast causes friction cracks, too slow overheats the bit. For handheld work, brace your elbow against your hip to eliminate wrist wobble. Crucially, never let the drill “walk” by applying uneven pressure—this creates stress fractures radiating from the hole. If your hand slips, stop immediately; restarting in the same spot risks catastrophic failure.
Water, Oil, or Antifreeze? Choosing Your Glass-Drilling Coolant
Water is the go-to coolant, but it evaporates too fast for thick glass, causing overheating cracks. For projects over 1/4 inch thick, switch to light cutting oil or 50/50 antifreeze-water mix—it lubricates 3x longer than water alone. Create a coolant reservoir by molding plumber’s putty into a 1/2-inch wall around your drill site, then fill it with fluid. As you drill, the putty ring traps slurry (glass dust + coolant), preventing abrasive particles from scratching the surface. Never let the bit run dry: if you hear a high-pitched squeal or smell burning, stop instantly—overheating weakens the glass structure within seconds. For bottles, fill the container with water before drilling; the internal liquid absorbs vibrations that cause micro-cracks.
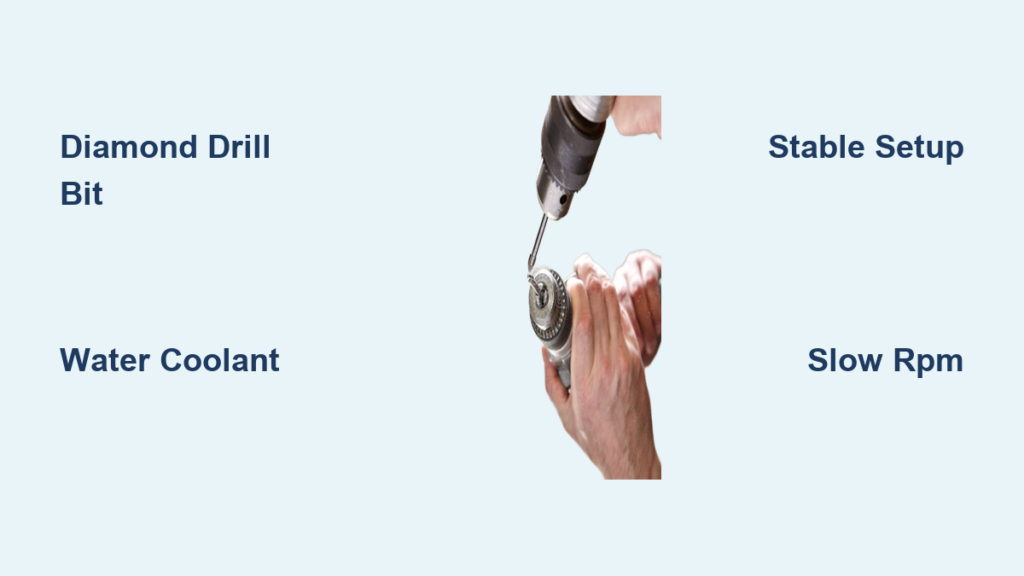
Securing Glass Without Cracks: The 3-Point Stabilization Method
Glass shifts on smooth surfaces, causing instant breakage. Place your piece on a 1/2-inch rubber mat (like a dishwasher mat) over plywood—never drill directly on metal or stone. Then apply the 3-point rule: clamp the glass at three corners using padded C-clamps (wrap jaws in cloth), leaving the drill zone completely unobstructed. For curved surfaces like bottles, nestle them in a V-shaped wooden cradle lined with foam. Test stability by flicking the glass—it should produce a clear “ping,” not a dull thud. If it moves when tapped lightly, reposition clamps. One pro trick: place a dime-sized dot of vacuum grease under each clamp foot for vibration dampening without slipping.
Marking Glass for Pinpoint-Accurate Holes: Tape Over Grease Pencils
Skip grease pencils—they leave oily residues that make bits slip. Instead, cover the drill site with blue painter’s tape, then mark your target with a fine-tip permanent marker. The tape fibers give the bit instant grip during startup. For perfect centering on bottles, wrap a string around the circumference, mark where ends meet, then transfer that point to tape. If drilling multiple holes, create a cardboard template with pre-punched holes to align your marks. Never rely on freehand—glass magnifies even 1mm errors into crooked holes. Before drilling, rub the marked spot with 400-grit sandpaper for 5 seconds; the micro-scratches help the bit catch without skating.
Starting the Hole: The 60-Second Technique That Prevents Slipping
This phase makes or breaks your project. Begin drilling at 100 RPM with ZERO downward pressure—just let the bit’s weight rest on the glass. Tilt the drill 15 degrees off-vertical and slowly circle the mark for 10 seconds to carve a shallow groove. Once the groove anchors the bit (you’ll hear a consistent “shhh” sound), straighten to 90 degrees. Apply feather-light pressure—imagine pressing a thumbtack into butter. If the bit slips, stop and deepen the groove with a center punch: place a nail tip on the mark and tap once with a hammer. Resume drilling within 30 seconds; delays let coolant dry, increasing slip risk. The starter phase should never exceed 60 seconds—prolonged grinding heats the surface.
Drilling Speed Guide: RPM Settings for 1/8″ to 1/2″ Thick Glass
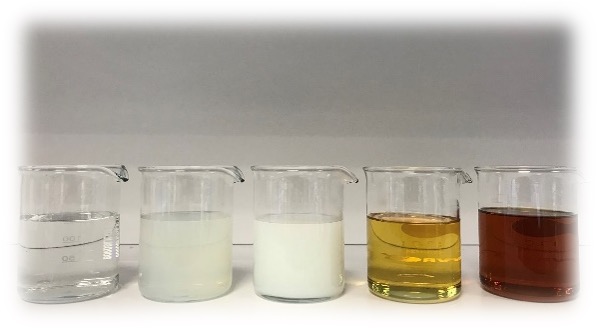
Thickness dictates your drilling rhythm. For thin glass (like 1/8-inch bottles), maintain 300 RPM with constant light pressure—never lift the bit until through. Thick glass (1/4 inch+) requires pulsed drilling: drill 5 seconds, lift for 2 seconds to flush slurry, repeat. Below 100 RPM, bits glaze over and overheat; above 400 RPM, friction cracks spread invisibly. Monitor the slurry color: milky white means proper cooling; gray streaks signal overheating. If drilling slows, back off pressure—you’re compressing glass fibers instead of cutting them. For 1/2-inch glass, expect 3-5 minutes per hole; rushing causes “exit blowout” where the backside shatters.
How to Stop Blowout When the Bit Breaks Through Glass
Blowout happens when the bit exits violently, tearing glass fibers. Prevent it by reducing pressure to 10% of original when you see the bit’s tip emerging (check every 10 seconds by stopping and inspecting). Place a sacrificial backing board—soft pine or particleboard—under the glass exit point. As the bit penetrates, it drills into the wood instead of air, eliminating sudden resistance changes. For bottles, drill only 70% through from one side, then flip and finish from the opposite side; this creates clean edges on both surfaces. If you hear a “crack” sound during exit, stop immediately—the hole is compromised.
Why Thick Glass (Over 1/4″) Requires Drilling From Both Sides
Glass thicker than 1/4 inch demands bilateral drilling to prevent internal stress cracks. Drill halfway through from the front side until the bit’s shoulder touches the glass, then flip the piece. Align the exit point with your original mark using a flashlight through the partial hole. Resume drilling from the backside at half your original speed. This technique ensures fibers separate cleanly at the center rather than splintering toward one surface. Never drill all the way through in one pass with thick glass—the bit’s vibration creates subsurface fractures that cause spontaneous breakage hours later.
Fixing a Slipping Drill Bit: 3 On-the-Spot Solutions
If your bit skates across the surface, don’t panic—these fixes work mid-drill. First, deepen the starter groove by pressing a diamond file against the spinning bit for 3 seconds (wear gloves!). Second, switch to a smaller pilot bit (1/16 inch) to create a guide hole, then step up sizes. Third, apply a drop of superglue to the drill site, wait 10 seconds for tackiness, then restart—the adhesive grips the bit without residue. Never increase pressure to stop slipping; this generates heat that weakens the glass within 20 seconds. If the bit slips twice, abandon the spot—it’s already micro-fractured.
Smoothing Rough Hole Edges: Sanding Without New Cracks
Freshly drilled holes have razor-sharp edges that can chip further. Wrap 220-grit sandpaper around a dowel matching your hole size, dip in coolant, and rotate gently by hand for 30 seconds. Avoid power tools—they create uneven pressure. For bottle necks, use a diamond file in a circular motion at the hole’s edge. Rinse thoroughly afterward; trapped grit causes handling injuries. Test smoothness by running a cotton ball through the hole—it should glide without snagging. Never skip this step: rough edges propagate cracks when exposed to temperature changes.
Drilling Bottles and Jars: The Water-Fill Method That Prevents Breakage
Hollow glass requires special handling. Fill the container completely with water before marking—this cushions internal vibrations. Drill at 200 RPM max, using light intermittent pressure. As the bit penetrates, water will jet out; maintain coolant flow to prevent slurry buildup. For narrow-neck bottles, use a flexible shaft drill attachment to access tight spaces. If water leaks during drilling, top it off immediately—air pockets cause uneven cooling and stress fractures. After drilling, submerge the bottle in a vinegar-water bath for 10 minutes to dissolve mineral deposits from the slurry.
Drilling glass successfully hinges on respecting its molecular fragility—every action must minimize stress points. Remember the core triad: diamond abrasion, constant cooling, and feather-light pressure. Most beginners fail by treating glass like other materials, but now you know why RPM control matters more than force, how bilateral drilling prevents hidden cracks, and why coolant choice makes the difference between success and shards. For your first attempt, practice on a discarded glass picture frame; its uniform thickness builds confidence before tackling curved bottles. Once mastered, how to drill into glass unlocks endless projects—from custom shower hardware to artistic light fixtures. The real secret isn’t fancy tools; it’s the patience to let the diamond bit grind at its own pace while you maintain that perfect slurry bath. Your next glass masterpiece starts with one perfectly drilled hole.


