
That high-pitched screech as your drill bit skitters across steel isn’t just annoying—it’s your bit screaming its last breath. Unlike wood, metal won’t forgive rushed techniques or improper tools. One wrong move and you’ll face overheated bits, dangerous kickbacks, or a ruined workpiece. The secret to clean, professional holes lies in mastering three non-negotiable factors: speed control, heat management, and bit selection. This guide cuts through the confusion with battle-tested techniques that transform metal drilling from a frustrating chore into a precise, safe process. Whether you’re mounting a license plate bracket or building a custom engine component, you’ll learn exactly how to drill into metal without costly mistakes.
Stop Wasting Drill Bits: Essential Metal Drilling Tools You Actually Need
Skipping these tools guarantees broken bits and ruined projects—no exceptions. Your standard wood drill setup will fail catastrophically on metal within seconds.
Drill Press vs. Hand Drill: When to Use Which
For holes larger than 1/4″ or any hardened steel, a drill press is mandatory. Its rigid frame maintains perfect perpendicularity and consistent pressure—critical for preventing bit “walking” on curved surfaces like pipe. If using a hand drill (acceptable for thin aluminum or small holes under 3/16″), clamp it vertically in a vise with a guide block. Never rely on hand steadiness alone—metal’s unforgiving nature turns minor wobble into oblong holes.
Cutting Fluids That Actually Work (Not Just WD-40)
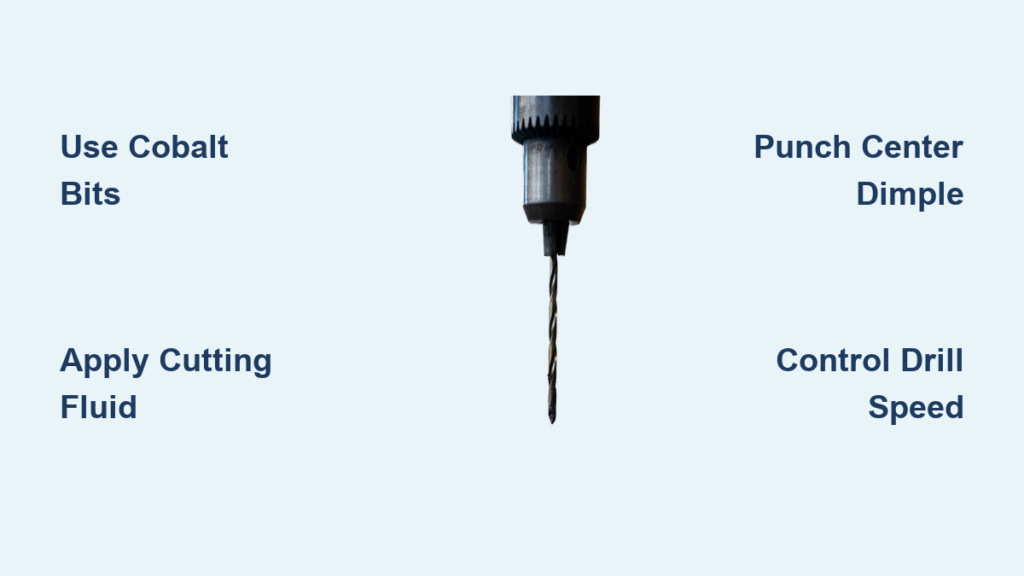
This isn’t optional—it’s your bit’s lifeline. For stainless steel or titanium, Tap Magic cutting fluid reduces heat by 40% compared to 3-in-1 oil. Aluminum requires kerosene to prevent “gumming” that clogs flutes. Apply fluid every 10 seconds of drilling; if the bit smokes, you’ve waited too long. Pro tip: Keep a small squeeze bottle with nozzle for pinpoint application on deep holes.
The Center Punch You Can’t Skip
A standard nail punch won’t cut it—use a solid tungsten carbide center punch. Strike once with a 16-oz hammer to create a dimple 1.5x deeper than your pilot bit’s tip. On curved surfaces like bolts, angle the punch 15° toward the curve’s center. Check your dimple: If light reflects off the bottom, it’s too shallow—re-punch immediately.
Why Your Drill Bits Shatter: Selecting the Right Bit for Your Metal
Using a general-purpose bit on steel is like using a butter knife to cut steak—guaranteed failure. Match your bit material to the metal’s hardness or face instant dulling.
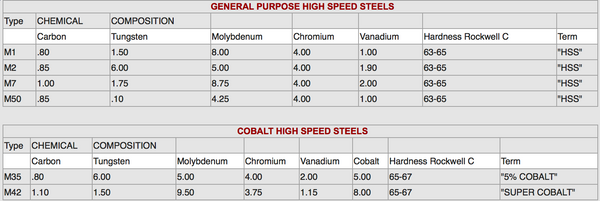
Cobalt Bits: Your Stainless Steel Lifesaver
For stainless steel, titanium, or hardened steel, HSS-Co 5-8% cobalt bits are non-negotiable. They withstand 1,100°F heat that would melt standard HSS bits. Check for “M42” or “M35” markings—these indicate cobalt content. Never use these on cast iron; the graphite content causes premature wear.
The Gold-Coated Bit Trap
That shiny TiN-coated bit looks premium, but it’s only 2-4 microns thick. Once the coating wears (after 3-5 holes in steel), it dulls faster than uncoated HSS. Reserve these for brass or aluminum where heat buildup is minimal.
Carbide Bits: Handle With Extreme Caution
Solid carbide bits shatter if your hand trembles during breakthrough. Only use them in a drill press with zero runout. For DIYers, carbide-tipped bits offer 70% of the hardness with 300% more shock resistance. If you see blue/purple tempering colors on steel bits, discard them—re-sharpening won’t restore the heat-treated core.
How to Drill Metal Without Breaking Bits: Step-by-Step Technique
Follow this exact sequence for clean, accurate holes—even on your first attempt. Skipping any step risks dangerous kickback or ruined workpieces.
Create a Foolproof Starting Point in 10 Seconds
Mark your spot with a scribe (not a pencil—lines vanish under pressure). Position your center punch precisely on the mark. Strike once with a full hammer swing—no tapping. The dimple must hold the drill bit tip without wobble. For holes over 3/8″, drill a 1/8″ spotting hole first using a center drill bit; this guides larger bits perfectly.
Secure Metal Like a Professional (Avoid Flying Projectiles)
Clamp workpieces in a steel vise with soft jaws—never hold metal by hand. For thin sheet metal, sandwich it between two sacrificial wood blocks. Test security: Attempt to rotate the metal with pliers; if it moves 1/16″, re-clamp. Position the work so chips eject downward—never toward your body.
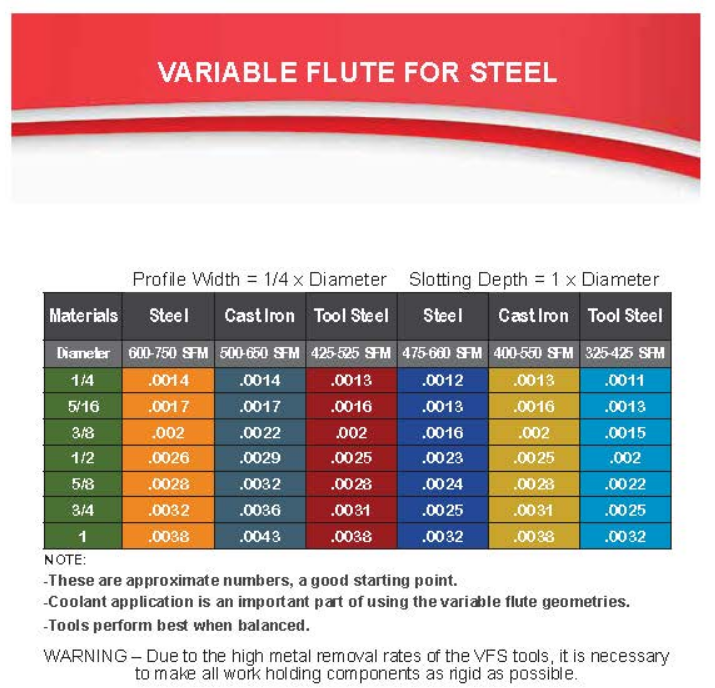
Drill at the Exact Speed That Prevents Overheating
Set your drill to 300-500 RPM for steel—faster speeds cause catastrophic heat buildup. For aluminum, increase to 600-800 RPM. Apply firm, constant pressure until chips form (not dust). Every 15 seconds:
1. Fully withdraw the bit
2. Clear chips with a brush (never fingers—chips are razor-sharp)
3. Reapply cutting fluid
4. Reinsert bit into the hole’s center
Master the Critical Breakthrough Moment
When the bit tip appears through the backside, reduce pressure by 70%. Let the bit’s rotation pull it through—forcing it causes “grabbing” that tears metal and creates dangerous burrs. For thin metal, place a wood scrap behind the exit point to prevent tear-out.
Fix These 5 Metal Drilling Disasters Immediately

Your drill bit isn’t the problem—your technique is. These fixes get you back on track in minutes.
Bit walks across polished steel
Why it happens: Dimple too shallow or wrong point angle.
Fix: Use a 135° split-point bit and re-punch with 50% harder hammer strike. For stainless steel, apply layout dye first—pencil marks vanish under pressure.
Bit smokes then snaps mid-drill
Why it happens: Speed too high or no lubricant.
Fix: Switch to cobalt bit, reduce RPM by 50%, and flood hole with cutting fluid. If bit breaks, use a left-hand drill bit extractor—it unscrews the fragment as you drill.
Hole tears out on the backside
Why it happens: Excessive pressure at breakthrough.
Fix: Back off pressure when you see the tip emerge. For critical projects, drill 90% through, flip the workpiece, and finish from the reverse side.
Aluminum clogs the bit flutes
Why it happens: Insufficient lubrication or wrong speed.
Fix: Switch to kerosene lubricant and increase RPM to 700. Use a “gum breaker” bit with polished flutes that shed chips.
Stainless steel won’t cut after pausing
Why it happens: Work-hardening from initial drilling.
Fix: Discard the bit—work-hardened spots require new, sharp cobalt bits. Never restart drilling in the same spot after stopping.
Drill These 4 Problem Metals Like a Pro
Generic advice fails on specialty metals. Use these material-specific tactics to avoid ruined projects.
Stainless Steel: Beat Work-Hardening
Drill continuously without stopping—pausing hardens the metal at the drill point. Use M42 cobalt bits at 250 RPM with Tap Magic fluid. Apply pressure until you feel the bit “bite,” then maintain constant feed. If chips turn blue, stop immediately—overheating has softened the bit.
Aluminum: Stop the Gumming Crisis
Keep cutting fluid flowing constantly—aluminum welds to bits when dry. Use a brad-point bit modified with a 0.005″ flat ground on the cutting edge. Drill at 650 RPM; if chips turn stringy, slow down by 20%. For thick aluminum, drill a 1/8″ pilot hole first to prevent clogging.
Brass: Prevent Dangerous “Grabbing”
Standard bits can screw themselves into brass violently. Use a bit with 130° point angle or grind a 0.010″ flat across the tip. Drill at 400 RPM with light pressure—brass cuts easily but tears if forced. Lubricate with 3-in-1 oil to reduce friction.
Cast Iron: Skip the Lubricant
The graphite in cast iron acts as a natural lubricant. Use standard HSS bits at 350 RPM—no cutting fluid needed. Expect powdery gray chips, not curls. Clamp securely; cast iron’s brittleness causes cracking if vibration occurs. Always wear a respirator—cast iron dust is toxic.
Mastering how to drill into metal transforms intimidating projects into satisfying successes. Remember: slow speed prevents heat, sharp cobalt bits conquer steel, and constant lubrication saves your tools. Never skip the center punch dimple—it takes 10 seconds but prevents 10 minutes of correcting a wandering bit. For stainless steel or titanium, always use fresh cobalt bits and Tap Magic fluid; cutting corners here guarantees failure. Store bits in a moisture-proof case with silica gel to prevent rust-induced dulling. Now that you can drill clean holes in any metal, your next challenge is learning how to tap threads for unbreakable fastening—start with brass or aluminum before tackling hardened steel.


