
That stunning river rock you found? It could become a breathtaking pendant—if you don’t turn it into gravel during drilling. How to drill holes in rocks for jewelry separates hobbyists who consistently create wearable art from those stuck with broken stones and ruined drill bits. Over 70% of beginners crack their first prized agate because they use the wrong speed, skip water cooling, or force the bit. This isn’t woodworking—rocks demand surgical precision. I’ve seen artists waste hours on a single stone only to have it explode at the final breakthrough. Follow these exact steps to drill clean, professional holes in agate, jasper, quartz, and beach stones while protecting your lungs from deadly silica dust.
Why Standard Drill Bits Destroy Rocks (And What to Use Instead)
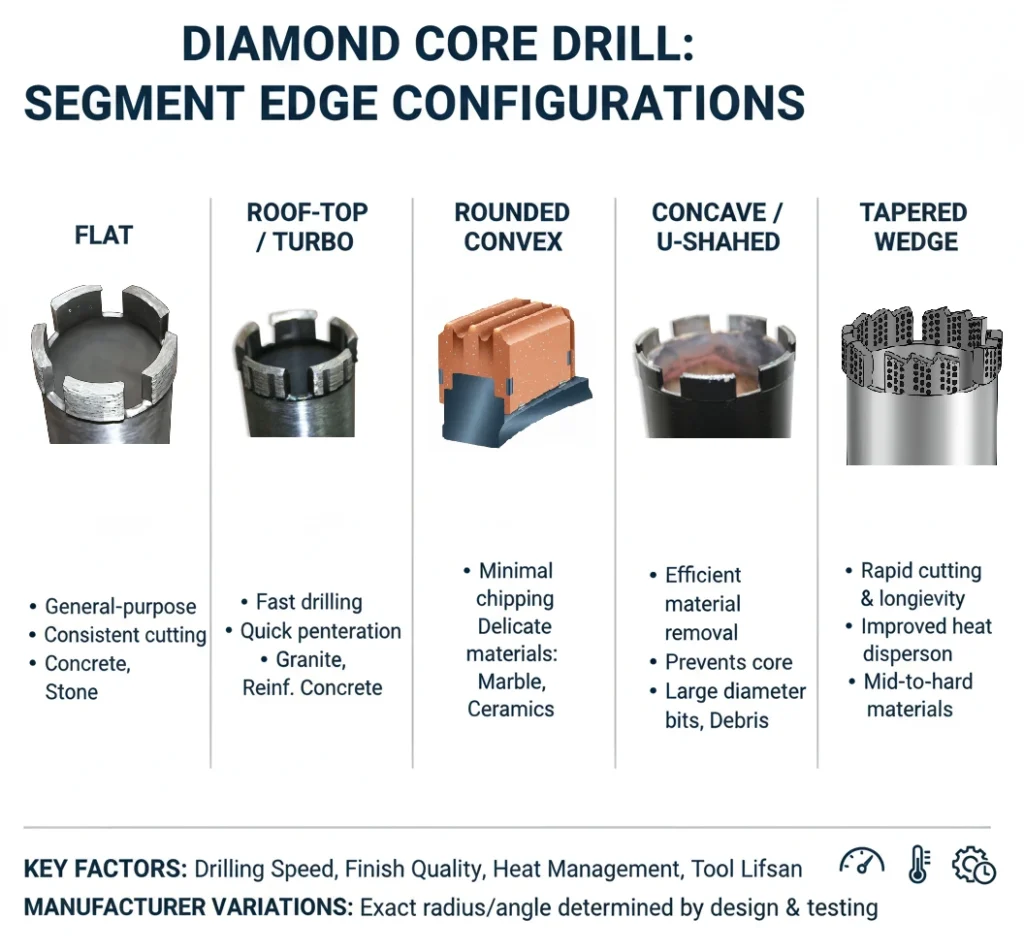
Your cordless drill’s masonry bits are useless here—they’ll dull in seconds against quartz. Diamond-coated bits are non-negotiable for rock jewelry. Standard metal bits can’t grind crystalline structures; they’ll skid, overheat, and shatter your stone. Invest in #60-80 grit diamond bits sized for jewelry: 0.5mm (tiny seed beads), 1.0-1.5mm (cords), and 2.0-2.5mm (jump rings). Cheap “diamond-coated” bits from discount stores often have poor grit adhesion—expect them to fail on your third hole. Pro jewelers use Foredom or Dremel diamond bits that last 50+ holes when used correctly. Never substitute with carbide or tungsten bits; they’ll crack on contact with hard stones.
Rotary Tools vs. Flex Shafts: Which Saves Your Stones?
Your handheld drill is too powerful—it spins at 1,500+ RPM, guaranteeing heat fractures. You need precise low-speed control:
– Rotary Tool (Dremel 4000): Best for beginners. Use with a flex-shaft attachment (like Dremel 225) to reduce vibration. Set speed to 5,000 RPM max—not the tool’s top speed.
– Dedicated Flex-Shaft (Foredom SR): The lapidary standard. Motor hangs overhead, letting you maneuver the handpiece like a pencil for perfect 90-degree holes. Worth the $200+ if you drill weekly.
– Drill Press (Last Resort): Only viable with a water drip system. Standard presses lack the sub-3,000 RPM needed for hard stones.
Why Water Cooling Isn’t Optional—It’s Life-Saving
Drilling dry creates silica dust that causes incurable silicosis. Water suppresses dust and prevents catastrophic failures:
– Submersion Method: Place rock in a shallow tray with 1/4″ water. Drill through the water layer. Best for flat stones.
– Drip System: Poke a pinhole in a water bottle cap. Squeeze constantly over the drill site. Add 1 drop of dish soap to break surface tension.
– Critical Rule: If your bit smokes or the water boils, you’re drilling too fast. Stop immediately—overheating melts diamond coatings permanently.
How to Stop Your Rock from Slipping Mid-Drill (No More “Walking” Bits)
Smooth tumbled stones or rounded beach rocks will spin violently in a standard vise, ruining your hole alignment. Secure irregular shapes like a pro:
1. Embed the stone in a clay block (like pottery clay) on a wood base. Press it in until 1/3 exposed.
2. For flat stones, use a small bench vise with leather jaw pads. Position the drilling spot exactly at the vise’s edge.
3. Create a “V-block” from scrap wood with a 90-degree groove to cradle rounded stones. Clamp this block to your workbench.
The Divot Trick for Perfect Hole Placement
Diamond bits skate on polished surfaces, drilling crooked holes. Create a starter dimple:
– Tap a center punch firmly on your mark (use a jeweler’s anvil for control).
– No center punch? Gently hammer a nail point into the stone to make a 1mm divot.
– Pro Tip: Mark the divot with red nail polish—makes it visible underwater.
Drilling Through Hard Agate Without Cracks: The Low-Speed Pecking Method
Quartz and agate fracture easily if you rush. Follow this exact sequence:
1. Start at 45 Degrees: Position your bit at a 45° angle. Run at 3,000 RPM with light pressure. Drill 3 seconds, lift to clear slurry, repeat until you carve a 2mm groove.
2. Straighten to 90 Degrees: Slowly tilt the drill vertical while maintaining water flow. Never force it—let the diamond grit grind, not chip.
3. Peck Drill Relentlessly: Drill 5 seconds → lift bit → clear debris with a toothpick → reapply water → repeat. Hard stones need 30+ pecks per mm depth.
4. Exit Safely: Place a soft rubber sheet under the rock. When the bit pierces through, reduce pressure to 10%—this prevents “blowout” chips on the backside.
Why Your Bit Gets Stuck (And How to Free It)
Rock slurry hardens like concrete in the bit’s flutes, jamming it mid-drill. Fix it without breaking the stone:
– Immediately stop the drill.
– Submerge the rock/bit in water for 30 seconds to soften the slurry.
– Gently rotate the bit by hand while pulling straight upward.
– Resume with shorter pecking intervals (2-second drills).
Drilling Soft Stones Like Soapstone Without Shattering
Slate and soapstone crumble if you use hard-stone techniques. Adjust your approach:
– Speed: Drop to 1,500 RPM—half what you’d use for agate.
– Pressure: Rest your hand lightly on the tool; let gravity provide force.
– Water: Use a mist sprayer instead of submersion to avoid waterlogging.
– Critical: Drill from both sides. Stop when 70% through, flip the stone, and meet the hole in the middle. Prevents backside spalling.
Finishing Holes Smoothly for Cord or Wire
Rough holes will fray silk cord or scratch metal findings. Polish the interior in 60 seconds:
1. Insert a diamond needle file (1.0mm for small holes) coated with water.
2. Rotate it slowly like a toothpick 10 times.
3. Wipe clean with a brass brush.
4. For glassy smoothness, use a 1.5mm mandrel with cerium oxide paste (30-second polish).
Why Your Safety Gear Is Incomplete (N95 Masks Aren’t Enough)

Silica particles from dry drilling penetrate standard dust masks. Wear this trio:
– Respirator: NIOSH-approved P100 cartridge respirator (3M 7500 series). N95s fail against silica.
– Eye Protection: Full-face shield over safety glasses—flying chips can penetrate side shields.
– Ear Protection: Flex-shafts hit 85dB; use foam earplugs during extended sessions.
Troubleshooting: 4 Catastrophic Drilling Mistakes and Fixes
Why Your Hole Went Crooked
Cause: Starting without a divot on a polished surface.
Fix: Stop immediately. Drill a new divot adjacent to the crooked hole. Reposition your clamp to align with the new mark.
Why the Rock Cracked Mid-Drill
Cause: Uneven pressure or no backing material during breakthrough.
Fix: If hairline cracks appear, submerge the stone and drill slower. Place rubber under the crack zone to distribute stress.
Why the Bit Won’t Penetrate
Cause: Dull bit or excessive speed burning the diamond coating.
Fix: Test the bit on scrap glass. If it skids, replace it. Always start at lowest RPM.
Why Water Isn’t Sticking to the Rock
Cause: Hydrophobic minerals (like quartz) repel water.
Fix: Add 1 drop of dish soap per cup of water. Improves wetting by 70%.
Pro Tips for Flawless Jewelry Holes Every Time
- Practice First: Drill 10 holes in scrap agate before touching your showcase stone.
- Bit Longevity: Soak used bits in vinegar overnight to dissolve mineral buildup.
- Speed Check: If you hear a high-pitched whine, your RPM is too high—silently grinding is ideal.
- Time Saver: Pre-mark 5 stones with divots before drilling to maintain workflow.
Drilling rocks for jewelry isn’t about power—it’s about respecting the stone’s fragility. Master the peck-drill rhythm, never skip water cooling, and treat silica dust like the invisible killer it is. Within 20 practice holes, you’ll drill clean through agate with the confidence to turn riverbed finds into heirloom pendants. Your next piece won’t shatter; it’ll shine. Keep your bits cool, your respirator tight, and let the diamonds do the work.


