
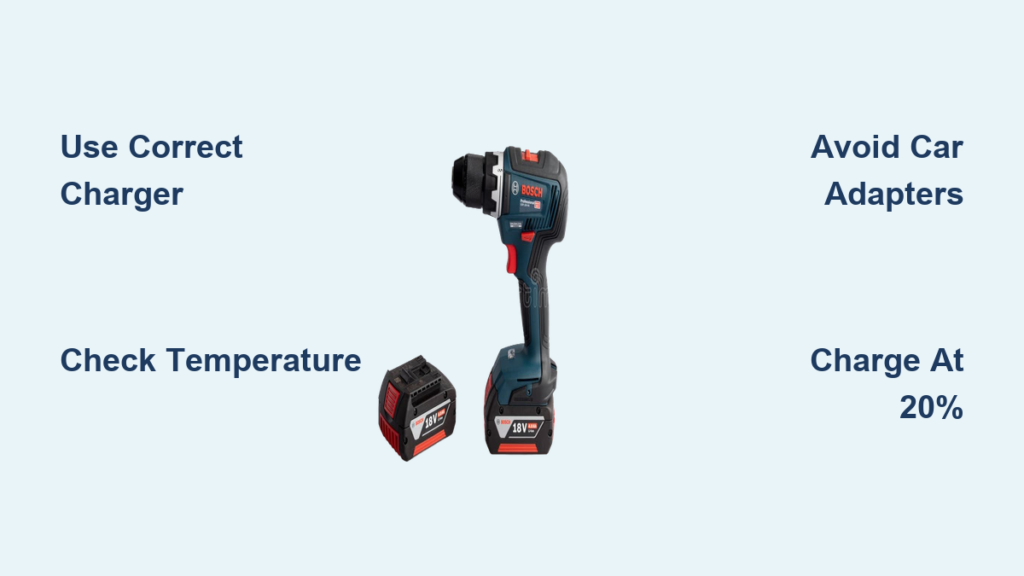
Your Bosch drill sputters to a stop mid-task, and you scramble for a spare battery—only to find it’s dead too. This frustrating scenario plagues contractors and DIYers daily, often because they’re unknowingly charging their Bosch drill batteries incorrectly. Properly charging your Bosch 18V or 12V battery isn’t just about plugging it in; it’s the critical foundation for reliable tool performance and battery longevity. When you master the exact process for your specific Bosch model—whether it’s a PowerForAll, Core, or Professional series battery—you’ll eliminate unexpected shutdowns and extend battery life by years. In this guide, you’ll discover the precise steps for standard charging, vehicle charging hacks that won’t fry your battery, solar setups for remote sites, and the temperature thresholds Bosch engineers insist you never ignore.
Why Your Bosch Drill Battery Refuses to Charge (And Immediate Fixes)

Before you replace a battery that seems dead, verify these common preventable issues. Most Bosch charging failures stem from simple oversights rather than battery defects, saving you unnecessary costs.
Diagnosing Zero LED Activity on Your Charger
When inserting your Bosch battery yields no LED response, follow this troubleshooting sequence:
1. Check the power source: Plug a lamp or phone charger into the same outlet to confirm it’s live
2. Inspect contacts: Wipe battery terminals and charger slots with a dry microfiber cloth—corrosion blocks conductivity
3. Test the charger: Try a different Bosch battery known to work; if still no light, the charger has failed
4. Verify compatibility: Cross-reference your battery model (e.g., GBA 18V 6.0Ah) with charger specs—never force mismatched units
Pro Tip: Keep a spare Bosch AL 18/40 charger in your truck. This $35 investment prevents job-site standstills when your primary charger fails.
Decoding Flashing Red/Yellow Error Lights
Blinking red or yellow LEDs indicate critical issues requiring immediate action:
– Rapid red flashes: Battery temperature outside safe range (below 41°F/5°C or above 104°F/40°C)
– Slow yellow pulses: Faulty cell communication—remove battery and let it rest at room temperature for 30 minutes
– Alternating red/green: Severe cell imbalance—this requires professional service; do not continue charging
Warning: Ignoring error lights risks permanent battery damage. If errors persist after cooling/warming the battery, contact Bosch support—don’t gamble with safety.
Step-by-Step: Charging Your Bosch 18V Battery Without Shortening Its Life
Using your Bosch charger correctly prevents the #1 cause of premature battery failure: improper charging cycles. Follow this exact sequence for every charge.
Selecting Your Exact Bosch Charger Model

Never assume all Bosch chargers work interchangeably. Match these critical specifications:
– Voltage: 18V batteries require 18V chargers (e.g., GAL 18V-40); 12V batteries need dedicated 12V chargers
– Capacity range: The AL 18/40 handles 2.0Ah–6.0Ah batteries, while the GAL 36 handles 8.0Ah–12.0Ah units
– Series compatibility: PowerForAll batteries work with Core chargers, but Professional series requires Pro-specific chargers
Critical Check: Locate your battery’s Ah rating (e.g., “6.0Ah” stamped on the label) and verify it falls within your charger’s supported range. Using an AL 18/40 charger on a 12.0Ah battery causes overheating.
Executing the Perfect Charging Cycle
- Prep the battery: Ensure it’s between 41°F–104°F (5°C–40°C)—never charge a freezing-cold battery fresh from a truck bed
- Plug in the charger: Use a grounded 120V outlet; avoid extension cords that cause voltage drops
- Insert with alignment: Slide the battery straight in until it clicks—forcing it damages terminals
- Monitor initial charge: Watch for the LED to blink blue/green within 30 seconds (confirms communication)
- Complete full cycle: Leave undisturbed until solid green/blue light appears—typically 55 minutes for a 6.0Ah battery
Time-Saver: Set a timer for 55 minutes when charging a PowerForAll 6.0Ah battery. Bosch’s BMS optimizes speed, but interrupting early reduces capacity.
Charging Your Bosch Drill Battery in a Vehicle: The Safe Method
Bosch doesn’t sell direct 12V car chargers for modern Li-ion batteries—a critical detail that prevents dangerous hacks. Here’s the only Bosch-approved vehicle charging method.
Why Car-Lighter Adapters Destroy Modern Bosch Batteries
That $20 “universal” 12V car charger you found online? It will ruin your Bosch battery. Older NiCd batteries accepted direct 12V-to-18V conversion, but Bosch’s Li-ion packs require precise voltage regulation only their smart chargers provide. Using incompatible adapters causes:
– Cell imbalance triggering premature shutdowns
– Reduced total charge cycles by up to 70%
– Permanent capacity loss after just 3 improper charges
Expert Note: Bosch discontinued the G 12-18V car charger in 2015 specifically because Li-ion technology made direct conversion unsafe.
Inverter-Based Charging: Your Road-Ready Solution
- Get a pure sine wave inverter: Minimum 150W continuous rating (e.g., Renogy 200W)—modified sine wave inverters fry charger circuitry
- Connect securely: Attach inverter clamps directly to your vehicle battery (not the 12V socket) to prevent voltage drops
- Plug in your Bosch charger: Use the exact AL 18/40 or GAL 18V-40 unit that came with your drill
- Monitor temperature: Keep the inverter away from direct sun; stop if components exceed 113°F (45°C)
Pro Tip: Run your vehicle engine during charging to maintain battery voltage—idling for 30 minutes replenishes what a single charge cycle consumes.
Extreme Environment Charging: Hot Jobsites & Freezing Conditions

Temperature extremes cause 68% of Bosch battery failures according to service data. These protocols keep you working when thermometers hit dangerous zones.
Charging Below 41°F (5°C): The 2-Hour Warm-Up Rule
Never plug in a cold battery. Instead:
– Store batteries in your insulated cab overnight during winter jobs
– Place frozen packs near (not on) a heater vent for 2 hours before charging
– Use the Bosch GAL 18V-40 charger—it has an integrated fan that activates below 50°F (10°C) to gently warm cells
Warning: Charging below 41°F creates lithium plating inside cells, permanently reducing capacity after just one incident.
Summer Jobsite Protocol for 100°F+ Conditions
When surface temperatures exceed 104°F (40°C):
1. Remove batteries from direct sun immediately after use
2. Let them cool in shade for 45 minutes minimum
3. Charge in air-conditioned space or under a pop-up canopy
4. Stop charging if the battery feels warm to the touch
Critical Fact: Bosch’s BMS automatically throttles charge speed above 104°F—but this stresses cells. Optimal charging occurs at 68°F–77°F (20°C–25°C).
Extending Battery Life: Charging Habits That Add 2+ Years
How you charge matters more than usage for long-term battery health. These practices prevent the gradual capacity fade that turns your 6.0Ah pack into a 3.0Ah liability.
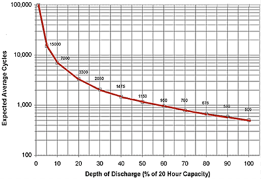
The 20% Minimum Charge Threshold
Always recharge when capacity hits 20% (indicated by your drill’s fuel gauge). Draining below 10%:
– Triggers deep-discharge protection that requires special resetting
– Accelerates cell degradation by 300% compared to partial discharges
– Causes voltage sag that mimics “dead battery” symptoms
Pro Tip: For weekend warriors, store batteries at 40% charge. Full storage drains cells 4x faster.
Monthly Calibration for Accurate Fuel Gauges
Bosch’s fuel indicators drift over time. Recalibrate monthly:
1. Run battery completely dead in your drill (until tool shuts off)
2. Let it rest 30 minutes
3. Charge uninterrupted to solid green light
4. Repeat monthly to maintain gauge accuracy within 5%
Expert Note: Skipping calibration makes “20% remaining” readings unreliable after 6 months—leading to unexpected job-site failures.
Troubleshooting Persistent Charging Failures
When standard fixes don’t work, these advanced diagnostics separate repairable issues from dead batteries.
Testing Battery Voltage with a Multimeter
- Set multimeter to DC voltage (20V range)
- Touch red probe to battery’s positive terminal, black to negative
- Healthy reading: 18V–20V for 18V batteries (e.g., 19.2V = 75% charged)
- Critical failure: Below 15V indicates cell failure—battery must be recycled
Warning: Never attempt to “jump-start” a low-voltage Bosch battery. This permanently damages the BMS.
When to Replace vs. Recycle
- Replace immediately: If voltage recovers after calibration but runtime remains <50% of new
- Recycle: If multimeter shows <14V or cells swell—Bosch batteries contain hazardous materials
- Warranty claim: For batteries failing within 3 years with proper charging history
Green Tip: All Bosch batteries are 100% recyclable. Locate drop-off points via Bosch’s website—never trash Li-ion packs.
Final Note: Proper Bosch drill battery charging isn’t complicated—it’s precise. By matching chargers to battery specs, respecting temperature limits, and avoiding vehicle charging shortcuts, you’ll consistently achieve full power when drilling through concrete or framing houses. Implement the 20% recharge rule and monthly calibration, and your batteries will deliver peak performance for 1,500+ cycles. For extreme conditions, always use the pure sine wave inverter method—not risky adapters. When in doubt, consult your specific charger’s manual: Bosch’s GAL 18V-40 has different error codes than the AL 18/40. Keep this guide handy, and you’ll never face a dead battery mid-job again.


