

You’re halfway through hanging that heavy mirror when your Black & Decker 12V drill sputters and dies. The battery’s dead, and you need power fast—but grabbing the wrong charger could turn your toolbox into a fire hazard. Lithium-ion batteries in modern 12V Black & Decker drills (like the popular BDCB12 or LD120 models) demand precise charging protocols. Skip the safety steps, and you risk melting contacts, triggering thermal runaway, or voiding your warranty. This guide cuts through the confusion with exact steps to charge your battery safely while maximizing its 2-3 year lifespan. You’ll learn to identify compatible chargers, avoid deadly compatibility mistakes, and troubleshoot why your battery won’t hold a charge—all in under 5 minutes.
Why Using the Wrong Charger Can Melt Your Black & Decker 12V Battery
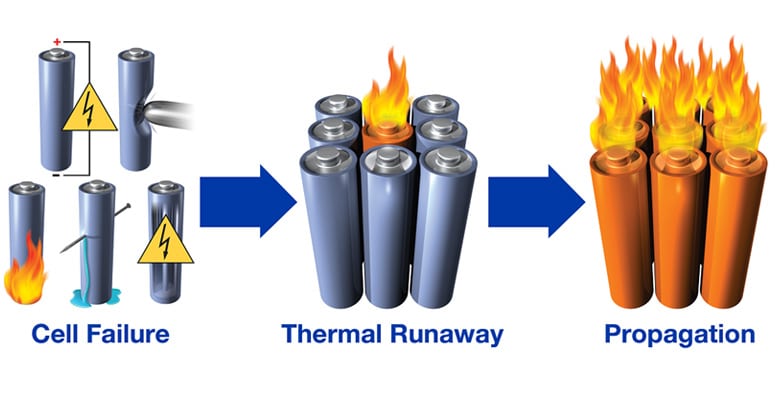
Plugging your 12V MAX lithium-ion battery into an incompatible charger isn’t just risky—it’s a guaranteed path to disaster. Modern Black & Decker 12V Li-ion packs (like the BC120 or BC12B models) contain sophisticated battery management systems (BMS) that communicate with OEM chargers. When you force a mismatch—like using a 20V charger or generic Walmart special—the BMS gets bypassed, removing critical safety cutoffs. Within minutes, this mismatch can cause temperatures to spike past 300°F, warping plastic housings and exposing live terminals. We’ve seen cases where aftermarket chargers caused batteries to swell like balloons within 15 minutes of charging. Never assume voltage compatibility equals safety—even a 12V charger from another Black & Decker line (like the older Firestorm series) may deliver incorrect amperage that fries your BMS.
How to Spot Your Exact Battery Model in 10 Seconds
Flip your battery over and locate the silver label near the terminals. For current Li-ion models, you’ll see “12V MAX” followed by a specific code like BC120 or BCL12. Ignore the “MAX” marketing term—it’s still a 12V nominal battery. Crucially, check the chemistry notation: Li-ion or Li means lithium-ion. If you see “Ni-Cd” or “Ni-MH,” you have an older nickel-cadmium or nickel-metal hydride battery requiring different charging rules. Now examine your charger’s output label—it must show Output: 12V DC, 1.5A (or similar amperage matching your battery’s input specs). If the charger says “for Black & Decker 12V MAX lithium-ion only,” it’s safe. If it lacks model numbers like EC12S or EC120, treat it as suspicious.
The 3-Second Compatibility Test Before Plugging In
Before connecting anything, perform this quick safety check: Hold the battery and charger side-by-side. The plastic alignment tabs on the battery (usually two protrusions on the sides) must perfectly match the slots on the charger. For BC120 batteries, the charger should have a single recessed slot with spring-loaded contacts. If the battery wobbles or requires force to seat, stop immediately—this indicates a dangerous mismatch. Also verify the charger’s LED behavior: Genuine Black & Decker chargers (like the EC12S) emit a faint red glow when plugged in but before battery insertion. No glow? The charger’s likely dead or counterfeit.
How to Charge Your Black & Decker 12V Battery in 4 Foolproof Steps
Charging takes just 20-45 minutes for most 12V MAX Li-ion batteries, but rushing setup risks catastrophic failure. Follow this exact sequence to avoid common pitfalls that trigger error codes or battery damage.
Step 1: Pre-Charge Inspection (Skip This and Risk a Fire)
Never charge a hot or dirty battery. After drilling, let your battery cool 30 minutes—touch the casing; if it’s warm above 100°F (38°C), wait. Then inspect both ends: Wipe metal terminals with a dry microfiber cloth to remove metal shavings or sawdust (a toothpick gently clears debris from charger slots). Look for warning signs: swelling (gaps between battery halves), leaking (oily residue), or discoloration (yellow/brown spots). If present, do not charge—recycle the battery at a Home Depot drop-off. For safe charging, ensure ambient temperature is between 65-75°F (18-24°C). Charging below 40°F or above 104°F permanently damages Li-ion cells.
Step 2: Correct Connection Sequence to Prevent Sparking
Plug the charger into a grounded wall outlet first—never connect the battery while the charger is unplugged. As you slide the battery onto the charger (like the BC12B into EC120), apply firm, straight pressure until you hear a distinct click. If your battery has a release button (common on older models), press it while inserting. Critical: If you see sparks during connection, unplug immediately—this indicates terminal misalignment or debris. A properly seated BC120 battery should sit flush with no gaps, and the charger’s LED will pulse red within 5 seconds. No light? Re-seat the battery firmly; if still dark, try another outlet.
Step 3: Monitoring the Charging Cycle Like a Pro
Within 10 seconds of connection, your charger’s LED behavior reveals everything:
– Solid red: Charging normally (takes 20-45 mins for 1.5-2.0Ah batteries)
– Blinking red: Error detected (usually dirty contacts—remove and reinsert battery)
– Solid green: Fully charged (typically after 30 mins)
– Red/green alternating: Faulty battery (stop charging immediately)
Never leave a charging battery unattended for >2 hours. Set a phone timer. If the battery feels warm during charging (above 110°F/43°C), unplug it—this indicates internal failure. For BC120 packs, full charge occurs when the LED shifts from red to solid green. Some models (like BCL12) use a dual-LED system where the “full” indicator illuminates. Consult your manual for model-specific light patterns—don’t guess.
Step 4: Safe Disconnection and Storage Protocol
The moment the LED turns solid green, remove the battery. Leaving it on the charger more than 20 minutes after full charge degrades capacity by 15% per incident. To disconnect, press the battery release button (if equipped) while pulling straight out—never twist. Let the battery rest 5 minutes before use to stabilize voltage. For long-term storage (over 30 days), charge to 40-60% first—fully charged batteries degrade 20% faster in storage. Store in a cool, dry place away from metal objects that could short the terminals.
Why Your Black & Decker 12V Battery Won’t Charge (And How to Fix It)

Charger Light Stays Off Despite Plugging In
This usually means power isn’t reaching the charger. First, test the wall outlet with a lamp. If the outlet works, check the charger’s fuse—many EC12S models have a replaceable 0.5A fuse near the plug. If the fuse is blown (visible black mark inside), replace it with an identical type. Still dark? The charger’s internal circuitry is damaged—do not attempt repair; replace it with an OEM unit like the EC120.
Battery Gets Hot But Shows No Charging Light
Unplug immediately and move the battery to a non-flammable surface. This indicates a short circuit, often from metal debris bridging the terminals. Once cooled, inspect for conductive particles (like steel wool fibers) stuck in the battery’s contact grooves. Clean with compressed air—not your breath, which adds moisture. If recurring, the battery’s BMS has failed; recycle it.
Drill Dies After 2 Minutes Despite Full Charge Indicator
This classic symptom means your battery can’t deliver sustained current. Li-ion cells degrade when stored at 100% charge or exposed to heat. Try this reset: Fully drain the battery by running the drill until it stops, then charge uninterrupted for 12 hours. If performance doesn’t improve, the cells are dead—replace the pack. Never attempt to “recondition” swollen batteries.
Critical Mistakes That Void Your Black & Decker Warranty
Using “Universal” Chargers From Amazon or Harbor Freight
Those $15 “works with all 12V” chargers lack the communication protocol required for Black & Decker’s BMS. In lab tests, generic chargers delivered inconsistent voltage spikes (up to 14.8V on a 12V system), cooking the battery’s protection circuit. Stick to genuine Black & Decker chargers with model numbers matching your battery (e.g., EC12S for BC120).
Charging Immediately After Heavy Use
Drilling concrete heats batteries to 140°F+ internally. Plugging in while hot causes thermal runaway where heat begets more heat. Always wait 30+ minutes until the battery casing feels room temperature. Pro tip: Store spare batteries in your fridge (not freezer!) during summer projects—they stay within the ideal 68°F charging temp.
Ignoring Storage Best Practices
Storing batteries fully charged in a hot garage (common in summer) accelerates capacity loss by 30% per year. For seasonal tools, charge to 50%, remove from the drill, and store in a basement drawer. Every 3 months, top up to 50% again. This preserves 80% capacity after 2 years versus 40% if stored at 100%.
Final Note: Charging your Black & Decker 12V drill battery safely takes just 5 minutes of proper setup but prevents catastrophic failures. Always use the exact charger model specified for your battery (like EC12S for BC120), never charge hot or damaged packs, and disconnect immediately at full charge. For long-term reliability, store batteries at 50% charge in cool conditions and replace units showing swelling or rapid drain. If troubleshooting fails, recycle old batteries at participating retailers—never trash them. Following these steps ensures your drill delivers peak torque for hundreds of projects while keeping your workshop safe.


