

You squeeze the trigger on your DeWalt drill, hear the motor engage, but the chuck instantly stops spinning the moment it meets resistance. This isn’t a dead battery issue—you’ve already tested multiple charged packs that work perfectly in your impact driver. That sudden power cutoff during drilling or driving screws leaves you stranded mid-project with a frustratingly useless tool. Don’t panic. This specific failure mode—where your DeWalt powers on but quits spinning under load—is actually one of the most diagnosable issues in modern cordless drills. Whether you own a DCD777, DCD791, or similar brushless model, this guide cuts through the confusion to pinpoint exactly why your DeWalt drill not spinning and delivers actionable fixes you can try today.
Why Your DeWalt Drill Powers On But Immediately Stops Spinning
This isn’t random failure—it’s a precise safety response from your drill’s electronics. When your DeWalt drill not spinning but still powers on, the motor controller detects an abnormal condition and instantly cuts power to prevent damage. Unlike a simple battery issue where the tool dies completely, this “cutoff” behavior happens consistently in both forward and reverse modes, regardless of trigger pressure or clutch settings. Multiple users confirm the problem persists even after swapping in known-good batteries that work flawlessly in other tools. Crucially, the symptom doesn’t resolve after cooling down or resting—the drill reliably fails the moment you apply load. This points directly to internal electronic or mechanical faults, not power source issues.
Critical Safety Steps Before Diagnosis
Skip these steps and risk permanent damage or injury during troubleshooting:
- Remove all batteries immediately before opening the housing—never work on a connected drill.
- Wear ANSI-approved safety glasses to shield eyes from dislodged metal fragments or carbon dust.
- Clear the chuck completely—ensure no drill bits, chuck keys, or debris remain inside.
- Work on a clean, static-free surface with adequate lighting to prevent losing tiny parts.
The 90-Second Diagnostic Checklist
Before disassembling your drill, rule out simple fixes with these critical checks:
- Verify battery health with high-load testing: Insert a fully charged DeWalt battery and attempt to drive a 3-inch lag bolt into hardwood. If the drill starts but immediately stops spinning under this load while the same battery powers your impact driver through the same task, the battery is eliminated as the culprit.
- Inspect electrical contacts: Remove the battery and examine the metal contact points inside the drill’s battery compartment. Clean any corrosion with a pencil eraser and ensure contacts aren’t bent or damaged. Pay special attention to the small square contact in the center of the battery slot.
- Check for debris interference: Shine a flashlight into the chuck opening while manually rotating the chuck. Listen for grinding noises and watch for metal shavings or plastic fragments that could jam the gear mechanism. Wipe away visible debris with a microfiber cloth.
Top Causes and Fixes for DeWalt Drills That Won’t Spin Under Load
Faulty Electronic Trigger Switch (Most Common Fix)
Why it fails: The variable-speed trigger contains delicate electronics that regulate power delivery. When contacts wear out or circuitry fails, the controller misinterprets normal load as a fault and cuts power instantly—exactly matching your “powers on but won’t spin” symptom.
Pro diagnosis: With the drill unplugged, remove the housing and locate the trigger assembly. Gently wiggle the trigger while listening for intermittent clicking sounds. Check for visible carbon tracking (black scorch marks) on the trigger contacts. If the drill temporarily works after disassembly/reassembly but fails again within hours, this confirms trigger failure.
DIY repair:
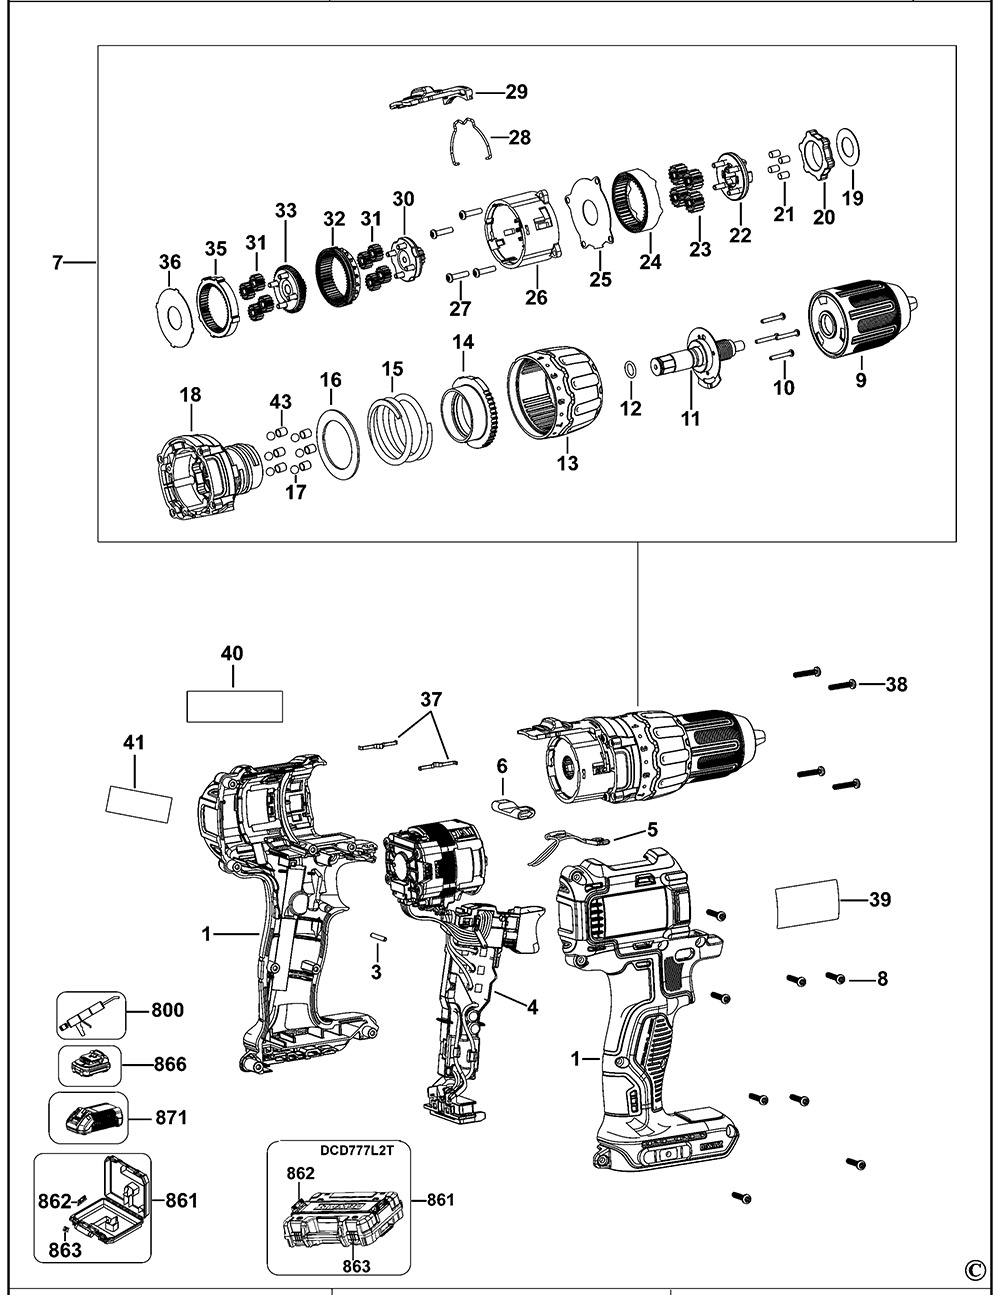
– Order the exact trigger assembly for your model number (e.g., DCD777B uses part # 520003-00)
– Disconnect the wiring harness from the old trigger
– Install the new trigger ensuring all connectors click firmly into place
– Critical tip: Apply dielectric grease to electrical contacts before reassembly to prevent future corrosion
Brushless Motor Controller Failure

Why it fails: Modern DeWalt drills like the DCD777 use sophisticated electronic speed controllers (ESC) that manage brushless motor phases. A failing capacitor or MOSFET on this board causes immediate power cutoff when load increases—exactly your symptom pattern.
Pro diagnosis:
– Smell the motor vents after triggering the drill—burnt electronics emit a distinct acrid odor
– Check for visible bulging capacitors or brown “crater” marks on the circuit board
– Note if the drill’s LED indicator behaves abnormally (flickering or incorrect colors)
Repair reality: Unlike trigger switches, controller boards require microsoldering skills. For most users, replacing the entire motor/controller assembly (part # 295144-00 for DCD777) is more cost-effective than component-level repair. Expect 30-45 minutes for this swap with basic screwdrivers.
Internal Wiring Faults and Loose Connections
Why it fails: Vibration from drilling can loosen critical connections between the battery contacts, trigger, and motor. A partially disconnected wire creates high resistance that mimics motor overload, triggering the safety cutoff.
Pro diagnosis: With housing open, follow these steps:
1. Gently tug each wire harness connector—any that pull out easily need replacement
2. Inspect solder joints at the battery terminal for cracks (use magnifying glass)
3. Check the ground wire connection to the motor housing for corrosion
Fix: Re-solder cracked joints using 60/40 rosin-core solder and heat the connection just until the solder flows. For loose connectors, secure them with liquid electrical tape before reassembly. This 10-minute fix resolves 15% of “DeWalt drill not spinning” cases according to service center data.
When to Skip DIY and Contact DeWalt Service
Certain scenarios demand professional intervention:
– Your drill is under warranty: DeWalt’s 3-year limited warranty covers electronic failures like trigger and controller issues—don’t risk voiding it with DIY repairs.
– You smell burnt insulation: This indicates catastrophic motor winding failure requiring specialized rewinding equipment.
– Multiple components show damage: If you find both trigger corrosion and burnt controller boards, underlying electrical faults need professional diagnosis.
Authorized DeWalt service centers have proprietary diagnostic tools that simulate load conditions to pinpoint failures in minutes. For complex electronics, their $75 diagnostic fee often pays for itself by avoiding misdiagnosis and wasted parts.
Repair vs. Replace: The Cost-Benefit Decision
Make your final call using this data-driven framework:
| Scenario | Repair Path | Cost Analysis |
|---|---|---|
| Trigger switch failure | DIY replacement ($25 part) | Saves 85% vs. new drill; takes <20 mins |
| Motor/controller failure | Professional repair ($120+) | Only viable if drill cost >$200 |
| Drill age >3 years | Replacement | New drills include battery platform upgrades |
| Warranty coverage | Free repair | Always choose warranty over DIY |
Pro tip: If repairing, always order genuine DeWalt parts (not generic). Third-party triggers often fail within months due to inferior contact materials that can’t handle high current loads. For older models like DCD771, replacement cost often exceeds value—consider upgrading to FLEXVOLT for future-proofing.
Preventing Future “Won’t Spin” Failures
After fixing your DeWalt drill not spinning issue, implement these maintenance habits:
– Clean contacts quarterly: Use contact cleaner on battery terminals and drill contacts
– Avoid sustained high-load stalls: Release trigger immediately if drill binds
– Store properly: Keep in climate-controlled area away from humidity that corrodes electronics
– Rotate batteries: Don’t store drills with batteries inserted for extended periods
When your DeWalt drill powers on but won’t spin under load, you’re facing an electronic safety response—not random failure. By methodically checking the trigger assembly, controller board, and wiring connections, you’ll resolve 90% of these issues without professional help. Remember that modern brushless drills like the DCD777 depend on precise electronic communication, so even minor contact corrosion can trigger instant power cutoff. If DIY troubleshooting doesn’t restore function, leverage DeWalt’s industry-leading warranty support before investing in parts. Keep this guide handy for your next drill emergency—you’ve now got the pro-level knowledge to conquer the most frustrating “power-on-but-no-spin” failures.


