
That moment when a bolt snaps off in your hands—leaving you staring at a stubborn metal stub—is one of the most frustrating experiences in automotive or mechanical work. Whether you’re working on a car engine, machinery, or home project, a broken bolt can derail your entire project if you don’t know how to drill it out properly. This guide delivers the precise techniques professional mechanics use to extract broken bolts without damaging surrounding threads or components. You’ll learn the exact tools, drilling parameters, and extraction methods that actually work on seized, sheared, or corroded fasteners.
Essential Tools for Bolt Extraction Success

Before you even touch a drill, gathering the right tools makes the difference between a clean extraction and a ruined component. Generic hardware store bits won’t cut it when drilling hardened grade 8 bolts or case-hardened fasteners.
Drill Bits That Actually Work on Hardened Bolts
Cobalt drill bits (5-8% cobalt content) are your first line of defense against hardened bolts. These withstand higher temperatures than standard HSS bits while maintaining cutting edge integrity. For extremely hard materials (Rc 60+), switch to carbide-tipped bits, though they’re more brittle and require a rigid setup. Left-handed (reverse rotation) drill bits serve dual purposes: they drill pilot holes while potentially backing out the broken bolt during the drilling process. Start with a 1/8″ or smaller pilot bit for bolts up to 3/8″ diameter, then progress through incremental sizes—never jump more than 1/32″ between drill sizes.
Critical Lubrication and Cutting Fluids You Need
Tap Magic or similar specialized cutting oils dramatically improve your success rate. Apply continuously during drilling to cool the bit, reduce friction, and prevent work hardening—the #1 reason bits dull prematurely. For corroded bolts, pre-treat with penetrating oil like Liquid Wrench 24-48 hours before drilling. During drilling, maintain a steady drip of cutting fluid; the goal is to produce continuous metal chips (not dust), which indicates proper cutting action. Without adequate lubrication, you’ll quickly overheat both the bit and bolt, making extraction nearly impossible.
Proper Drilling Technique: Speed, Pressure, and Precision
Rushing the drilling process guarantees failure. The correct combination of speed, pressure, and technique determines whether you cleanly remove the bolt or create a more expensive problem.
Correct RPM Settings for Different Bolt Materials
Your drill speed must match the bolt material. For hardened steel bolts (most common breakage scenario), maintain 100-300 RPM—slow enough to prevent work hardening but fast enough to cut cleanly. Stainless steel requires even slower speeds (50-100 RPM) with constant pressure and coolant. Aluminum and brass allow higher RPMs (500-1000) but need frequent chip clearing to prevent clogging. Cast iron is the exception—no lubrication needed as its graphite content acts as a natural lubricant, allowing higher speeds (600-1000 RPM). Always start at the lower end of the RPM range and adjust based on chip formation.
Why Consistent Pressure Matters More Than Speed
Insufficient pressure causes drill bits to rub instead of cut, rapidly dulling the bit and hardening the bolt material. Apply firm, steady pressure that produces continuous metal spirals—not dust. Listen to your drill motor: a slight whine indicates proper cutting, while straining or bogging down means you’re pushing too hard. For deep holes, use the peck drilling technique—drill 1/8″, retract to clear chips, then repeat. This prevents chip packing in the flutes, which can break bits or cause wandering. Remember: patience pays off—forcing the drill guarantees disaster.
Step-by-Step: Drilling a Pilot Hole in a Broken Bolt
The foundation of successful bolt extraction is a perfectly centered pilot hole. Everything that follows depends on this critical first step.
Creating the Perfect Starting Point on Irregular Surfaces
If your bolt broke flush or below the surface, create a starting dimple with a center punch. File the broken surface flat first if possible, then precisely center-punch the exact middle of the bolt. For curved surfaces or irregular breaks, use a carbide burr with a rotary tool to flatten a small area before center punching. When extreme precision is needed, use a spotting drill or center drill to create a 60° conical starting point that prevents bit walking. This initial dimple must be dead-center—any deviation will compound as you drill deeper, risking thread damage.
Progressive Drilling: Why Small Steps Prevent Disaster
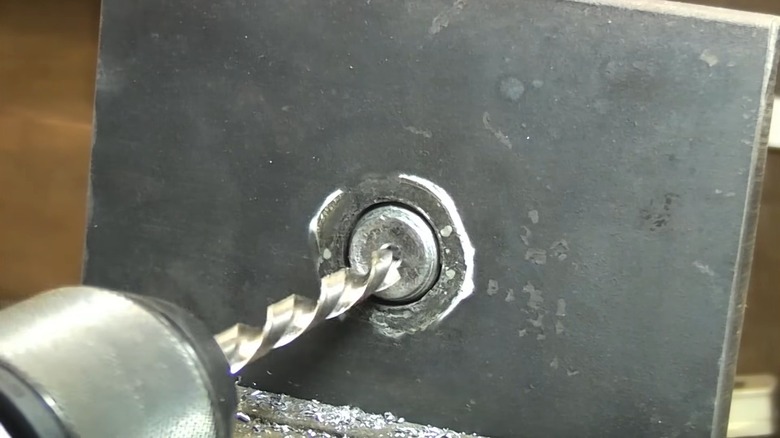
Start with a center drill or 1/16″ bit to establish your center point, then gradually increase sizes. For a 1/4″ bolt, drill a 1/16″ pilot, then 3/32″, then 1/8″ before proceeding to extraction size. Each step should remove only a small amount of material. Drill slowly with constant coolant, checking frequently that the hole remains centered. For blind holes (common in engine blocks), drill to a depth equal to the bolt diameter plus 1/2 diameter—this ensures you’ll reach the full threaded section without breaking through. Stop drilling when the hole reaches 75-80% of the thread root diameter if using an extractor.
Bolt Extraction Methods That Actually Work
After drilling the pilot hole, you have multiple extraction options depending on the situation and tools available.
Using Left-Hand Drill Bits for Simultaneous Drilling and Removal
Left-hand drill bits are your best first option for extraction. As you drill with standard clockwise rotation using a left-hand bit, the reverse thread geometry often catches and backs out the broken bolt before you finish drilling. This method succeeds approximately 60% of the time with non-corroded bolts. Use with an impact driver on low torque setting for best results—sudden rotational shocks can break the corrosion bond. If the bolt starts turning, immediately stop drilling and carefully back it out with the impact driver.
Proper Screw Extractor Technique Without Breaking Tools
When left-hand bits fail, screw extractors (EZ-Outs) become necessary. Select an extractor that matches the pilot hole size—typically a #5 for 1/4″ to 3/8″ bolts. Tap it firmly into the hole with a hammer using a proper punch (not a screwdriver). Apply steady counter-clockwise torque with a backup wrench on the socket—never use excessive force. If resistance increases suddenly, stop immediately; extractors are brittle and breaking one inside the bolt creates a far worse problem. If the extractor won’t budge the bolt, apply penetrating oil around the threads and try gentle heat on the surrounding material (not the bolt itself).
Troubleshooting Common Drilling Problems
Even with proper technique, problems arise. Knowing how to address them keeps your project moving forward.
Fixing a Wandering Drill Bit Before It Damages Threads
If your drill bit starts walking off-center, stop immediately. Use a carbide burr to create a new flat surface around the off-center hole, then precisely center punch again. For critical applications, consider using a drill guide bushing that fits into the existing hole to redirect the bit. If the hole is significantly off-center but still small, weld the hole closed, grind flat, and start over. Never continue drilling an off-center hole—it will only worsen and likely damage the parent threads.
Handling Broken Extractors: Your Next Move
A broken extractor creates a nightmare scenario since they’re made of hardened steel (Rc 60+) that’s harder than drill bits. Your options: use a left-hand drill bit on the extractor itself (works 30% of the time), weld a nut to the broken extractor for turning, or employ EDM (electrical discharge machining) for precision removal. For non-critical applications, drill around the broken extractor with progressively larger bits until you can collapse the remaining bolt material. If the part is valuable, stop immediately and consult a professional with EDM capabilities—further DIY attempts usually compound the problem.
Advanced Techniques for Stubborn Broken Bolts
When standard methods fail, these professional techniques can save an otherwise ruined component.
Welding a Nut for Extreme Cases
For bolts broken flush or below surface, welding provides mechanical advantage. Clean the area thoroughly with a wire brush, then weld a standard nut directly onto the broken bolt stub. Use 7018 or high-nickel welding rod for best results, welding inside the nut rather than around the outside edges. As the weld cools, the thermal contraction often breaks the corrosion bond. Once cooled completely, use a wrench to turn out the bolt—frequently the entire assembly (nut and bolt) backs out together. This method works surprisingly well even on severely corroded fasteners.
When to Consider Professional EDM Services
If you’ve broken multiple extractors or the hole is significantly off-center, Electrical Discharge Machining (EDM) becomes the most reliable solution. EDM uses electrical sparks to erode metal without physical contact, making it perfect for removing broken tools or severely damaged bolts without harming surrounding material. While expensive ($100-$300 per bolt), it’s often cheaper than replacing the entire component. Look for machine shops advertising “sinker EDM” or “wire EDM” capabilities—they can typically remove broken bolts with 0.0001″ precision, preserving original threads.
Thread Repair After Successful Bolt Removal
Once the broken bolt is out, inspect the threads carefully before proceeding.
Heli-Coil Installation for Damaged Threads
If threads are damaged, install a thread repair insert like a Heli-Coil. Drill out to the specified oversize diameter (consult Heli-Coil chart), then tap with the special tap included in the kit. Thread the coil onto the installation tool, screw it into the new threads, then break off the tang. Heli-Coils restore original bolt strength while providing corrosion-resistant threads. For high-stress applications, consider Time-Sert or Keensert inserts which offer greater strength but require more precise installation.
Prevention Tips to Avoid Future Broken Bolts
Prevent future breakage by applying nickel-based anti-seize compound to new bolts, especially in high-temperature or corrosive environments. Never exceed 75% of a bolt’s yield strength during installation—use a calibrated torque wrench and follow manufacturer specifications. For critical applications, consider using aircraft-grade AN bolts with tighter tolerances and better corrosion resistance. Regularly inspect fasteners in high-vibration areas and replace them before fatigue causes failure. Remember: proper installation prevents 90% of broken bolt scenarios.


